Scribes
“Strangers in the Landscape”: On Research Development and Making Things for Making

Introduction
This piece is about making in support of making. It is about projects born from myriad goals that gather new objectives along their lifecycle, through evaluation and iteration.
This piece is about translating: from concept to design to product; from fragment to image to text; from high-level goal to incremental steps. It is about workflows and spin-offs and objectives; it is about unraveling a tapestry to learn how to spin its yarn.
In Data Feminism, Catherine D’Ignazio and Lauren F. Klein use the example of the proliferation of street signs to make a point about making: “One does not need street names for navigation until one has strangers in the landscape” (italics in the original).1 In D’Ignazio and Klein’s usage, the “strangers” here are data scientists, digging through data with which they are not intimately familiar. In this piece, we use our experience as platform maintainers to illustrate how all collaborators and participants are “strangers” at one point or another in the process of research development;2 it is only through collective building that we can successfully name our streets.
The framework for our discussion will be Scribes of the Cairo Geniza, a crowdsourcing project hosted on the Zooniverse platform.3 Scribes invites members of the public to engage deeply with the Cairo Geniza corpus: hundreds of thousands of manuscript fragments written in Hebrew and Arabic script, found in an Egyptian synagogue and dating mostly from the tenth to thirteenth centuries CE.4 The project is a collaboration between the Zooniverse team and a group of specialists from the Judaica Digital Humanities program at the University of Pennsylvania Libraries (as well as a consortium of partner institutions).5 Though a collaborative effort, each of the lead institutions brought their own goals to this project.6 For the Penn team, the original goal was to fully digitize the Geniza corpus through transcription of the fragment texts by a nonspecialist audience. The Zooniverse team came to the Scribes partnership as part of a larger research and development effort, “Transforming Libraries and Archives through Crowdsourcing,” which aimed to expand the resources available on the Zooniverse platform to better support galleries, libraries, archives, and museums in their efforts to create and run crowdsourcing projects.7
This piece will trace the history of this partnership, focusing on the interplay between often-competing elements of Digital Humanities (henceforth DH) collaboration: optimization and engagement, experience and outcome. In our attempts to balance the demands of infrastructure against the practice of paleography, what can we, as collaborators, learn about the process?
Throughout the piece, we have provided interludes in which we will walk you through the process of creating clickable keyboards for transcribing Hebrew script. Please feel free to interact with the example keyboards. You can try the full version by visiting Scribes of the Cairo Geniza and choosing the Easy Hebrew transcription workflow.8 You can read the interludes in their entirety and view the source code on GitHub.
01. The Basics: A Form With Some Text Input
Let’s start by setting up a very basic web form. It has one text input field, one submit button, and one output panel.
view source code
    <!DOCTYPE html>
<html lang="en">
<head>
<meta charset="UTF-8">
<link href="./main.css" rel="stylesheet">
</head>
<body>
<form>
  <label for="input">Input</label>
  <textarea id="input" rows="2" placeholder="type..."></textarea>
  <button id="submit" type="button">Submit</button>
  <hr>
  <label>Output</label>
  <pre id="output"></pre>
</form>
</body>
<script>
/*
We're organising all the keyboard logic into a single 'KeyboardApp'.
 */
class KeyboardApp {
  constructor (form) {
    // Let's register all the HTML elements to make them easier to access later.
    this.html = {
      input: document.getElementById('input'),
      submit: document.getElementById('submit'),
      output: document.getElementById('output'),
    }

    // Let's register all the event handling
    this.html.submit.onclick = this.submit.bind(this)
  }

  /*
  This 'submit' logic is just placeholder for what you actually want to do.
  Normally, this is where we'd submit the input data to a server. For our
  example, we just print the text into the output field.
   */
  submit () {
    const text = input.value
    output.innerText = text
  }
}

var app = new KeyboardApp(document.getElementById("#kb1"))  // Let's start the app!
</script>
</html>
Everything we build from this point onwards is meant to solve one very simple problem: how do we allow users to type, into that text input field, in a language that’s not native to their keyboard? For example, how do we help a user type in the text “ごはんを食べる” when they only have a US-International QWERTY keyboard, and we don’t want to ask them to futz about in their computer settings to install a Japanese language pack?
Communal Making and Collective Building
When we build public crowdsourcing projects, the work we do as platform builders/maintainers is intended to facilitate research goals without sacrificing the experience of the people who will be engaging with what we build. This means taking the ideas our collaborators bring to the table (“What do you want to do with this project?”) and creating tools and interfaces that support their needs (“What do we need to build/adapt to facilitate the realization of these goals?”) while simultaneously supporting public audiences by allowing them to engage with the project content with no assumption of previously-held knowledge (“How do we need to adjust these goals—and, by extension, the supporting tools/infrastructure—to make this project inclusive of a broad, public audience?”).
…bridging concepts as varied as paleography and pull requests requires time and patience
Bill Endres writes that “building faces the challenge of not being writing.”9 For Endres, “building” is a practice typically excluded from institutional decisions on tenure and promotion in humanities departments. Much of the discourse around building in DH acknowledges this disparate treatment between the creation of tools and the production of traditional research, but Endres’s phrase also reminds us that writing is the medium by and around which scholarly communication has also primarily taken place. We write, we peer review, we give written feedback. When we talk about the Things We Are Building, the role of translator or mediator is often assumed by team members who have spent time in both “worlds.” Learning how to communicate across varying disciplinary backgrounds or via unfamiliar mediums (in our case, bridging concepts as varied as paleography and pull requests) requires time and patience.
02. A Simple On-screen Keyboard
A straightforward solution is to create an on-screen keyboard for the user. In this example, we create a Japanese keyboard with 5 characters. Clicking on each button/“keyboard key” adds the corresponding character to the end of the text input field.
Note: we’re using the Japanese hiragana characters あいうえお here because they map easily to the English characters AIUEO, and are written left to right. We’ll build up to more complex alphabets, such as Hebrew and its right-to-left layout, in later sections.
view source code
    <!DOCTYPE html>
<html lang="en">
<head>
<meta charset="UTF-8">
<link href="./main.css" rel="stylesheet">
</head>
<body>
<form>
  <label for="input">Input</label>
  <textarea id="input" rows="2"></textarea>
  <div id="keyboard">
    <button class="keyboard-key" type="button" data-char="あ">あ</button>
    <button class="keyboard-key" type="button" data-char="い">い</button>
    <button class="keyboard-key" type="button" data-char="う">う</button>
    <button class="keyboard-key" type="button" data-char="え">え</button>
    <button class="keyboard-key" type="button" data-char="お">お</button>
  </div>
  <button id="submit" type="button">Submit</button>
  <hr>
  <label>Output</label>
  <pre id="output"></pre>
</form>
</body>
<script>
/*
We're organising all the keyboard logic into a single 'KeyboardApp'.
 */
class KeyboardApp {
  constructor () {
    // Let's register all the HTML elements to make them easier to access later.
    this.html = {
      input: document.getElementById('input'),
      keyboard: document.getElementById('keyboard'),
      submit: document.getElementById('submit'),
      output: document.getElementById('output'),
    }

    // Let's register all the event handling
    this.html.submit.onclick = this.submit.bind(this)

    this.setupKeyboard()
  }

  /*
  This 'submit' logic is just placeholder for what you actually want to do.
  Normally, this is where we'd submit the input data to a server. For our
  example, we just print the text into the output field.
   */
  submit () {
    const text = input.value
    output.innerText = text
  }

  /*
  setupKeyboard() does exactly what it says on the tin.
   */
  setupKeyboard () {
    // In this version, we've hardcoded the keyboard keys into the HTML
    const keyboardKeys = Array.from(document.getElementsByClassName('keyboard-key'))

    // We're going through each <button#keyboard-key> and attaching a simple
    // 'insert the character associated with this button' action.
    keyboardKeys.forEach((keyboardKey) => {
      const char = keyboardKey.dataset.char
      keyboardKey.onclick = () => { this.insertChar(char) }
    });
  }

  /*
  insertChar() inserts a single character to the (end of the) input text box.
   */
  insertChar (char) {
    this.html.input.value = this.html.input.value + char
  }
}

var app = new KeyboardApp()  // Let's start the app!
</script>
</html>
The code here is simple, but we already come across a problem: what if the user wants to add a Japanese character in the middle (instead of at the end) of the text box? This is, after all, a very basic function for a normal text box—you can place the text cursor/caret at any part of the existing text and then start typing.
It can help to identify shared frames of reference early in the collaboration. The original proposal for the project that would become Scribes of the Cairo Geniza envisioned a public transcription effort that would teach volunteers “without any prerequisite knowledge” how to transcribe the Arabic and Hebrew scripts found in the Geniza. It cited a previous Zooniverse project, Ancient Lives (2011),10 which featured a clickable keyboard that allowed users to transcribe ancient Greek papyri from the Oxyrhynchus Collection at the University of Oxford’s Sackler Library through the process of character matching. Ancient Lives became an important reference for the entire Geniza project team because it allowed a group of people with a variety of professional backgrounds to engage in referential communication around a shared goal, rather than fumbling together toward an abstract concept. Starting with a critique of an existing resource allowed us to determine the features that were applicable for the context in which we were working—what we wanted to recreate (or revamp) as well as what components were missing that would be key to working with Geniza fragments.
To approach the transcription of a large, multilingual corpus by a nonspecialist audience, we needed to think about scaffolding. We began by considering the goals, translating those goals into actionable tasks, then breaking those tasks down to their very smallest unit. This is particularly useful from a project management perspective, where it’s necessary to get a sense of the total effort required—no matter how small the task—to see what can realistically be completed within the available time frame. Additionally, this process can help identify potential conflict in the design and development stages. There will often be overlap in the translation from goals into tasks: the goal of transcribing the Geniza corpus and the goal of making the project accessible by a public, nonspecialist audience are not separate things; indeed, each will significantly impact how the other is carried out. Breaking down the goals helps to identify the places where that overlap will create tension in the work.
Of those in our audience who could read Arabic and/or Hebrew, a significant subset would not have experience reading or transcribing Aramaic, Judeo-Persian, or any of the other languages known to be found among the Geniza fragments.
During the brainstorming process for Scribes, we discussed how the Ancient Lives approach (presenting users with a clickable keyboard to use while transcribing) was desirable because it provides support for audiences who don’t use an Arabic or Hebrew keyboard at home and may not be familiar with each script’s characters. We know through Google Analytics and user surveys that the majority of registered Zooniverse volunteers are from the United States and the United Kingdom. As a result, we could safely assume that a significant portion of our audience would use an English-language keyboard, and a significant subset would not be able to read Arabic and/or Hebrew. Of those in our audience who could read Arabic and/or Hebrew, a significant subset would not have experience reading or transcribing Aramaic, Judeo-Persian, or any of the other languages known to be found among the Geniza fragments.11 While clickable keyboards would help with the specific task of transcription within the overall project workflow, we also knew a translatable interface would be necessary to support a multilingual community of volunteers. So we decided early on that the entire project would need to be available in Arabic, English, and Hebrew, adding an additional layer of complexity to the design and development process in order to support right-to-left (RTL) as well as left-to-right (LTR) text.
03. Text Selection
This is actually a solved problem: we use the standard HTMLInputElement’s selectionStart, selectionEnd, and setSelectionRange to interact with the “text cursor” on the text input field.
view source code
    <!DOCTYPE html>
<html lang="en">
<head>
<meta charset="UTF-8">
<link href="./main.css" rel="stylesheet">
</head>
<body>
<form>
  <label for="input">Input</label>
  <textarea id="input" rows="2"></textarea>
  <div id="keyboard">
    <button class="keyboard-key" type="button" data-char="あ">あ</button>
    <button class="keyboard-key" type="button" data-char="い">い</button>
    <button class="keyboard-key" type="button" data-char="う">う</button>
    <button class="keyboard-key" type="button" data-char="え">え</button>
    <button class="keyboard-key" type="button" data-char="お">お</button>
  </div>
  <button id="submit" type="button">Submit</button>
  <hr>
  <label>Output</label>
  <pre id="output"></pre>
</form>
</body>
<script>
/*
We're organising all the keyboard logic into a single 'KeyboardApp'.
 */
class KeyboardApp {
  constructor () {
    // Let's register all the HTML elements to make them easier to access later.
    this.html = {
      input: document.getElementById('input'),
      keyboard: document.getElementById('keyboard'),
      submit: document.getElementById('submit'),
      output: document.getElementById('output'),
    }

    // Let's register all the event handling
    this.html.submit.onclick = this.submit.bind(this)

    this.setupKeyboard()
  }

  /*
  This 'submit' logic is just placeholder for what you actually want to do.
  Normally, this is where we'd submit the input data to a server. For our
  example, we just print the text into the output field.
   */
  submit () {
    const text = input.value
    output.innerText = text
  }

  /*
  setupKeyboard() does exactly what it says on the tin.
   */
  setupKeyboard () {
    // In this version, we've hardcoded the keyboard keys into the HTML
    const keyboardKeys = Array.from(document.getElementsByClassName('keyboard-key'))

    // We're going through each <button#keyboard-key> and attaching a simple
    // 'insert the character associated with this button' action.
    keyboardKeys.forEach((keyboardKey) => {
      const char = keyboardKey.dataset.char
      keyboardKey.onclick = () => { this.insertChar(char) }
    });
  }

  /*
  insertChar() inserts a single character to the (end of the) input text box.
   */
  insertChar (char) {
    // Find the position of the "text cursor" on the text input
    const startIndex = this.html.input.selectionStart
    const endIndex = this.html.input.selectionEnd

    // Minor trivia: if the text cursor has selected some text (e.g. a user
    // highlighted a word) then startIndex will not be the same as endIndex ;
    // otherwise, startIndex will be the same as endIndex.

    // Insert the new character where the text cursor is, OR replace the text
    // that the text cursor is selecting.
    const text = this.html.input.value
    const startText = text.substring(0, startIndex)
    const endText = text.substring(endIndex)
    this.html.input.value = startText + char + endText

    // Return focus to the input text box, and reset the "text cursor" to the
    // location where we just inserted the character
    this.html.input.focus()
    const focusIndex = startIndex + char.length
    this.html.input.setSelectionRange(focusIndex, focusIndex)
  }
}

var app = new KeyboardApp()  // Let's start the app!
</script>
</html>
In the example above, we’ve done two things in the code: 1. we ensure the Japanese characters are inserted at the position of the text cursor/caret, and 2. we ensure the text input maintains focus after the insertion. These may seem like minor coding considerations, but they’re important to ensure a consistent User Experience (UX), since users often have pre-set expectations on how User Interface (UI) elements should behave.
Based on institutional knowledge—held by our Zooniverse colleagues who built the Ancient Lives project—and early technical experiments, we knew that a basic version of the clickable keyboard feature would be technically feasible to create. However, the breadth of scripts, languages, layouts, and physical deterioration among the vast Geniza corpus meant that there would be varying levels of difficulty in the fragments’ transcription. To be immediately presented with a random Geniza fragment and asked to transcribe it would be overwhelming for most users. To that end, we considered ways to harness existing information about the fragments (metadata) to break down the corpus into smaller groups. The problem with this approach was that the fragments came from multiple institutions, each with its own metadata system. Some of those systems were more robust (and more recently updated) than others.
The team agreed that this method would be helpful in creating pathways for participation for nonspecialists, but we were concerned that not all of the datasets we were working with had robust, reliable metadata. What was the taxonomy we were hoping to draw on—an existing framework for classifying fragments? A new one? How would we apply consistent metadata to so many fragments within a limited amount of time? Is this something that the project volunteers could help with?
Once we determined that metadata enhancement could be its own crowdsourced task, we considered how to add that task to the project in a meaningful way.12 We wanted to make transcription accessible. But we also wondered: Could the classification of fragments proceed in a way that did not require previous knowledge of the materials? Would it be interesting for our audience? How would they benefit from taking part?
Could the classification of fragments proceed in a way that did not require previous knowledge of the materials?
To break down the necessary metadata fields into accessible tasks, we decided to map our desired classification types onto easily identifiable visual characteristics.13 The Geniza experts determined several pieces of information they might ask for at the pre-transcription stage, and were then challenged to teach the team members who weren’t familiar with the Geniza—or even manuscript studies in the broader sense—how to recognize these features when viewing a fragment. For example, in order to ask users whether a fragment was written in Hebrew script or Arabic script (or both), the content experts needed to determine what information is necessary to successfully answer the question.
Script examples from the Geniza corpus, intended to help volunteers answer the question of whether a fragment they are viewing is written in Hebrew or Arabic script.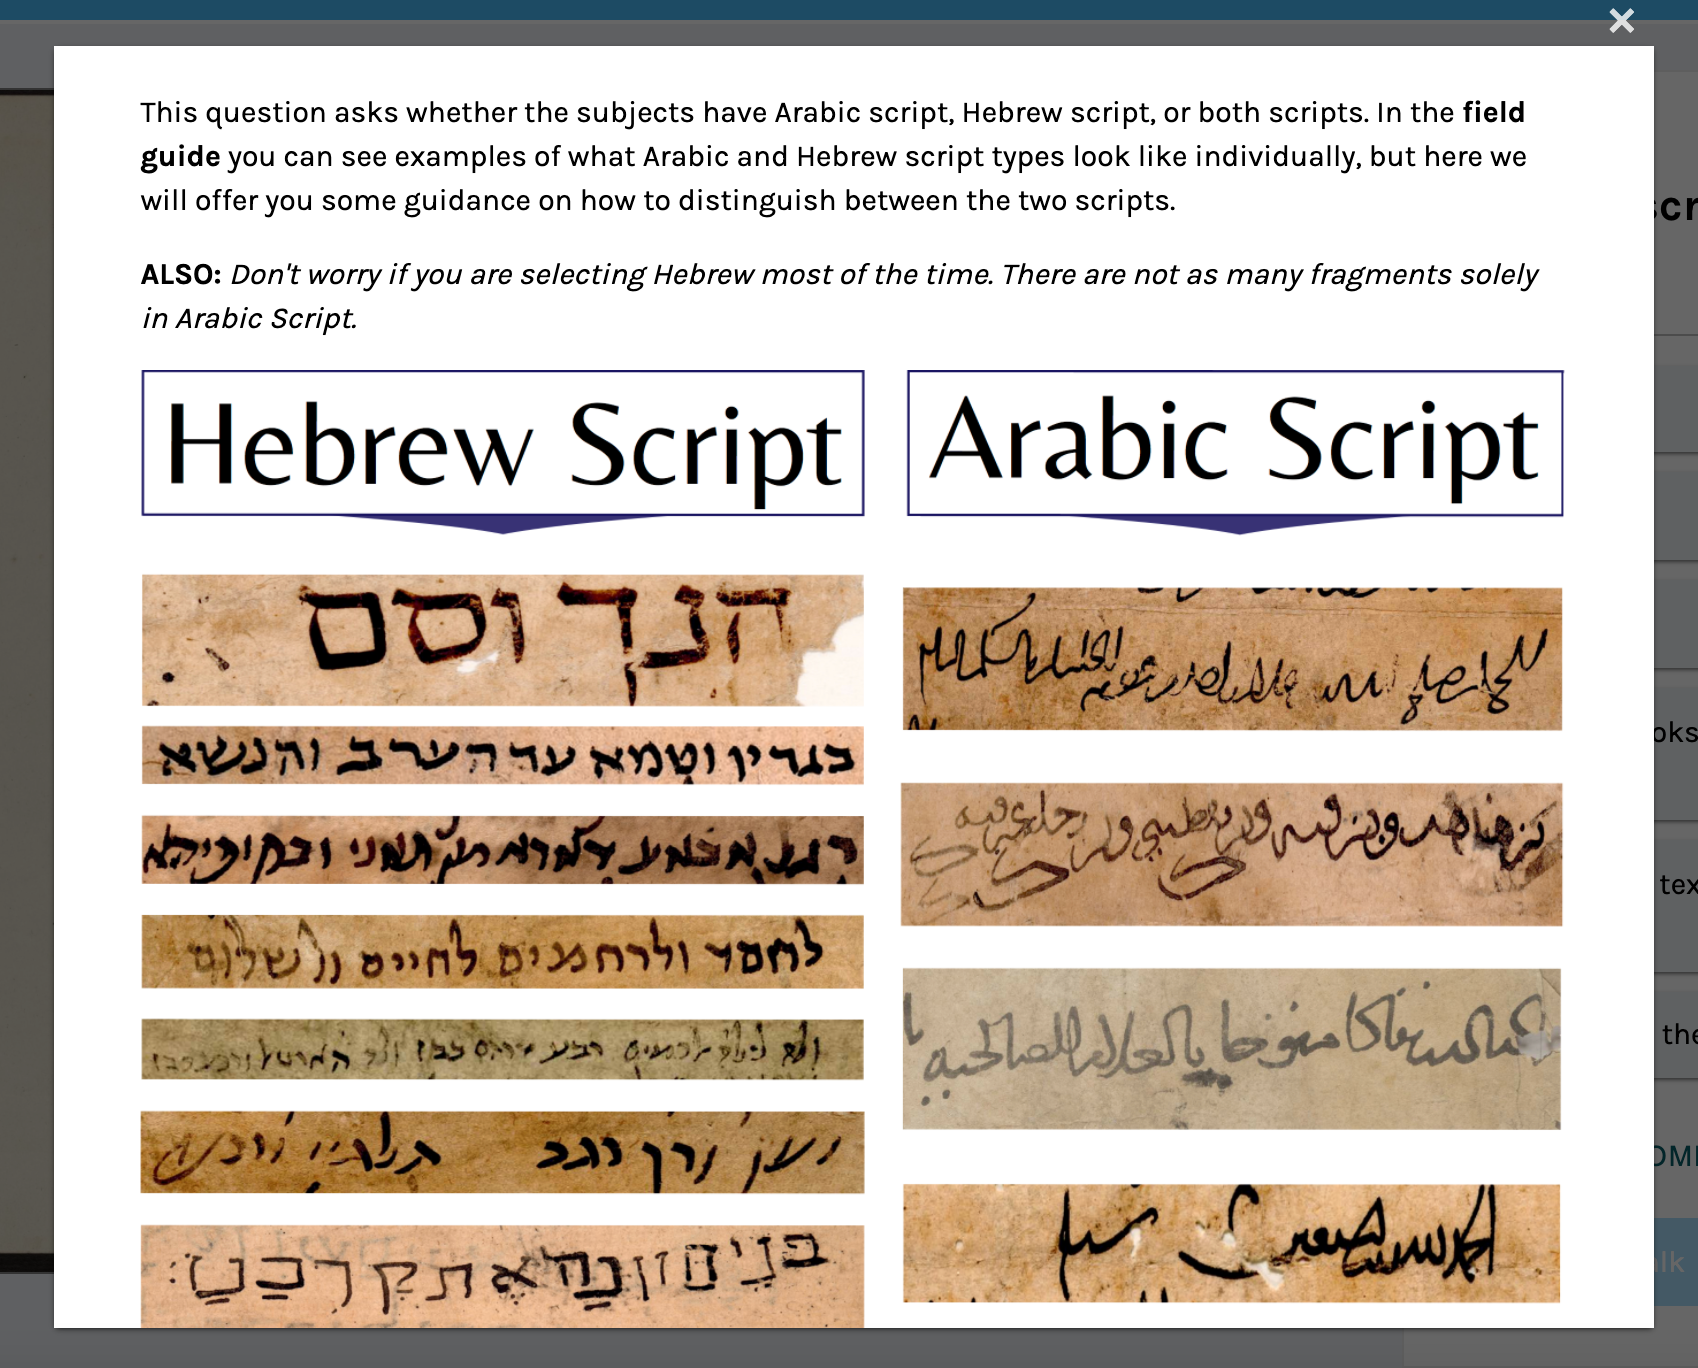
We were then able to use our own expertise as platform maintainers to design and build resources for volunteers (including the Help Text, shown above) that allowed the content experts to communicate that information to project volunteers as efficiently as possible.14 The resulting effort is known as the Sorting workflow.
04. Physical Keyboard Key Capture
Alright, so we now have an on-screen keyboard. But what about the user’s physical keyboard? A user might find it easier to use their physical keyboard to do text transcription, compared to clicking each on-screen keyboard button individually. With that in mind, let’s try to translate those physical key presses into our custom character input.
In this example, when the user presses the “A” key on their keyboard, the Japanese character あ is inserted into the text field instead. Same for the other characters: A -> あ , I -> い, U -> う, E -> え, O -> お
view source code
    <!DOCTYPE html>
<html lang="en">
<head>
<meta charset="UTF-8">
<link href="./main.css" rel="stylesheet">
</head>
<body>
<form>
  <label for="input">Input</label>
  <textarea id="input" rows="2"></textarea>
  <div id="keyboard">
    <button class="keyboard-key" type="button" data-char="あ">あ <span>(A)</span></button>
    <button class="keyboard-key" type="button" data-char="い">い <span>(I)</span></button>
    <button class="keyboard-key" type="button" data-char="う">う <span>(U)</span></button>
    <button class="keyboard-key" type="button" data-char="え">え <span>(E)</span></button>
    <button class="keyboard-key" type="button" data-char="お">お <span>(O)</span></button>
  </div>
  <button id="submit" type="button">Submit</button>
  <hr>
  <label>Output</label>
  <pre id="output"></pre>
</form>
</body>
<script>
/*
We're organising all the keyboard logic into a single 'KeyboardApp'.
 */
class KeyboardApp {
  constructor () {
    // Let's register all the HTML elements to make them easier to access later.
    this.html = {
      input: document.getElementById('input'),
      keyboard: document.getElementById('keyboard'),
      submit: document.getElementById('submit'),
      output: document.getElementById('output'),
    }

    // Let's register all the event handling
    this.html.input.onkeypress = this.onKeyPress.bind(this)
    this.html.submit.onclick = this.submit.bind(this)

    this.setupKeyboard()
  }

  /*
  This 'submit' logic is just placeholder for what you actually want to do.
  Normally, this is where we'd submit the input data to a server. For our
  example, we just print the text into the output field.
   */
  submit () {
    const text = input.value
    output.innerText = text
  }

  /*
  setupKeyboard() does exactly what it says on the tin.
   */
  setupKeyboard () {
    // In this version, we've hardcoded the keyboard keys into the HTML
    const keyboardKeys = Array.from(document.getElementsByClassName('keyboard-key'))

    // We're going through each <button#keyboard-key> and attaching a simple
    // 'insert the character associated with this button' action.
    keyboardKeys.forEach((keyboardKey) => {
      const char = keyboardKey.dataset.char
      keyboardKey.onclick = () => { this.insertChar(char) }
    });
  }

  /*
  insertChar() inserts a single character to the (end of the) input text box.
   */
  insertChar (char) {
    // Find the position of the "text cursor" on the text input
    const startIndex = this.html.input.selectionStart
    const endIndex = this.html.input.selectionEnd

    // Minor trivia: if the text cursor has selected some text (e.g. a user
    // highlighted a word) then startIndex will not be the same as endIndex ;
    // otherwise, startIndex will be the same as endIndex.

    // Insert the new character where the text cursor is, OR replace the text
    // that the text cursor is selecting.
    const text = this.html.input.value
    const startText = text.substring(0, startIndex)
    const endText = text.substring(endIndex)
    this.html.input.value = startText + char + endText

    // Return focus to the input text box, and reset the "text cursor" to the
    // location where we just inserted the character
    this.html.input.focus()
    const focusIndex = startIndex + char.length
    this.html.input.setSelectionRange(focusIndex, focusIndex)
  }

  /*
  onKeyPress listens for keyboard input on the text input field.
   */
  onKeyPress (keyboardEvent) {
    // Get the key that the user just pressed
    const code = keyboardEvent.code

    // Note: there are different ways to get what the user typed into a text
    // field.
    // keyboardEvent.code corresponds to the PHYSICAL key on the keyboard.
    // keyboardEvent.key corresponds to the TEXT VALUE of the key.
    // If a user presses the 'A' key on a US-International QWERTY keyboard,
    // we get code='KeyA', and key='a' (if shift/capslock is off) or key='A'
    // (if shift/capslock is on)

    // If the user presses the A, I, U, E, or O keys, then instead of
    // inserting those English characters into the text, we insert the
    // characters あ, い,う , え, or お
    switch (code) {
      case 'KeyA':
        this.insertChar('あ')
        return stopEvent(keyboardEvent)
      case 'KeyI':
        this.insertChar('い')
        return stopEvent(keyboardEvent)
      case 'KeyU':
        this.insertChar('う')
        return stopEvent(keyboardEvent)
      case 'KeyE':
        this.insertChar('え')
        return stopEvent(keyboardEvent)
      case 'KeyO':
        this.insertChar('お')
        return stopEvent(keyboardEvent)
    }

    return true
  }
}

/*
Stops the default actions for an input event. For example, pressing the 'A' key
on a keyboard will insert the character 'a' into a text input field. If we want
to change the action so the 'A' key inserts the 'あ' character, we first need to
disable the default action.
 */
function stopEvent (e) {
  e.preventDefault && e.preventDefault()
  e.stopPropagation && e.stopPropagation()
  return false
}

var app = new KeyboardApp()  // Let's start the app!
</script>
</html>
If you have an on-screen keyboard AND you’re capturing physical key input, it’s a good idea to label those on-screen keyboard buttons with the corresponding physical keys.
One of the biggest considerations here is what kind of physical keyboard does your user have? In our examples, we’re making a very hard assumption that all our users have US-International QWERTY keyboards, and we choose to map physical keyboard keys to their replacement characters.
Note: there are different ways to get what the user typed into a text field. keyboardEvent.code corresponds to the PHYSICAL key on the keyboard. keyboardEvent.key corresponds to the TEXT VALUE of the key. If a user presses the “A” key on a US-International QWERTY keyboard, we get code=‘KeyA,’ and key=‘a’ (if shift and caps lock are off) or key=‘A’ (if shift and caps lock are on).
WARNING: Now that we know how to capture and replace keyboard input, we also need to learn when not to do so. Sometimes, when a user presses the “A” key, they just want to type in the character “A,” not “あ”! Always allow your users the option to disable your on-screen keyboard. The example above has no such option, but we’ll explore how we can do this once we jump into the “multi-language” functionality of our onscreen keyboard.
This was a turning point in the collaboration, as we began to understand the real value of having multiple kinds of “strangers” and their perspectives in the room. Speaking to diverse perspectives—even within our planning meetings—prevented us from sharing ideas and information without considering how those concepts might be broken down into simpler components. Rather than being a barrier to communication, it gave us the opportunity to observe a version of the volunteer experience we were building in real time, through our interactions with one another.
Designing Scribes of the Cairo Geniza for Public Access
As the content specialists solidified their goals and worked with our team to determine the best way to accomplish those goals, two design needs became clear: first, that we could utilize existing Zooniverse project builder infrastructures to make a pre-transcription task that would produce useful metadata; and second, that a custom transcription interface would be necessary to support the on-screen keyboards.
User experience (UX) design relies on common behavioral patterns to help a user feel comfortable in an interface, even when faced with a completely novel situation
We didn’t need to start from scratch. Ancient Lives provided a shared reference on which to build. Which parts of that interface were successful? What made the use cases in Scribes unique and therefore required a rethinking of the user experience? What other transcription projects existed online that could provide inspiration for our task? These questions helped shape initial design sketches for the transcription workflow and text input area.
An early sketch of the Scribes of the Cairo Geniza transcription interface.By designer Becky Rother.
User experience (UX) design relies on common behavioral patterns to help a user feel comfortable in an interface, even when faced with a completely novel situation (such as transcribing an ancient manuscript written in an unfamiliar language). UX designers also rely heavily on direct user feedback to ensure that the interface both functions as it should and feels natural to those users. To that end, we first identified a few key groups of user personas to envision our target audience. These personas served as guides throughout the design process. Would a grad student in Massachusetts be able to quickly understand how to transcribe a line of text? Would a pensioner in Brighton? What about a modern native speaker? By keeping in mind these different experience levels, we were able to focus our design efforts and keep scope creep to a minimum.15
Multi-Language Keyboards
05. Code Cleanup
Before we proceed with the advanced considerations of creating an on-screen keyboard with multiple languages, let’s clean up our code.
In the example below, you won’t see many changes in terms of UI functionality, but a lot of the source code was altered. Notably:
- The Japanese characters have now been compiled into a “Japanese keyboard” data object, setting the stage for dynamically generated keyboards for different languages.
- Similarly, we now have “English keyboard” and “QWERTY layout” data objects that help ensure the visual layout of the on-screen keyboard matches the user’s physical keyboard.
view source code
    <!DOCTYPE html>
<html lang="en">
<head>
<meta charset="UTF-8">
<link href="./main.css" rel="stylesheet">
</head>
<body>
<form>
  <label for="input">Input</label>
  <textarea id="input" rows="2"></textarea>
  <div id="keyboard"></div>
  <button id="submit" type="button">Submit</button>
  <hr>
  <label>Output</label>
  <pre id="output"></pre>
</form>
</body>
<script>
/*
We're organising all the keyboard logic into a single 'KeyboardApp'.
 */
class KeyboardApp {
  constructor () {
    // Let's register all the HTML elements to make them easier to access later.
    this.html = {
      input: document.getElementById('input'),
      keyboard: document.getElementById('keyboard'),
      submit: document.getElementById('submit'),
      output: document.getElementById('output'),
    }

    // Let's register some event handling
    this.html.input.onkeypress = this.onKeyPress.bind(this)
    this.html.submit.onclick = this.submit.bind(this)

    // Let's set the current keyboard language
    this.activeKeyboard = JAPANESE_KEYBOARD
    this.setupKeyboard()
  }

  /*
  This 'submit' logic is just placeholder for what you actually want to do.
  Normally, this is where we'd submit the input data to a server. For our
  example, we just print the text into the output field.
   */
  submit () {
    const text = input.value
    output.innerText = text
  }

  /*
  setupKeyboard() does exactly what it says on the tin.
   */
  setupKeyboard () {
    // First, we erase everything in the current keyboard.
    while (this.html.keyboard.firstChild) {
      this.html.keyboard.removeChild(this.html.keyboard.firstChild)
    }

    // If there's no active keyboard, I guess we've got nothing to do!
    if (!this.activeKeyboard) return

    // Right, now let's add the keys (buttons) for a QWERTY layout
    QWERTY_LAYOUT.forEach((row) => {
      const divRow = document.createElement('div')
      divRow.className = 'row'

      row.forEach((key) => {
        // Create a button for each key in the QWERTY layout
        const buttonKey = document.createElement('button')
        buttonKey.className = 'keyboard-key'
        buttonKey.type = 'button'

        // Is there a character in our custom language keyboard that corresponds
        // with this QWERTY key? If so, then pressing the key should insert
        // the associated character.
        const char = this.activeKeyboard[key]
        if (char) {
          buttonKey.innerText = char
          buttonKey.onclick = () => { this.insertChar(char) }
        } else {
          buttonKey.innerText = ' '
        }

        // Add the 'shortcut' (i.e. the QWERTY key)
        const shortcutSpan = document.createElement('span')
        shortcutSpan.innerText = '(' + ENGLISH_KEYBOARD[key] + ')'
        buttonKey.appendChild(shortcutSpan)

        divRow.appendChild(buttonKey)
      })

      this.html.keyboard.appendChild(divRow)
    })
  }

  /*
  insertChar() inserts a single character to the (end of the) input text box.
   */
  insertChar (char) {
    // Find the position of the "text cursor" on the text input
    const startIndex = this.html.input.selectionStart
    const endIndex = this.html.input.selectionEnd

    // Minor trivia: if the text cursor has selected some text (e.g. a user
    // highlighted a word) then startIndex will not be the same as endIndex ;
    // otherwise, startIndex will be the same as endIndex.

    // Insert the new character where the text cursor is, OR replace the text
    // that the text cursor is selecting.
    const text = this.html.input.value
    const startText = text.substring(0, startIndex)
    const endText = text.substring(endIndex)
    this.html.input.value = startText + char + endText

    // Return focus to the input text box, and reset the "text cursor" to the
    // location where we just inserted the character
    this.html.input.focus()
    const focusIndex = startIndex + char.length
    this.html.input.setSelectionRange(focusIndex, focusIndex)
  }

  /*
  onKeyPress listens for keyboard input on the text input field.
   */
  onKeyPress (keyboardEvent) {
    // Get the key that the user just pressed
    const keyPressed = keyboardEvent.code

    // Note: there are different ways to get what the user typed into a text
    // field.
    // keyboardEvent.code corresponds to the PHYSICAL key on the keyboard.
    // keyboardEvent.key corresponds to the TEXT VALUE of the key.
    // If a user presses the 'A' key on a US-International QWERTY keyboard,
    // we get code='KeyA', and key='a' (if shift/capslock is off) or key='A'
    // (if shift/capslock is on)

    // Check to see if there's a character on the on-screen keyboard that
    // corresponds to the key the user just pressed. If yes, insert that
    // character.
    const char = this.activeKeyboard && this.activeKeyboard[keyPressed]
    if (char) {
      this.insertChar(char)
      return stopEvent(keyboardEvent)
    }

    return true
  }
}

/*
Stops the default actions for an input event. For example, pressing the 'A' key
on a keyboard will insert the character 'a' into a text input field. If we want
to change the action so the 'A' key inserts the 'あ' character, we first need to
disable the default action.
 */
function stopEvent (e) {
  e.preventDefault && e.preventDefault()
  e.stopPropagation && e.stopPropagation()
  return false
}

/*
English Keyboard + QWERTY Layout: defines the baseline US-International QWERTY
keyboard that we assume each user is using.
 */
const ENGLISH_KEYBOARD = {
  'KeyQ': 'Q',
  'KeyW': 'W',
  'KeyE': 'E',
  'KeyR': 'R',
  'KeyT': 'T',
  'KeyY': 'Y',
  'KeyU': 'U',
  'KeyI': 'I',
  'KeyO': 'O',
  'KeyP': 'P',
  // --------
  'KeyA': 'A',
  'KeyS': 'S',
  'KeyD': 'D',
  'KeyF': 'F',
  'KeyG': 'G',
  'KeyH': 'H',
  'KeyJ': 'J',
  'KeyK': 'K',
  'KeyL': 'L',
  // --------
  'KeyZ': 'Z',
  'KeyX': 'X',
  'KeyC': 'C',
  'KeyV': 'V',
  'KeyB': 'B',
  'KeyN': 'N',
  'KeyM': 'M',
 }
 const QWERTY_LAYOUT = [
   [ 'KeyQ', 'KeyW', 'KeyE', 'KeyR', 'KeyT', 'KeyY', 'KeyU', 'KeyI', 'KeyO', 'KeyP' ],
   [ 'KeyA', 'KeyS', 'KeyD', 'KeyF', 'KeyG', 'KeyH', 'KeyJ', 'KeyK', 'KeyL' ],
   [ 'KeyZ', 'KeyX', 'KeyC', 'KeyV', 'KeyB', 'KeyN', 'KeyM' ]
 ]

/*
Japanese Keyboard: translates key presses on a US-International QWERTY keyboard
into (a small subset of) Japanese hiragana characters.
 */
const JAPANESE_KEYBOARD = {
  'KeyA': 'あ',
  'KeyI': 'い',
  'KeyU': 'う',
  'KeyE': 'え',
  'KeyO': 'お',
}

var app = new KeyboardApp()  // Let's start the app!
</script>
</html>
As we worked through the design, it was essential that we also speak to real users of the platform in order to validate our assumptions and test that the task we were designing was easy to understand. We reached out to our list of Zooniverse beta reviewers as well as personal networks to find native Hebrew and Arabic speakers who were willing to test the platform in translation. Through these conversations, we were able to see how a RTL interface would differ from English or other LTR language interfaces, and make adjustments accordingly.
We also realized that because the subject matter could be intimidating, it was important to craft an interface that would straddle the line between friendly and knowledgeable. This was accomplished through the use of typography and color. First, we looked for a typeface that could be both friendly and trustworthy: both are attributes of a family of sans-serifs called Grotesque. These simple, clean typefaces are easy to read and add a friendly personality to the interface.
The three Grotesque typefaces used for Scribes of the Cairo Geniza in English, Arabic, and Hebrew.
It was also important that the experience remain similar across all three languages, so typefaces were chosen and vetted with native speakers to ensure parity.
06. Language Selection
Now that we have cleaned up the code so that the English and Japanese keyboards are stored data objects, we see that it’s very simple to add new languages/keyboards to the system, and to allow the user to switch between those languages/keyboards.
To illustrate this point, we’ve added a joke “Emoji keyboard” that maps QWERTY keys to arbitrary emoji characters. Typing in “Hello world” into input text field will result in the emoji “text” of “🐟🤣🦋🦋😍 😅😍🥰🦋🐒.”
view source code
    <!DOCTYPE html>
<html lang="en">
<head>
<meta charset="UTF-8">
<link href="./main.css" rel="stylesheet">
</head>
<body>
<form>
  <label for="input">Input</label>
  <textarea id="input" rows="2"></textarea>
  <div id="keyboards-list"><span>Keyboards:</span></div>
  <div id="keyboard"></div>
  <button id="submit" type="button">Submit</button>
  <hr>
  <label>Output</label>
  <pre id="output"></pre>
</form>
</body>
<script>
/*
We're organising all the keyboard logic into a single 'KeyboardApp'.
 */
class KeyboardApp {
  constructor () {
    // Let's register all the HTML elements to make them easier to access later.
    this.html = {
      input: document.getElementById('input'),
      keyboard: document.getElementById('keyboard'),
      keyboardsList: document.getElementById('keyboards-list'),
      submit: document.getElementById('submit'),
      output: document.getElementById('output'),
    }

    // Let's register some event handling
    this.html.input.onkeypress = this.onKeyPress.bind(this)
    this.html.submit.onclick = this.submit.bind(this)

    // Let's prepare the list of selectable keyboards
    this.setupKeyboardsList()

    // Let's set the default keyboard language
    this.activeKeyboard = EMOJI_KEYBOARD
    this.setupKeyboard()
  }

  /*
  This 'submit' logic is just placeholder for what you actually want to do.
  Normally, this is where we'd submit the input data to a server. For our
  example, we just print the text into the output field.
   */
  submit () {
    const text = input.value
    output.innerText = text
  }

  /*
  setupKeyboardsList() does exactly what it says on the tin.
   */
  setupKeyboardsList () {
    Object.entries(KEYBOARDS).forEach(([language, keyboard]) => {
      const buttonKeyboard = document.createElement('button')
      buttonKeyboard.type = 'button'
      buttonKeyboard.innerText = language
      buttonKeyboard.onclick = () => {
        this.activeKeyboard = keyboard
        this.setupKeyboard()
      }
      this.html.keyboardsList.appendChild(buttonKeyboard)
    })
  }

  /*
  setupKeyboard() does exactly what it says on the tin.
   */
  setupKeyboard () {
    // First, we erase everything in the current keyboard.
    while (this.html.keyboard.firstChild) {
      this.html.keyboard.removeChild(this.html.keyboard.firstChild)
    }

    // If there's no active keyboard, I guess we've got nothing to do!
    if (!this.activeKeyboard) return

    // Right, now let's add the keys (buttons) for a QWERTY layout
    QWERTY_LAYOUT.forEach((row) => {
      const divRow = document.createElement('div')
      divRow.className = 'row'

      row.forEach((key) => {
        // Create a button for each key in the QWERTY layout
        const buttonKey = document.createElement('button')
        buttonKey.className = 'keyboard-key'
        buttonKey.type = 'button'

        // Is there a character in our custom language keyboard that corresponds
        // with this QWERTY key? If so, then pressing the key should insert
        // the associated character.
        const char = this.activeKeyboard[key]
        if (char) {
          buttonKey.innerText = char
          buttonKey.onclick = () => { this.insertChar(char) }
        } else {
          buttonKey.innerText = ' '
        }

        // Add the 'shortcut' (i.e. the QWERTY key)
        const shortcutSpan = document.createElement('span')
        shortcutSpan.innerText = '(' + ENGLISH_KEYBOARD[key] + ')'
        buttonKey.appendChild(shortcutSpan)

        divRow.appendChild(buttonKey)
      })

      this.html.keyboard.appendChild(divRow)
    })
  }

  /*
  insertChar() inserts a single character to the (end of the) input text box.
   */
  insertChar (char) {
    // Find the position of the "text cursor" on the text input
    const startIndex = this.html.input.selectionStart
    const endIndex = this.html.input.selectionEnd

    // Minor trivia: if the text cursor has selected some text (e.g. a user
    // highlighted a word) then startIndex will not be the same as endIndex ;
    // otherwise, startIndex will be the same as endIndex.

    // Insert the new character where the text cursor is, OR replace the text
    // that the text cursor is selecting.
    const text = this.html.input.value
    const startText = text.substring(0, startIndex)
    const endText = text.substring(endIndex)
    this.html.input.value = startText + char + endText

    // Return focus to the input text box, and reset the "text cursor" to the
    // location where we just inserted the character
    this.html.input.focus()
    const focusIndex = startIndex + char.length
    this.html.input.setSelectionRange(focusIndex, focusIndex)
  }

  /*
  onKeyPress listens for keyboard input on the text input field.
   */
  onKeyPress (keyboardEvent) {
    // Get the key that the user just pressed
    const keyPressed = keyboardEvent.code

    // Note: there are different ways to get what the user typed into a text
    // field.
    // keyboardEvent.code corresponds to the PHYSICAL key on the keyboard.
    // keyboardEvent.key corresponds to the TEXT VALUE of the key.
    // If a user presses the 'A' key on a US-International QWERTY keyboard,
    // we get code='KeyA', and key='a' (if shift/capslock is off) or key='A'
    // (if shift/capslock is on)

    // Check to see if there's a character on the on-screen keyboard that
    // corresponds to the key the user just pressed. If yes, insert that
    // character.
    const char = this.activeKeyboard && this.activeKeyboard[keyPressed]
    if (char) {
      this.insertChar(char)
      return stopEvent(keyboardEvent)
    }

    return true
  }
}

/*
Stops the default actions for an input event. For example, pressing the 'A' key
on a keyboard will insert the character 'a' into a text input field. If we want
to change the action so the 'A' key inserts the 'あ' character, we first need to
disable the default action.
 */
function stopEvent (e) {
  e.preventDefault && e.preventDefault()
  e.stopPropagation && e.stopPropagation()
  return false
}

/*
English Keyboard + QWERTY Layout: defines the baseline US-International QWERTY
keyboard that we assume each user is using.
 */
const ENGLISH_KEYBOARD = {
  'KeyQ': 'Q',
  'KeyW': 'W',
  'KeyE': 'E',
  'KeyR': 'R',
  'KeyT': 'T',
  'KeyY': 'Y',
  'KeyU': 'U',
  'KeyI': 'I',
  'KeyO': 'O',
  'KeyP': 'P',
  // --------
  'KeyA': 'A',
  'KeyS': 'S',
  'KeyD': 'D',
  'KeyF': 'F',
  'KeyG': 'G',
  'KeyH': 'H',
  'KeyJ': 'J',
  'KeyK': 'K',
  'KeyL': 'L',
  // --------
  'KeyZ': 'Z',
  'KeyX': 'X',
  'KeyC': 'C',
  'KeyV': 'V',
  'KeyB': 'B',
  'KeyN': 'N',
  'KeyM': 'M',
 }
 const QWERTY_LAYOUT = [
   [ 'KeyQ', 'KeyW', 'KeyE', 'KeyR', 'KeyT', 'KeyY', 'KeyU', 'KeyI', 'KeyO', 'KeyP' ],
   [ 'KeyA', 'KeyS', 'KeyD', 'KeyF', 'KeyG', 'KeyH', 'KeyJ', 'KeyK', 'KeyL' ],
   [ 'KeyZ', 'KeyX', 'KeyC', 'KeyV', 'KeyB', 'KeyN', 'KeyM' ]
 ]

/*
Japanese Keyboard: translates key presses on a US-International QWERTY keyboard
into (a small subset of) Japanese hiragana characters.
 */
const JAPANESE_KEYBOARD = {
  'KeyA': 'あ',
  'KeyI': 'い',
  'KeyU': 'う',
  'KeyE': 'え',
  'KeyO': 'お',
}

/*
Emoji Keyboard: a joke keyboard to demonstrate how easy it is to add map keys
to characters of any 'language'.
 */
const EMOJI_KEYBOARD = {
  'KeyQ': '😃',
  'KeyW': '😅',
  'KeyE': '🤣',
  'KeyR': '🥰',
  'KeyT': '😉',
  'KeyY': '😂',
  'KeyU': '🥵',
  'KeyI': '🥶',
  'KeyO': '😍',
  'KeyP': '😵',
  // --------
  'KeyA': '🐈',
  'KeyS': '🐕',
  'KeyD': '🐒',
  'KeyF': '🕊️',
  'KeyG': '🐓',
  'KeyH': '🐟',
  'KeyJ': '🐙',
  'KeyK': '🦑',
  'KeyL': '🦋',
  // --------
  'KeyZ': '❤️',
  'KeyX': '🧡',
  'KeyC': '💛',
  'KeyV': '💚',
  'KeyB': '💙',
  'KeyN': '💜',
  'KeyM': '🤍',
}

const KEYBOARDS = {
  '(No keyboard)': undefined,
  'English': ENGLISH_KEYBOARD,
  'Japanese': JAPANESE_KEYBOARD,
  'Emoji': EMOJI_KEYBOARD,
}

var app = new KeyboardApp()  // Let's start the app!
</script>
</html>
Note: there is an option to select “(No keyboard)” here, which disables the on-screen keyboard as well as key capture. As mentioned earlier, always allow your users the option to disable your on-screen keyboard.
At this point, you might realize one limitation to our solution: our code simply re-maps the QWERTY keyboard, so we can only have one character for one key.
While we started our examples with a very simple five-character Japanese keyboard, we unfortunately have to discard it since a proper, fully functional Japanese keyboard is beyond the scope of this work. The Japanese hiragana writing system alone has 48 common base characters, which can be further modified with diacritics, character size, etc.
In the next section, we’ll start adding a Hebrew keyboard. The Hebrew alphabet has 22 characters, which will map very easily to English/QWERTY’s 26 characters. However, the Hebrew alphabet will introduce a new wrinkle: right-to-left text, which we’ll need to solve.
After the typography was chosen, we created a color palette that was inspired by the Geniza fragments themselves. A contrasting purple was chosen for the background to allow the subjects to visually pop. Even the help text was closely considered: because of the wide reach of the project, help text needed to be clear, concise, and easy to understand. Our baseline was a fifth-grade reading level using the Flesch-Kincaid scale.16
While most of the design used common user-interface patterns—a toolbar, iconography, other resources familiar to Zooniverse volunteers—the project goals called for the creation of a few novel or less frequently seen elements. These included the transcription mechanism itself and the interactive, on-screen keyboards.
In order to create useful transcription data, the team needed to ensure consistent line placement that an algorithm would be able to parse correctly.17 We looked both within and outside of Zooniverse for inspiration and found a variety of transcription methods, from single- to multi-track. We considered what to use as the basic unit of transcription: how would we ask users to break down the text on the page, e.g. by character, word, line? From our experience with other crowdsourced transcription projects, we knew that line-by-line transcription would be the optimal blend of user effort to manageable data output. And from testing, we found that it was most intuitive to click once at the start of a line and then again at the end of the line. From there, the project tutorial as well as pop-up directions guided the user through the transcription process and the use of the on-screen clickable keyboards.
07. Hebrew and Right-to-Left languages
With the given assumption that English is the “default” language of web code (yes, we know, that discussion is a can of worms), it’s unsurprising that that layout of most web pages default to left-to-right (LTR), top-to-bottom.
As a result, we must be conscientious when we create on-screen keyboards for languages to read right-to-left (RTL), such as Hebrew and Arabic. In the example below, we’ve done two things:
- We’ve upgraded the keyboard data objects so each language, in addition to having characters, also has an explicit “direction” value. (Either “ltr” or “rtl”)
- The text input field has an explicit CSS direction value that changes depending on the active keyboard.
view source code
    <!DOCTYPE html>
<html lang="en">
<head>
<meta charset="UTF-8">
<link href="./main.css" rel="stylesheet">
</head>
<body>
<form>
  <label for="input">Input</label>
  <textarea id="input" rows="2"></textarea>
  <div id="keyboards-list"><span>Keyboards:</span></div>
  <div id="keyboard"></div>
  <button id="submit" type="button">Submit</button>
  <hr>
  <label>Output</label>
  <pre id="output"></pre>
</form>
</body>
<script>
/*
We're organising all the keyboard logic into a single 'KeyboardApp'.
 */
class KeyboardApp {
  constructor () {
    // Let's register all the HTML elements to make them easier to access later.
    this.html = {
      input: document.getElementById('input'),
      keyboard: document.getElementById('keyboard'),
      keyboardsList: document.getElementById('keyboards-list'),
      submit: document.getElementById('submit'),
      output: document.getElementById('output'),
    }

    // Let's register some event handling
    this.html.input.onkeypress = this.onKeyPress.bind(this)
    this.html.submit.onclick = this.submit.bind(this)

    // Let's prepare the list of selectable keyboards
    this.setupKeyboardsList()

    // Let's set the default keyboard language
    this.activeKeyboard = HEBREW_KEYBOARD
    this.setupKeyboard()
  }

  /*
  This 'submit' logic is just placeholder for what you actually want to do.
  Normally, this is where we'd submit the input data to a server. For our
  example, we just print the text into the output field.
   */
  submit () {
    const text = input.value
    output.innerText = text
  }

  /*
  setupKeyboardsList() does exactly what it says on the tin.
   */
  setupKeyboardsList () {
    Object.entries(KEYBOARDS).forEach(([language, keyboard]) => {
      const buttonKeyboard = document.createElement('button')
      buttonKeyboard.type = 'button'
      buttonKeyboard.innerText = language
      buttonKeyboard.onclick = () => {
        this.activeKeyboard = keyboard
        this.setupKeyboard()
      }
      this.html.keyboardsList.appendChild(buttonKeyboard)
    })
  }

  /*
  setupKeyboard() does exactly what it says on the tin.
   */
  setupKeyboard () {
    // First, we erase everything in the current keyboard.
    while (this.html.keyboard.firstChild) {
      this.html.keyboard.removeChild(this.html.keyboard.firstChild)
    }

    // If there's no active keyboard, I guess we've got nothing to do!
    if (!this.activeKeyboard) {
      this.html.input.style.direction = 'ltr'  // Default direction
      return
    }

    // Right, now let's add the keys (buttons) for a QWERTY layout
    QWERTY_LAYOUT.forEach((row) => {
      const divRow = document.createElement('div')
      divRow.className = 'row'

      row.forEach((key) => {
        // Create a button for each key in the QWERTY layout
        const buttonKey = document.createElement('button')
        buttonKey.className = 'keyboard-key'
        buttonKey.type = 'button'

        // Is there a character in our custom language keyboard that corresponds
        // with this QWERTY key? If so, then pressing the key should insert
        // the associated character.
        const char = this.activeKeyboard.keys[key]
        if (char) {
          buttonKey.innerText = char
          buttonKey.onclick = () => { this.insertChar(char) }
        } else {
          buttonKey.innerText = ' '
        }

        // Add the 'shortcut' (i.e. the QWERTY key)
        const shortcutSpan = document.createElement('span')
        shortcutSpan.innerText = ENGLISH_KEYBOARD.keys[key]
        buttonKey.appendChild(shortcutSpan)

        divRow.appendChild(buttonKey)
      })

      this.html.keyboard.appendChild(divRow)
    })

    // Some keyboards/languages write from right to left. Update the CSS style
    // for the text input field accordingly.
    this.html.input.style.direction = this.activeKeyboard.direction || 'ltr'
  }

  /*
  insertChar() inserts a single character to the (end of the) input text box.
   */
  insertChar (char) {
    // Find the position of the "text cursor" on the text input
    const startIndex = this.html.input.selectionStart
    const endIndex = this.html.input.selectionEnd

    // Minor trivia: if the text cursor has selected some text (e.g. a user
    // highlighted a word) then startIndex will not be the same as endIndex ;
    // otherwise, startIndex will be the same as endIndex.

    // Insert the new character where the text cursor is, OR replace the text
    // that the text cursor is selecting.
    const text = this.html.input.value
    const startText = text.substring(0, startIndex)
    const endText = text.substring(endIndex)
    this.html.input.value = startText + char + endText

    // Return focus to the input text box, and reset the "text cursor" to the
    // location where we just inserted the character
    this.html.input.focus()
    const focusIndex = startIndex + char.length
    this.html.input.setSelectionRange(focusIndex, focusIndex)
  }

  /*
  onKeyPress listens for keyboard input on the text input field.
   */
  onKeyPress (keyboardEvent) {
    // Get the key that the user just pressed
    const keyPressed = keyboardEvent.code

    // Note: there are different ways to get what the user typed into a text
    // field.
    // keyboardEvent.code corresponds to the PHYSICAL key on the keyboard.
    // keyboardEvent.key corresponds to the TEXT VALUE of the key.
    // If a user presses the 'A' key on a US-International QWERTY keyboard,
    // we get code='KeyA', and key='a' (if shift/capslock is off) or key='A'
    // (if shift/capslock is on)

    // Check to see if there's a character on the on-screen keyboard that
    // corresponds to the key the user just pressed. If yes, insert that
    // character.
    const char = this.activeKeyboard && this.activeKeyboard.keys[keyPressed]
    if (char) {
      this.insertChar(char)
      return stopEvent(keyboardEvent)
    }

    return true
  }
}

/*
Stops the default actions for an input event. For example, pressing the 'A' key
on a keyboard will insert the character 'a' into a text input field. If we want
to change the action so the 'A' key inserts the 'あ' character, we first need to
disable the default action.
 */
function stopEvent (e) {
  e.preventDefault && e.preventDefault()
  e.stopPropagation && e.stopPropagation()
  return false
}

/*
English Keyboard + QWERTY Layout: defines the baseline US-International QWERTY
keyboard that we assume each user is using.
 */
const ENGLISH_KEYBOARD = {
  direction: 'ltr',
  keys: {
    'KeyQ': 'Q',
    'KeyW': 'W',
    'KeyE': 'E',
    'KeyR': 'R',
    'KeyT': 'T',
    'KeyY': 'Y',
    'KeyU': 'U',
    'KeyI': 'I',
    'KeyO': 'O',
    'KeyP': 'P',
    'BracketLeft': '[',
    'BracketRight': ']',
    // --------
    'KeyA': 'A',
    'KeyS': 'S',
    'KeyD': 'D',
    'KeyF': 'F',
    'KeyG': 'G',
    'KeyH': 'H',
    'KeyJ': 'J',
    'KeyK': 'K',
    'KeyL': 'L',
    'Semicolon': ';',
    'Quote': '\'',
    // --------
    'KeyZ': 'Z',
    'KeyX': 'X',
    'KeyC': 'C',
    'KeyV': 'V',
    'KeyB': 'B',
    'KeyN': 'N',
    'KeyM': 'M',
    'Comma': ',',
    'Period': '.',
    'Slash': '/',
  }
}
const QWERTY_LAYOUT = [
  [ 'KeyQ', 'KeyW', 'KeyE', 'KeyR', 'KeyT', 'KeyY', 'KeyU', 'KeyI', 'KeyO', 'KeyP', 'BracketLeft', 'BracketRight' ],
  [ 'KeyA', 'KeyS', 'KeyD', 'KeyF', 'KeyG', 'KeyH', 'KeyJ', 'KeyK', 'KeyL', 'Semicolon', 'Quote' ],
  [ 'KeyZ', 'KeyX', 'KeyC', 'KeyV', 'KeyB', 'KeyN', 'KeyM', 'Comma', 'Period', 'Slash' ]
]

/*
Hebrew Keyboard: translates key presses on a US-International QWERTY keyboard
into Hebrew characters.
 */
const HEBREW_KEYBOARD = {
  direction: 'rtl',
  keys: {
    // 'KeyQ': 'Q',
    // 'KeyW': 'W',
    'KeyE': 'ק',
    'KeyR': 'ר',
    'KeyT': 'א',
    'KeyY': 'ט',
    'KeyU': 'ו',
    'KeyI': 'ן',
    'KeyO': 'ם',
    'KeyP': 'פ',
    // 'BracketLeft': '[',
    // 'BracketRight': ']',
    // --------
    'KeyA': 'ש',
    'KeyS': 'ד',
    'KeyD': 'ג',
    'KeyF': 'כ',
    'KeyG': 'ע',
    'KeyH': 'י',
    'KeyJ': 'ח',
    'KeyK': 'ל',
    'KeyL': 'ך',
    'Semicolon': 'ף',
    // 'Quote': '\'',
    // --------
    'KeyZ': 'ז',
    'KeyX': 'ס',
    'KeyC': 'ב',
    'KeyV': 'ה',
    'KeyB': 'נ',
    'KeyN': 'מ',
    'KeyM': 'צ',
    'Comma': 'ת',
    'Period': 'ץ',
    'Slash': 'ﭏ',
  }
}

/*
Emoji Keyboard: a joke keyboard to demonstrate how easy it is to add map keys
to characters of any 'language'.
 */
const EMOJI_KEYBOARD = {
  direction: 'ltr',
  keys: {
    'KeyQ': '😃',
    'KeyW': '😅',
    'KeyE': '🤣',
    'KeyR': '🥰',
    'KeyT': '😉',
    'KeyY': '😂',
    'KeyU': '🥵',
    'KeyI': '🥶',
    'KeyO': '😍',
    'KeyP': '😵',
    'BracketLeft': '🎉',
    'BracketRight': '🍎',
    // --------
    'KeyA': '🐈',
    'KeyS': '🐕',
    'KeyD': '🐒',
    'KeyF': '🕊️',
    'KeyG': '🐓',
    'KeyH': '🐟',
    'KeyJ': '🐙',
    'KeyK': '🦑',
    'KeyL': '🦋',
    'Semicolon': '🔥',
    'Quote': '💧',
    // --------
    'KeyZ': '❤️',
    'KeyX': '🧡',
    'KeyC': '💛',
    'KeyV': '💚',
    'KeyB': '💙',
    'KeyN': '💜',
    'KeyM': '🤎',
    'Comma': '🖤',
    'Period': '🤍',
    'Slash': '💌',
  }
}

const KEYBOARDS = {
  '(No keyboard)': undefined,
  'English': ENGLISH_KEYBOARD,
  'Hebrew': HEBREW_KEYBOARD,
  'Emoji': EMOJI_KEYBOARD,
}

var app = new KeyboardApp()  // Let's start the app!
</script>
</html>
Since we’re only interested in creating a functional on-screen keyboard, we only modified the CSS direction of the text input field. On the other hand, if you’re creating, for example, a whole website that supports both LTR and RTL languages, then you need to be conscientious about the layout of your entire website, and whether that layout needs to be flipped along the horizontal axis to make sense to RTL readers.
Fun(?) Note: mixing LTR text with RTL text can lead to extremely confusing UI interactions. For example, in the text input field below, using your mouse, try to highlight the word APPLE plus one character before it and one character after it, i.e. “הAPPLEן”. Good luck!
Creating clickable keyboards
With the basic functionality of the clickable keyboards in place, we wanted to consider how we might further expand this resource for the context of Scribes of the Cairo Geniza. To support volunteers in the paleographic elements of transcribing Geniza fragments written in Hebrew script (again, the vast majority of the corpus), Penn team member Laura Newman Eckstein created a series of twenty script-based Hebrew “Alephbets” to be used as interchangeable skins on the clickable keyboard, to complement the modern Hebrew keyboard modeled after the Ancient Lives approach.
The “Alephbets” chart which formed the basis of the interchangeable keyboard skins, created for Scribes of the Cairo Geniza by Laura Newman Eckstein. Downloadable via GitHub.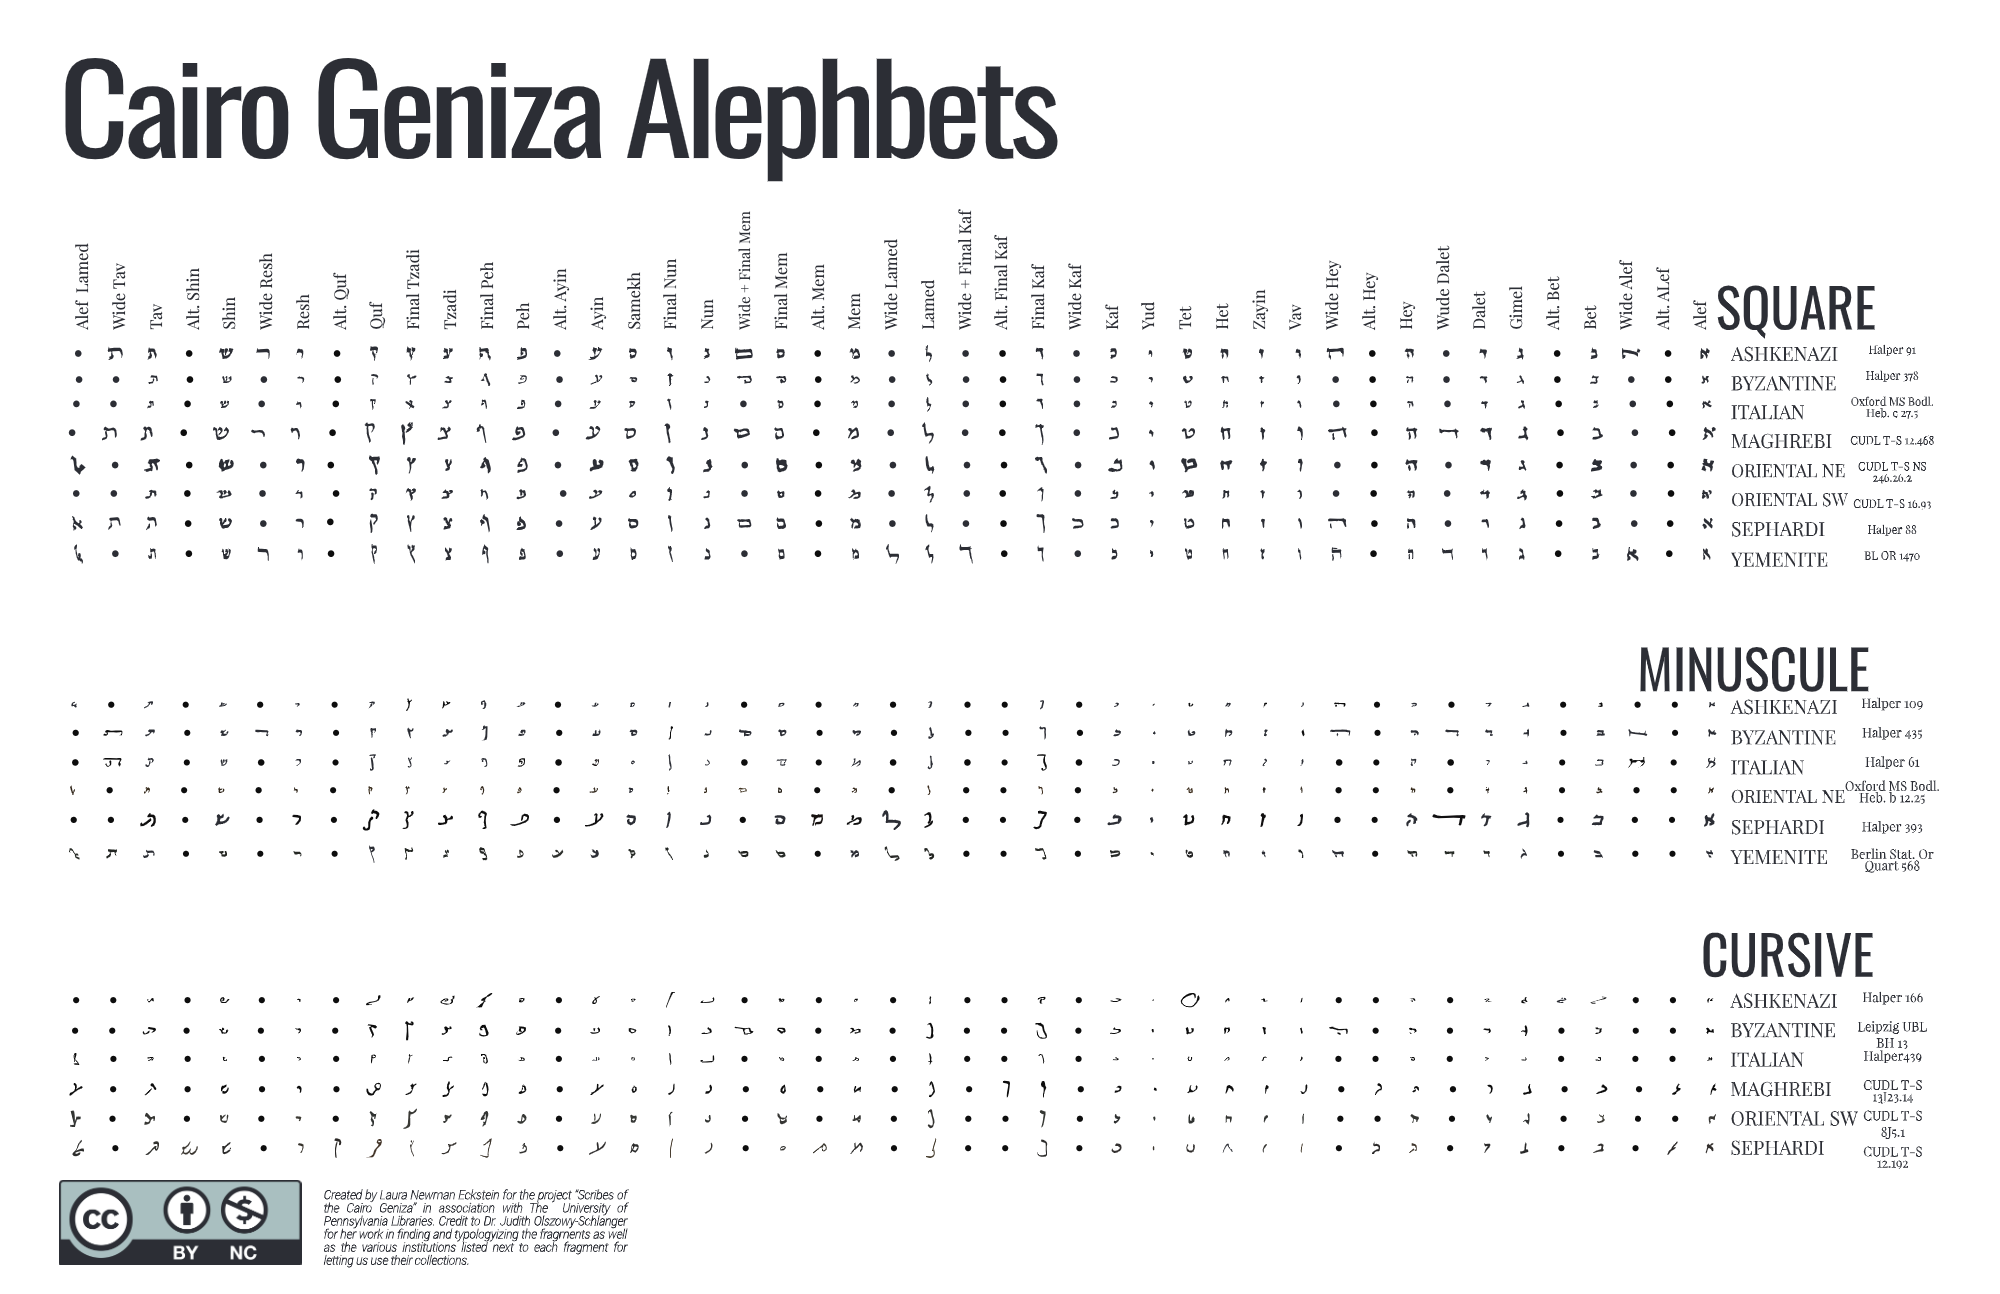
Because of the variation in the way that individual characters are composed across the variety of hands in the Geniza, these skins are essential to helping nonexpert transcribers feel more confident submitting a transcription. Users can view alternate ways of writing a particular character, and choose the keyboard that most closely matches the script type of the fragment they’re currently transcribing. The option to return to modern characters is always available, too.
The Scribes of the Cairo Geniza transcription modal, including the Hebrew keyboard, showing the Sephardi Square script type.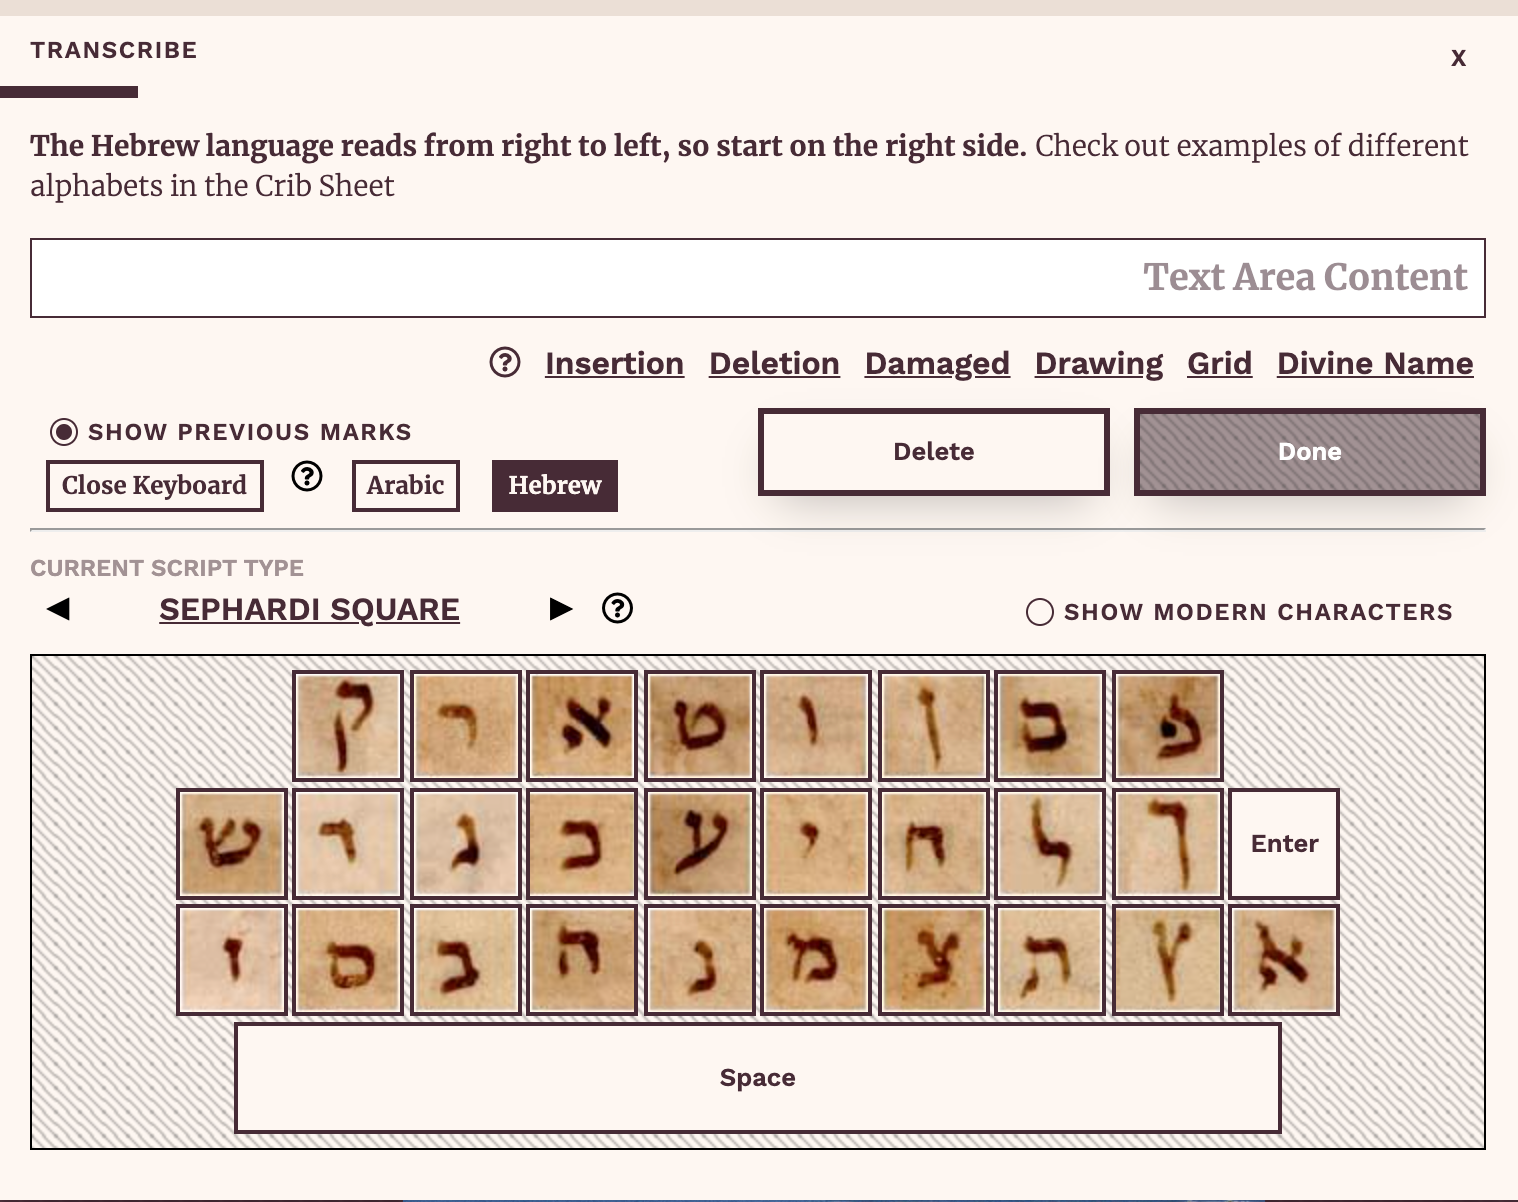
This resource not only boosts confidence for transcribers, it also allows them to engage with paleographic concepts in a way that meets them at their level, whatever that may be. Users can look at the full list of scripts available and learn how to distinguish between square, cursive, and minuscule scripts. They can learn the names of Hebrew characters. Regional variations on scripts may inspire transcribers to think more closely about how or why writing might differ across physical space. This resource allows people to engage deeply with primary source materials without judging their level of expertise. It tells them it’s okay to be wrong. It invites participants in and encourages budding curiosity to bloom.
Visual Script References
08. Keys with Visual Script References
Now that we’ve proven that it’s possible to map different key input to characters from different languages, we need to solve another problem. Our users will be looking at handwritten manuscripts from different regions and different eras, so it’ll be very useful if they can have a visual reference for the different kind of scripts (handwritten text) available.
Fortunately, this is a fairly straightforward matter of adding images—for each character, from various scripts—to our visual keyboard.
In our example below, we’ve added the “Yemenite Square” visual script reference for the Hebrew keyboard.
view source code
    <!DOCTYPE html>
<html lang="en">
<head>
<meta charset="UTF-8">
<link href="./main.css" rel="stylesheet">
</head>
<body>
<form>
  <label for="input">Input</label>
  <textarea id="input" rows="2"></textarea>
  <div id="keyboards-list"><span>Keyboards:</span></div>
  <div id="visual-scripts-list"></div>
  <div id="keyboard" class="v2"></div>
  <button id="submit" type="button">Submit</button>
  <hr>
  <label>Output</label>
  <pre id="output"></pre>
</form>
</body>
<script>
/*
We're organising all the keyboard logic into a single 'KeyboardApp'.
 */
class KeyboardApp {
  constructor () {
    // Let's register all the HTML elements to make them easier to access later.
    this.html = {
      input: document.getElementById('input'),
      keyboard: document.getElementById('keyboard'),
      keyboardsList: document.getElementById('keyboards-list'),
      visualScriptsList: document.getElementById('visual-scripts-list'),
      submit: document.getElementById('submit'),
      output: document.getElementById('output'),
    }

    // Let's register some event handling
    this.html.input.onkeypress = this.onKeyPress.bind(this)
    this.html.submit.onclick = this.submit.bind(this)

    // Let's prepare the list of selectable keyboards
    this.setupKeyboardsList()

    // Let's set the default keyboard language
    this.activeKeyboard = HEBREW_KEYBOARD
    this.activeVisualScript = HEBREW_KEYBOARD.visualScripts['Yemenite Square']
    this.setupVisualScriptsList()
    this.setupKeyboard()
  }

  /*
  This 'submit' logic is just placeholder for what you actually want to do.
  Normally, this is where we'd submit the input data to a server. For our
  example, we just print the text into the output field.
   */
  submit () {
    const text = input.value
    output.innerText = text
  }

  /*
  setupKeyboardsList() does exactly what it says on the tin.
   */
  setupKeyboardsList () {
    Object.entries(KEYBOARDS).forEach(([language, keyboard]) => {
      const buttonKeyboard = document.createElement('button')
      buttonKeyboard.type = 'button'
      buttonKeyboard.innerText = language
      buttonKeyboard.onclick = () => {
        this.activeKeyboard = keyboard
        this.activeVisualScript = undefined
        this.setupVisualScriptsList()
        this.setupKeyboard()
      }
      this.html.keyboardsList.appendChild(buttonKeyboard)
    })
  }

  /*
  If the selected keyboard (i.e. language) has a visual script reference (i.e.
  handwritten image reference for each character), set it up here.
   */
  setupVisualScriptsList () {
    // First, we erase everything in the current list.
    while (this.html.visualScriptsList.firstChild) {
      this.html.visualScriptsList.removeChild(this.html.visualScriptsList.firstChild)
    }

    // If there's no active keyboard, or if the active keyboard doesn't have any
    // visual script references, then we can call it quits!
    if (!this.activeKeyboard || !this.activeKeyboard.visualScripts) {
      this.html.visualScriptsList.style.display = 'none'
      return
    }

    // OK, now let's create the buttons that will allow users to switch between
    // the different visual references available.
    this.html.visualScriptsList.style.display = 'block'
    Object.entries(this.activeKeyboard.visualScripts).forEach(([scriptName, scriptData]) => {
      const buttonVisualScript = document.createElement('button')
      buttonVisualScript.type = 'button'
      buttonVisualScript.innerText = scriptName
      buttonVisualScript.onclick = () => {
        this.activeVisualScript = scriptData
        this.setupKeyboard()
      }
      this.html.visualScriptsList.appendChild(buttonVisualScript)
    })
  }

  /*
  setupKeyboard() does exactly what it says on the tin.
   */
  setupKeyboard () {
    // First, we erase everything in the current keyboard.
    while (this.html.keyboard.firstChild) {
      this.html.keyboard.removeChild(this.html.keyboard.firstChild)
    }

    // If there's no active keyboard, I guess we've got nothing to do!
    if (!this.activeKeyboard) {
      this.html.input.style.direction = 'ltr'  // Default direction
      return
    }

    // Right, now let's add the keys (buttons) for a QWERTY layout
    QWERTY_LAYOUT.forEach((row) => {
      const divRow = document.createElement('div')
      divRow.className = 'row'

      row.forEach((key) => {
        // Create a button for each key in the QWERTY layout
        const buttonKey = document.createElement('button')
        buttonKey.className = 'keyboard-key'
        buttonKey.type = 'button'

        // Is there a character in our custom language keyboard that corresponds
        // with this QWERTY key? If so, then pressing the key should insert
        // the associated character.
        const char = this.activeKeyboard.keys[key]
        if (char) {
          const hasVisualReference = this.activeVisualScript
            && this.activeKeyboard.visualScriptLayout
            && this.activeKeyboard.visualScriptLayout[char]

          // If the character has a visual reference, we add a button with an image.
          if (hasVisualReference) {
            const characterPositionOnImage = this.activeKeyboard.visualScriptLayout[char]
            const characterSizeOnImage = '50px'  // We know this in advance

            // We're using a CSS trick known as "image sprites".
            // The visual reference image has ALL the characters in a given
            // script, so we use CSS background image + positioning to only show
            // specific parts of the whole reference image, corresponding to
            // individual characters.
            const visualSpan = document.createElement('div')
            visualSpan.style.backgroundImage = 'url(' + this.activeVisualScript + ')'
            visualSpan.style.backgroundPosition = -characterPositionOnImage.x + 'px ' + -characterPositionOnImage.y + 'px'
            visualSpan.style.width = characterSizeOnImage
            visualSpan.style.height = characterSizeOnImage

            buttonKey.appendChild(visualSpan)
            buttonKey.onclick = () => { this.insertChar(char) }

          // Otherwise, we add a standard button.
          } else {
            buttonKey.innerText = char
            buttonKey.onclick = () => { this.insertChar(char) }
          }
        } else {
          buttonKey.innerText = ' '
        }

        // Add the 'shortcut' (i.e. the QWERTY key)
        const shortcutSpan = document.createElement('span')
        shortcutSpan.innerText = ENGLISH_KEYBOARD.keys[key]
        buttonKey.appendChild(shortcutSpan)

        divRow.appendChild(buttonKey)
      })

      this.html.keyboard.appendChild(divRow)
    })

    // Some keyboards/languages write from right to left. Update the CSS style
    // for the text input field accordingly.
    this.html.input.style.direction = this.activeKeyboard.direction || 'ltr'
  }

  /*
  insertChar() inserts a single character to the (end of the) input text box.
   */
  insertChar (char) {
    // Find the position of the "text cursor" on the text input
    const startIndex = this.html.input.selectionStart
    const endIndex = this.html.input.selectionEnd

    // Minor trivia: if the text cursor has selected some text (e.g. a user
    // highlighted a word) then startIndex will not be the same as endIndex ;
    // otherwise, startIndex will be the same as endIndex.

    // Insert the new character where the text cursor is, OR replace the text
    // that the text cursor is selecting.
    const text = this.html.input.value
    const startText = text.substring(0, startIndex)
    const endText = text.substring(endIndex)
    this.html.input.value = startText + char + endText

    // Return focus to the input text box, and reset the "text cursor" to the
    // location where we just inserted the character
    this.html.input.focus()
    const focusIndex = startIndex + char.length
    this.html.input.setSelectionRange(focusIndex, focusIndex)
  }

  /*
  onKeyPress listens for keyboard input on the text input field.
   */
  onKeyPress (keyboardEvent) {
    // Get the key that the user just pressed
    const keyPressed = keyboardEvent.code

    // Note: there are different ways to get what the user typed into a text
    // field.
    // keyboardEvent.code corresponds to the PHYSICAL key on the keyboard.
    // keyboardEvent.key corresponds to the TEXT VALUE of the key.
    // If a user presses the 'A' key on a US-International QWERTY keyboard,
    // we get code='KeyA', and key='a' (if shift/capslock is off) or key='A'
    // (if shift/capslock is on)

    // Check to see if there's a character on the on-screen keyboard that
    // corresponds to the key the user just pressed. If yes, insert that
    // character.
    const char = this.activeKeyboard && this.activeKeyboard.keys[keyPressed]
    if (char) {
      this.insertChar(char)
      return stopEvent(keyboardEvent)
    }

    return true
  }
}

/*
Stops the default actions for an input event. For example, pressing the 'A' key
on a keyboard will insert the character 'a' into a text input field. If we want
to change the action so the 'A' key inserts the 'あ' character, we first need to
disable the default action.
 */
function stopEvent (e) {
  e.preventDefault && e.preventDefault()
  e.stopPropagation && e.stopPropagation()
  return false
}

/*
English Keyboard + QWERTY Layout: defines the baseline US-International QWERTY
keyboard that we assume each user is using.
 */
const ENGLISH_KEYBOARD = {
  direction: 'ltr',
  keys: {
    'KeyQ': 'Q',
    'KeyW': 'W',
    'KeyE': 'E',
    'KeyR': 'R',
    'KeyT': 'T',
    'KeyY': 'Y',
    'KeyU': 'U',
    'KeyI': 'I',
    'KeyO': 'O',
    'KeyP': 'P',
    'BracketLeft': '[',
    'BracketRight': ']',
    // --------
    'KeyA': 'A',
    'KeyS': 'S',
    'KeyD': 'D',
    'KeyF': 'F',
    'KeyG': 'G',
    'KeyH': 'H',
    'KeyJ': 'J',
    'KeyK': 'K',
    'KeyL': 'L',
    'Semicolon': ';',
    'Quote': '\'',
    // --------
    'KeyZ': 'Z',
    'KeyX': 'X',
    'KeyC': 'C',
    'KeyV': 'V',
    'KeyB': 'B',
    'KeyN': 'N',
    'KeyM': 'M',
    'Comma': ',',
    'Period': '.',
    'Slash': '/',
  }
}
const QWERTY_LAYOUT = [
  [ 'KeyQ', 'KeyW', 'KeyE', 'KeyR', 'KeyT', 'KeyY', 'KeyU', 'KeyI', 'KeyO', 'KeyP', 'BracketLeft', 'BracketRight' ],
  [ 'KeyA', 'KeyS', 'KeyD', 'KeyF', 'KeyG', 'KeyH', 'KeyJ', 'KeyK', 'KeyL', 'Semicolon', 'Quote' ],
  [ 'KeyZ', 'KeyX', 'KeyC', 'KeyV', 'KeyB', 'KeyN', 'KeyM', 'Comma', 'Period', 'Slash' ]
]

/*
Hebrew Keyboard: translates key presses on a US-International QWERTY keyboard
into Hebrew characters.
 */
const HEBREW_KEYBOARD = {
  direction: 'rtl',
  keys: {
    // 'KeyQ': 'Q',
    // 'KeyW': 'W',
    'KeyE': 'ק',  // Qof
    'KeyR': 'ר',  // Resh
    'KeyT': 'א',  // Alef
    'KeyY': 'ט',  // Tet
    'KeyU': 'ו',  // Waw/Vav
    'KeyI': 'ן',  // Nun (2)
    'KeyO': 'ם',  // Mem (2)
    'KeyP': 'פ',  // Pe (1)
    // 'BracketLeft': '[',
    // 'BracketRight': ']',
    // --------
    'KeyA': 'ש',  // Shin
    'KeyS': 'ד',  // Dalet
    'KeyD': 'ג',  // Gimel
    'KeyF': 'כ',  // Kaf
    'KeyG': 'ע',  // Ayin
    'KeyH': 'י',  // Yod
    'KeyJ': 'ח',  // Chet
    'KeyK': 'ל',  // Lamed
    'KeyL': 'ך',  // Kaf
    'Semicolon': 'ף',  // Pe (2)
    // 'Quote': '\'',
    // --------
    'KeyZ': 'ז',  // Zayin
    'KeyX': 'ס',  // Samech
    'KeyC': 'ב',  // Bet
    'KeyV': 'ה',  // He
    'KeyB': 'נ',  // Nun (1)
    'KeyN': 'מ',  // Mem (1)
    'KeyM': 'צ',  // Tsadik (1)
    'Comma': 'ת',  // Tav
    'Period': 'ץ',  // Tsadik (2)
    'Slash': 'ﭏ',  // Alef-lamed
  },
  // The following contains info on how to map each character (i.e. data) with a
  // visual reference (i.e. image) of how the character looks like in a
  // real-world manuscript written by human hands. (i.e. the Hebrew script)
  visualScripts: {
    'Yemenite Square': 'images/yemenite-square.jpg',
    'none': undefined,
  },
  // To keep things simple, each image file (representing a Hebrew script and
  // containing an instance of every handwritten character) follows a specific
  // visual layout. For example, each handwritten Hebrew character's image is a
  // 50x50px square located at specific x-y coordinates. This consistency allows
  // us to use a CSS technique known as "image sprites" to package multiple
  // character images into one file, which in turn lets us rapidly add new
  // visual guides for different styles of Hebrew scripts.
  visualScriptLayout: {
    'ק': { x: 440, y: 256 },  // Qof
    'ר': { x: 330, y: 256 },  // Resh
    'א': { x: 440, y: 0 },  // Alef
    'ט': { x: 110, y: 64 },  // Tet
    'ו': { x: 275, y: 64 },  // Waw/Vav
    'ן': { x: 385, y: 192 },  // Nun (2)
    'ם': { x: 55, y: 128 },  // Mem (2)
    'פ': { x: 165, y: 192 },  // Pe (1)
    // --------
    'ש': { x: 220, y: 256 },  // Shin
    'ד': { x: 55, y: 0 },  // Dalet
    'ג': { x: 110, y: 0 },  // Gimel
    'כ': { x: 0, y: 64 },  // Kaf (1)
    'ע': { x: 275, y: 192 },  // Ayin
    'י': { x: 55, y: 64 },  // Yod
    'ח': { x: 165, y: 64 },  // Chet
    'ל': { x: 275, y: 128 },  // Lamed
    'ך': { x: 440, y: 128 },  // Kaf (2)
    'ף': { x: 110, y: 192 },  // Pe (2)
    // --------
    'ז': { x: 220, y: 64 },  // Zayin
    'ס': { x: 55, y: 128 },  // Samech
    'ב': { x: 220, y: 0 },  // Bet
    'ה': { x: 440, y: 64 },  // He
    'נ': { x: 440, y: 192 },  // Nun (1)
    'מ': { x: 110, y: 256 },  // Mem (1)
    'צ': { x: 55, y: 192 },  // Tsadik (1)
    'ת': { x: 110, y: 256 },  // Tav
    'ץ': { x: 0, y: 192 },  // Tsadik (2)
    'ﭏ': { x: 330, y: 0 },  // Alef-lamed
  },
}

/*
Emoji Keyboard: a joke keyboard to demonstrate how easy it is to add map keys
to characters of any 'language'.
 */
const EMOJI_KEYBOARD = {
  direction: 'ltr',
  keys: {
    'KeyQ': '😃',
    'KeyW': '😅',
    'KeyE': '🤣',
    'KeyR': '🥰',
    'KeyT': '😉',
    'KeyY': '😂',
    'KeyU': '🥵',
    'KeyI': '🥶',
    'KeyO': '😍',
    'KeyP': '😵',
    'BracketLeft': '🎉',
    'BracketRight': '🍎',
    // --------
    'KeyA': '🐈',
    'KeyS': '🐕',
    'KeyD': '🐒',
    'KeyF': '🕊️',
    'KeyG': '🐓',
    'KeyH': '🐟',
    'KeyJ': '🐙',
    'KeyK': '🦑',
    'KeyL': '🦋',
    'Semicolon': '🔥',
    'Quote': '💧',
    // --------
    'KeyZ': '❤️',
    'KeyX': '🧡',
    'KeyC': '💛',
    'KeyV': '💚',
    'KeyB': '💙',
    'KeyN': '💜',
    'KeyM': '🤎',
    'Comma': '🖤',
    'Period': '🤍',
    'Slash': '💌',
  }
}

const KEYBOARDS = {
  '(No keyboard)': undefined,
  'English': ENGLISH_KEYBOARD,
  'Hebrew': HEBREW_KEYBOARD,
  'Emoji': EMOJI_KEYBOARD,
}

var app = new KeyboardApp()  // Let's start the app!
</script>
</html>
The actual hard work comes in two parts. First, it requires a human hand to create the reference image JPEG for each style of script, and to ensure it has a consistent layout. Second, there’s a one-off upfront development cost to map the visuals to the data. We found that this early investment is well worth it when we get into the next section.
For our project, we decided to put every character of the “Yemenite Square” Hebrew script into a single image file (i.e. as opposed to having dozens of image files, one for each character) and used a CSS technique called “image sprites” to separate each character when needed. For example, when we want to show the ‘Alef’ א character (top row, right-most column) we tell the code to “crop” the image at x=440px y=0px width=50px height=50px.
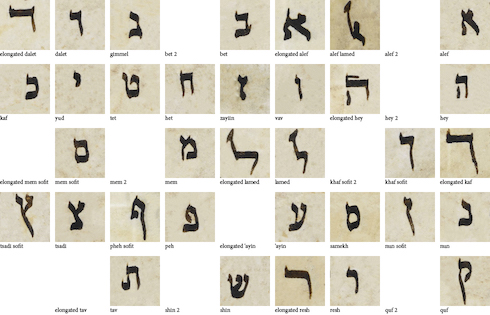
Visual Hebrew script reference for Yemenite Square.
Research Development and Volunteer Advocacy
The process of designing and building Scribes of the Cairo Geniza required a deeply human-centered approach to ensure we could meet the original project goals of transcribing the Geniza corpus and providing a space for anyone to engage with Geniza materials, no matter their level of expertise. To achieve this, we considered the range of experience our users might have, and included scaffolding in the project to ensure that there were multiple pathways to participation (e.g. the Sorting workflow, transcription with aid from on-screen keyboards).
In this essay, we’ve discussed the interpersonal challenges of collaborating across disciplines, and the technical challenges of designing and building resources for a range of users. The final piece to discuss is the challenge of balancing engagement and outcome—in particular, identifying where the opportunities exist in this process to advocate for a positive user experience from our positions of power as builders and project leads, and considering what sort of impact that advocacy can have on the project’s outcomes.
Crowdsourcing is never a case of building a project and letting volunteers come to you. Scribes has succeeded in attracting a broad volunteer base because we built the project intentionally, with them in mind.
Whether we’re discussing workflows, networks of communication, data pipelines, or design processes, the individual components of public crowdsourcing projects cannot exist independently from the project as a whole. We don’t think about design as separate from data, because these pieces are inextricably linked; project data influences design, which then impacts data output. Every decision we make during the design phase will impact various other pieces of a project beyond those directly affected in that moment. Choosing to build for a broad audience instead of restricting the project to those with previous experience will have an impact on the results. It will also increase the amount of labor involved in creating the project.
09. Multiple Visual Script References
There are several advantages to organising our “Yemenite Square” Hebrew script into a single image file. Smaller downloads for our users is one, but more importantly, its consistent visual layout allows us to use it as a template to quickly deploy multiple visual scripts.
In the example below, you’ll see that we’ve added six new Hebrew scripts, and if you check the code, doing so only required six additional lines of code.
view source code
    <!DOCTYPE html>
<html lang="en">
<head>
<meta charset="UTF-8">
<link href="./main.css" rel="stylesheet">
</head>
<body>
<form>
  <label for="input">Input</label>
  <textarea id="input" rows="2"></textarea>
  <div id="keyboards-list"><span>Keyboards:</span></div>
  <div id="visual-scripts-list"></div>
  <div id="keyboard" class="v2"></div>
  <button id="submit" type="button">Submit</button>
  <hr>
  <label>Output</label>
  <pre id="output"></pre>
</form>
</body>
<script>
/*
We're organising all the keyboard logic into a single 'KeyboardApp'.
 */
class KeyboardApp {
  constructor () {
    // Let's register all the HTML elements to make them easier to access later.
    this.html = {
      input: document.getElementById('input'),
      keyboard: document.getElementById('keyboard'),
      keyboardsList: document.getElementById('keyboards-list'),
      visualScriptsList: document.getElementById('visual-scripts-list'),
      submit: document.getElementById('submit'),
      output: document.getElementById('output'),
    }

    // Let's register some event handling
    this.html.input.onkeypress = this.onKeyPress.bind(this)
    this.html.submit.onclick = this.submit.bind(this)

    // Let's prepare the list of selectable keyboards
    this.setupKeyboardsList()

    // Let's set the default keyboard language
    this.activeKeyboard = HEBREW_KEYBOARD
    this.activeVisualScript = HEBREW_KEYBOARD.visualScripts['Yemenite Square']
    this.setupVisualScriptsList()
    this.setupKeyboard()
  }

  /*
  This 'submit' logic is just placeholder for what you actually want to do.
  Normally, this is where we'd submit the input data to a server. For our
  example, we just print the text into the output field.
   */
  submit () {
    const text = input.value
    output.innerText = text
  }

  /*
  setupKeyboardsList() does exactly what it says on the tin.
   */
  setupKeyboardsList () {
    Object.entries(KEYBOARDS).forEach(([language, keyboard]) => {
      const buttonKeyboard = document.createElement('button')
      buttonKeyboard.type = 'button'
      buttonKeyboard.innerText = language
      buttonKeyboard.onclick = () => {
        this.activeKeyboard = keyboard
        this.activeVisualScript = undefined
        this.setupVisualScriptsList()
        this.setupKeyboard()
      }
      this.html.keyboardsList.appendChild(buttonKeyboard)
    })
  }

  /*
  If the selected keyboard (i.e. language) has a visual script reference (i.e.
  handwritten image reference for each character), set it up here.
   */
  setupVisualScriptsList () {
    // First, we erase everything in the current list.
    while (this.html.visualScriptsList.firstChild) {
      this.html.visualScriptsList.removeChild(this.html.visualScriptsList.firstChild)
    }

    // If there's no active keyboard, or if the active keyboard doesn't have any
    // visual script references, then we can call it quits!
    if (!this.activeKeyboard || !this.activeKeyboard.visualScripts) {
      this.html.visualScriptsList.style.display = 'none'
      return
    }

    // OK, now let's create the buttons that will allow users to switch between
    // the different visual references available.
    this.html.visualScriptsList.style.display = 'block'
    Object.entries(this.activeKeyboard.visualScripts).forEach(([scriptName, scriptData]) => {
      const buttonVisualScript = document.createElement('button')
      buttonVisualScript.type = 'button'
      buttonVisualScript.innerText = scriptName
      buttonVisualScript.onclick = () => {
        this.activeVisualScript = scriptData
        this.setupKeyboard()
      }
      this.html.visualScriptsList.appendChild(buttonVisualScript)
    })
  }

  /*
  setupKeyboard() does exactly what it says on the tin.
   */
  setupKeyboard () {
    // First, we erase everything in the current keyboard.
    while (this.html.keyboard.firstChild) {
      this.html.keyboard.removeChild(this.html.keyboard.firstChild)
    }

    // If there's no active keyboard, I guess we've got nothing to do!
    if (!this.activeKeyboard) {
      this.html.input.style.direction = 'ltr'  // Default direction
      return
    }

    // Right, now let's add the keys (buttons) for a QWERTY layout
    QWERTY_LAYOUT.forEach((row) => {
      const divRow = document.createElement('div')
      divRow.className = 'row'

      row.forEach((key) => {
        // Create a button for each key in the QWERTY layout
        const buttonKey = document.createElement('button')
        buttonKey.className = 'keyboard-key'
        buttonKey.type = 'button'

        // Is there a character in our custom language keyboard that corresponds
        // with this QWERTY key? If so, then pressing the key should insert
        // the associated character.
        const char = this.activeKeyboard.keys[key]
        if (char) {
          const hasVisualReference = this.activeVisualScript
            && this.activeKeyboard.visualScriptLayout
            && this.activeKeyboard.visualScriptLayout[char]

          // If the character has a visual reference, we add a button with an image.
          if (hasVisualReference) {
            const characterPositionOnImage = this.activeKeyboard.visualScriptLayout[char]
            const characterSizeOnImage = '50px'  // We know this in advance

            // We're using a CSS trick known as "image sprites".
            // The visual reference image has ALL the characters in a given
            // script, so we use CSS background image + positioning to only show
            // specific parts of the whole reference image, corresponding to
            // individual characters.
            const visualSpan = document.createElement('div')
            visualSpan.style.backgroundImage = 'url(' + this.activeVisualScript + ')'
            visualSpan.style.backgroundPosition = -characterPositionOnImage.x + 'px ' + -characterPositionOnImage.y + 'px'
            visualSpan.style.width = characterSizeOnImage
            visualSpan.style.height = characterSizeOnImage

            buttonKey.appendChild(visualSpan)
            buttonKey.onclick = () => { this.insertChar(char) }

          // Otherwise, we add a standard button.
          } else {
            buttonKey.innerText = char
            buttonKey.onclick = () => { this.insertChar(char) }
          }
        } else {
          buttonKey.innerText = ' '
        }

        // Add the 'shortcut' (i.e. the QWERTY key)
        const shortcutSpan = document.createElement('span')
        shortcutSpan.innerText = ENGLISH_KEYBOARD.keys[key]
        buttonKey.appendChild(shortcutSpan)

        divRow.appendChild(buttonKey)
      })

      this.html.keyboard.appendChild(divRow)
    })

    // Some keyboards/languages write from right to left. Update the CSS style
    // for the text input field accordingly.
    this.html.input.style.direction = this.activeKeyboard.direction || 'ltr'
  }

  /*
  insertChar() inserts a single character to the (end of the) input text box.
   */
  insertChar (char) {
    // Find the position of the "text cursor" on the text input
    const startIndex = this.html.input.selectionStart
    const endIndex = this.html.input.selectionEnd

    // Minor trivia: if the text cursor has selected some text (e.g. a user
    // highlighted a word) then startIndex will not be the same as endIndex ;
    // otherwise, startIndex will be the same as endIndex.

    // Insert the new character where the text cursor is, OR replace the text
    // that the text cursor is selecting.
    const text = this.html.input.value
    const startText = text.substring(0, startIndex)
    const endText = text.substring(endIndex)
    this.html.input.value = startText + char + endText

    // Return focus to the input text box, and reset the "text cursor" to the
    // location where we just inserted the character
    this.html.input.focus()
    const focusIndex = startIndex + char.length
    this.html.input.setSelectionRange(focusIndex, focusIndex)
  }

  /*
  onKeyPress listens for keyboard input on the text input field.
   */
  onKeyPress (keyboardEvent) {
    // Get the key that the user just pressed
    const keyPressed = keyboardEvent.code

    // Note: there are different ways to get what the user typed into a text
    // field.
    // keyboardEvent.code corresponds to the PHYSICAL key on the keyboard.
    // keyboardEvent.key corresponds to the TEXT VALUE of the key.
    // If a user presses the 'A' key on a US-International QWERTY keyboard,
    // we get code='KeyA', and key='a' (if shift/capslock is off) or key='A'
    // (if shift/capslock is on)

    // Check to see if there's a character on the on-screen keyboard that
    // corresponds to the key the user just pressed. If yes, insert that
    // character.
    const char = this.activeKeyboard && this.activeKeyboard.keys[keyPressed]
    if (char) {
      this.insertChar(char)
      return stopEvent(keyboardEvent)
    }

    return true
  }
}

/*
Stops the default actions for an input event. For example, pressing the 'A' key
on a keyboard will insert the character 'a' into a text input field. If we want
to change the action so the 'A' key inserts the 'あ' character, we first need to
disable the default action.
 */
function stopEvent (e) {
  e.preventDefault && e.preventDefault()
  e.stopPropagation && e.stopPropagation()
  return false
}

/*
English Keyboard + QWERTY Layout: defines the baseline US-International QWERTY
keyboard that we assume each user is using.
 */
const ENGLISH_KEYBOARD = {
  direction: 'ltr',
  keys: {
    'KeyQ': 'Q',
    'KeyW': 'W',
    'KeyE': 'E',
    'KeyR': 'R',
    'KeyT': 'T',
    'KeyY': 'Y',
    'KeyU': 'U',
    'KeyI': 'I',
    'KeyO': 'O',
    'KeyP': 'P',
    'BracketLeft': '[',
    'BracketRight': ']',
    // --------
    'KeyA': 'A',
    'KeyS': 'S',
    'KeyD': 'D',
    'KeyF': 'F',
    'KeyG': 'G',
    'KeyH': 'H',
    'KeyJ': 'J',
    'KeyK': 'K',
    'KeyL': 'L',
    'Semicolon': ';',
    'Quote': '\'',
    // --------
    'KeyZ': 'Z',
    'KeyX': 'X',
    'KeyC': 'C',
    'KeyV': 'V',
    'KeyB': 'B',
    'KeyN': 'N',
    'KeyM': 'M',
    'Comma': ',',
    'Period': '.',
    'Slash': '/',
  }
}
const QWERTY_LAYOUT = [
  [ 'KeyQ', 'KeyW', 'KeyE', 'KeyR', 'KeyT', 'KeyY', 'KeyU', 'KeyI', 'KeyO', 'KeyP', 'BracketLeft', 'BracketRight' ],
  [ 'KeyA', 'KeyS', 'KeyD', 'KeyF', 'KeyG', 'KeyH', 'KeyJ', 'KeyK', 'KeyL', 'Semicolon', 'Quote' ],
  [ 'KeyZ', 'KeyX', 'KeyC', 'KeyV', 'KeyB', 'KeyN', 'KeyM', 'Comma', 'Period', 'Slash' ]
]

/*
Hebrew Keyboard: translates key presses on a US-International QWERTY keyboard
into Hebrew characters.
 */
const HEBREW_KEYBOARD = {
  direction: 'rtl',
  keys: {
    // 'KeyQ': 'Q',
    // 'KeyW': 'W',
    'KeyE': 'ק',  // Qof
    'KeyR': 'ר',  // Resh
    'KeyT': 'א',  // Alef
    'KeyY': 'ט',  // Tet
    'KeyU': 'ו',  // Waw/Vav
    'KeyI': 'ן',  // Nun (2)
    'KeyO': 'ם',  // Mem (2)
    'KeyP': 'פ',  // Pe (1)
    // 'BracketLeft': '[',
    // 'BracketRight': ']',
    // --------
    'KeyA': 'ש',  // Shin
    'KeyS': 'ד',  // Dalet
    'KeyD': 'ג',  // Gimel
    'KeyF': 'כ',  // Kaf
    'KeyG': 'ע',  // Ayin
    'KeyH': 'י',  // Yod
    'KeyJ': 'ח',  // Chet
    'KeyK': 'ל',  // Lamed
    'KeyL': 'ך',  // Kaf
    'Semicolon': 'ף',  // Pe (2)
    // 'Quote': '\'',
    // --------
    'KeyZ': 'ז',  // Zayin
    'KeyX': 'ס',  // Samech
    'KeyC': 'ב',  // Bet
    'KeyV': 'ה',  // He
    'KeyB': 'נ',  // Nun (1)
    'KeyN': 'מ',  // Mem (1)
    'KeyM': 'צ',  // Tsadik (1)
    'Comma': 'ת',  // Tav
    'Period': 'ץ',  // Tsadik (2)
    'Slash': 'ﭏ',  // Alef-lamed
  },
  // The following contains info on how to map each character (i.e. data) with a
  // visual reference (i.e. image) of how the character looks like in a
  // real-world manuscript written by human hands. (i.e. the Hebrew script)
  visualScripts: {
    'Byzantine Cursive': 'images/byzantine-cursive.jpg',
    'Byzantine Minuscule': 'images/byzantine-minuscule.jpg',
    'Byzantine Square': 'images/byzantine-square.jpg',
    'Maghrebi Cursive': 'images/maghrebi-cursive.jpg',
    'Maghrebi Square': 'images/maghrebi-square.jpg',
    'Yemenite Minuscule': 'images/yemenite-minuscule.jpg',
    'Yemenite Square': 'images/yemenite-square.jpg',
    'none': undefined,
  },
  // To keep things simple, each image file (representing a Hebrew script and
  // containing an instance of every handwritten character) follows a specific
  // visual layout. For example, each handwritten Hebrew character's image is a
  // 50x50px square located at specific x-y coordinates. This consistency allows
  // us to use a CSS technique known as "image sprites" to package multiple
  // character images into one file, which in turn lets us rapidly add new
  // visual guides for different styles of Hebrew scripts.
  visualScriptLayout: {
    'ק': { x: 440, y: 256 },  // Qof
    'ר': { x: 330, y: 256 },  // Resh
    'א': { x: 440, y: 0 },  // Alef
    'ט': { x: 110, y: 64 },  // Tet
    'ו': { x: 275, y: 64 },  // Waw/Vav
    'ן': { x: 385, y: 192 },  // Nun (2)
    'ם': { x: 55, y: 128 },  // Mem (2)
    'פ': { x: 165, y: 192 },  // Pe (1)
    // --------
    'ש': { x: 220, y: 256 },  // Shin
    'ד': { x: 55, y: 0 },  // Dalet
    'ג': { x: 110, y: 0 },  // Gimel
    'כ': { x: 0, y: 64 },  // Kaf (1)
    'ע': { x: 275, y: 192 },  // Ayin
    'י': { x: 55, y: 64 },  // Yod
    'ח': { x: 165, y: 64 },  // Chet
    'ל': { x: 275, y: 128 },  // Lamed
    'ך': { x: 440, y: 128 },  // Kaf (2)
    'ף': { x: 110, y: 192 },  // Pe (2)
    // --------
    'ז': { x: 220, y: 64 },  // Zayin
    'ס': { x: 55, y: 128 },  // Samech
    'ב': { x: 220, y: 0 },  // Bet
    'ה': { x: 440, y: 64 },  // He
    'נ': { x: 440, y: 192 },  // Nun (1)
    'מ': { x: 110, y: 256 },  // Mem (1)
    'צ': { x: 55, y: 192 },  // Tsadik (1)
    'ת': { x: 110, y: 256 },  // Tav
    'ץ': { x: 0, y: 192 },  // Tsadik (2)
    'ﭏ': { x: 330, y: 0 },  // Alef-lamed
  },
}

/*
Emoji Keyboard: a joke keyboard to demonstrate how easy it is to add map keys
to characters of any 'language'.
 */
const EMOJI_KEYBOARD = {
  direction: 'ltr',
  keys: {
    'KeyQ': '😃',
    'KeyW': '😅',
    'KeyE': '🤣',
    'KeyR': '🥰',
    'KeyT': '😉',
    'KeyY': '😂',
    'KeyU': '🥵',
    'KeyI': '🥶',
    'KeyO': '😍',
    'KeyP': '😵',
    'BracketLeft': '🎉',
    'BracketRight': '🍎',
    // --------
    'KeyA': '🐈',
    'KeyS': '🐕',
    'KeyD': '🐒',
    'KeyF': '🕊️',
    'KeyG': '🐓',
    'KeyH': '🐟',
    'KeyJ': '🐙',
    'KeyK': '🦑',
    'KeyL': '🦋',
    'Semicolon': '🔥',
    'Quote': '💧',
    // --------
    'KeyZ': '❤️',
    'KeyX': '🧡',
    'KeyC': '💛',
    'KeyV': '💚',
    'KeyB': '💙',
    'KeyN': '💜',
    'KeyM': '🤎',
    'Comma': '🖤',
    'Period': '🤍',
    'Slash': '💌',
  }
}

const KEYBOARDS = {
  '(No keyboard)': undefined,
  'English': ENGLISH_KEYBOARD,
  'Hebrew': HEBREW_KEYBOARD,
  'Emoji': EMOJI_KEYBOARD,
}

var app = new KeyboardApp()  // Let's start the app!
</script>
</html>
While it’s now trivial to add new scripts from a code perspective, please remember that it still takes a considerable amount of effort to create each individual script’s JPEG. (So developers, please remember to thank the people who’ve been scanning the manuscripts, manually identifying the handwritten characters, and putting them into a nice image file for us.)
Below, you can see three different Hebrew scripts that we used. You’ll note that while we made an effort to keep the visual layout, character position, and character size consistent across every style of script, some scripts are missing certain characters. For example, both Maghrebi Cursive and Byzantine Miniscule don’t have a visual reference for the “elongated Kaf” ך character. In these cases, we simply didn’t have a visual reference from the source.
Visual Hebrew script reference for Yemenite Square.
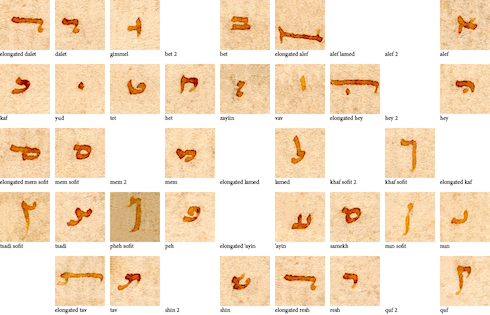
Visual Hebrew script reference for Byzantine Minuscule.
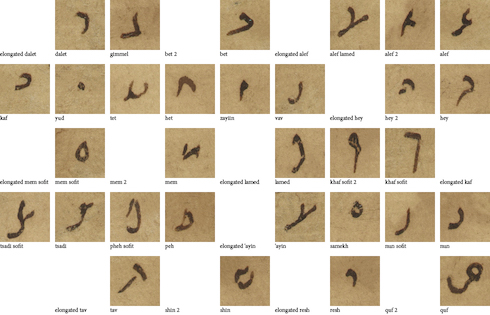
Visual Hebrew script reference for Maghrebi Cursive.
In the case of Scribes, creating the Sorting workflow was not part of the original project goals. Including the workflow meant that there would be another large set of project results, in addition to the transcription data being generated, that the Penn team would need to manage. It also meant that our team would have to consider how best to move data from the Sorting workflow into the appropriate Transcription workflows based on how the data was classified. Yes, this choice has resulted in more work for all of us, but it is also by far the most popular workflow on the project, with more than 325,000 classifications generated since Scribes launched in August 2017.
An early review of the Sorting workflow data showed that for a majority of the fragments, volunteers were in one hundred percent agreement about which category best represented the scripts being used in the fragment (Hebrew, Arabic, both, no text).
The Sorting workflow and the clickable keyboards are both examples of how creating projects that are truly catered to nonspecialists requires teams to actually include public engagement as a goal and priority, instead of allowing it to be a secondary outcome to data generation. This prioritization requires serious time and effort. In particular, it requires a rejection of the common narrative around crowdsourcing as being a way to save time and energy, or a good option for under-resourced institutions who don’t have staff time to process data. Crowdsourcing is never a case of building a project and letting volunteers come to you. Scribes has succeeded in attracting a broad volunteer base because we built the project intentionally, with them in mind.
Paleography and manuscript transcription have traditionally been the purview of specialists, only accessible to those with institutional access and the skills to be trusted with fragile physical resources. By opening up a complex task to a broad, nonspecialist audience through collaborative, human-centered design, Scribes says to the public, “We trust you, we appreciate your help, and we worked hard to create a space that will support you.” We ended up with a space that “strangers” to the field could explore without feeling lost.
And it worked. An early review of the Sorting workflow data showed that for a majority of the fragments, volunteers were in one hundred percent agreement about which category best represented the scripts being used in the fragment (Hebrew, Arabic, both, no text). As Penn team member Emily Esten notes in a blog post about these results, “That’s impressive, considering the range of expertise from our volunteer base. For volunteers who had no experience at all, this means your best guess contributed to the community of knowledge and was, more likely than not, in agreement with others.”18 For public crowdsourcing projects, this is the best possible outcome: useful results created by a community of volunteers who don’t feel like they need special credentials to take part, and who can then see their collective effort taking shape as a meaningful contribution to research. From “strangers in a landscape” to makers themselves.
Catherine D’Ignazio and Lauren F. Klein, Data Feminism (Cambridge: MIT Press, 2020), 133. ↩︎
We use “platform maintainers” in a capacious sense, encompassing all of the various skill sets and backgrounds that team members can bring to a successful digital humanities collaboration. The authors of this piece (core Zooniverse team members who worked on the Scribes of the Cairo Geniza front-end interface) have professional backgrounds in manuscript studies/digital humanities research, front-end development (x 2), and UX design, respectively. ↩︎
Zooniverse is the world’s largest platform for online crowdsourced research, often referred to as “citizen science” or “citizen research.” More than 2.3 million volunteers have registered on the platform since its founding in 2009. Zooniverse volunteers have collectively contributed more than 625 million classifications to over 350 projects, the results of which have been used in more than two hundred peer-reviewed publications. ↩︎
The Cairo Geniza is a corpus of hundreds of thousands of manuscript fragments, found in the Ben Ezra Synagogue of Fustat (Old Cairo). To learn about the fragments featured in Scribes of the Cairo Geniza, please see https://www.scribesofthecairogeniza.org/about#provenance. ↩︎
The project is led by the University of Pennsylvania Libraries and the Zooniverse team, in collaboration with an international cohort of Geniza researchers and image-sharing partner institutions. For a full list of partners, see https://www.scribesofthecairogeniza.org/about#partners ↩︎
For more about the project goals, see Laura Newman Eckstein, “Of Scribes and Scripts: Citizen Science and the Cairo Genizah,” Manuscript Studies 3, no.1 (2018), 208–14; and Emily Esten and Samantha Blickhan, “Scribes of the Cairo Geniza,” in Visualizing Objects, Places, and Spaces: A Digital Project Handbook (2021), https://doi.org/10.21428/51bee781.0afc1687. ↩︎
IMLS award number LG-71-16-0028-16. For an overview of the project goals, see Victoria Van Hyning, Samantha Blickhan, Laura Trouille, and Chris Lintott, “Transforming Libraries and Archives Through Crowdsourcing,” D-Lib Magazine 23, nos. 5/6 (2017), https://doi.org/10.1045/may2017-vanhyning. ↩︎
Scribes also features a clickable modern Arabic keyboard, but this piece will focus on creating the Hebrew keyboards since the majority of the fragments in the project thus far are written in Hebrew. ↩︎
Bill Endres, “A Literacy of Building: Making in the Digital Humanities,” in Making Things and Drawing Boundaries: Experiments in the Digital Humanities, ed. Jentery Sayers (Minneapolis: University of Minnesota Press, 2017), 44. ↩︎
For further detail on the Ancient Lives project, see https://zooniverseancientlives.wordpress.com/. ↩︎
A 2019 blog post by Emily Esten examines the languages found in the project so far, through an analysis of hashtags used in the project’s ‘Talk’ message boards. “#DataDeep Dive: Scripts & Languages of the Geniza,” Judaica DH at the Penn Libraries, April 23, 2019, https://medium.com/@judaicadh/datadeepdive-scripts-languages-of-the-geniza-22c64504d009. ↩︎
Many definitions of crowdsourcing in digital humanities include language that includes “meaningful” participation as a prerequisite. See, for example, Mia Ridge et al., The Collective Wisdom Handbook: Perspectives on Crowdsourcing in Cultural Heritage (2021), https://britishlibrary.pubpub.org/; Mia Ridge, ed., Crowdsourcing Our Cultural Heritage (Farnham: Ashgate Publishing, 2014). ↩︎
A full list of the initial questions (as well as a few that didn’t make the cut) is available, along with additional discussion around the creation of the Sorting phase, in Eckstein, “Of Scribes and Scripts.” ↩︎
This breakdown would later become the basis for user-facing resources in the project, including the Tutorial, Help Text, and Field Guide. ↩︎
“Scope creep” refers to the way that projects will often gradually expand while under construction, as ongoing design and development work leads to new ideas that were not included in the original scope (or, crucially, the budget). ↩︎
The Flesch-Kinkaid scale is a metric used to determine the difficulty of English-language writing. The Flesch-Kinkaid resource our team used for this project was https://goodcalculators.com/flesch-kincaid-calculator/. ↩︎
A full explanation of Zooniverse text transcription data aggregation practices is available in Samantha Blickhan et al., “Individual vs. Collaborative Methods of Crowdsourced Transcription,” in “Collecting, Preserving, and Disseminating Endangered Cultural Heritage for New Understandings through Multilingual Approaches,” eds. Amel Fraisse, Ronald Jenn, and Shelley Fisher Fishkin, special issue, Journal of Data Mining and Digital Humanities (2019), https://doi.org/10.46298/jdmdh.5759. “Zooniverse projects all follow the same general format: each item in a project, be it an image, audio or video file, is independently assessed by multiple individuals. The responses are then aggregated together for ‘consensus’ (typically majority rule).” Blickhan et. al, “Individual vs. Collaborative Methods,” 2. ↩︎
Emily Esten, “Reviewing Sorting Phase Data: Hebrew or Arabic Script?” Judaica DH at the Penn Libraries (blog), March 22, 2019, https://medium.com/@judaicadh/reviewing-phase-1-data-hebrew-or-arabic-script-a8ad3316fcbe. ↩︎