Transformations
Weave Derrida's References

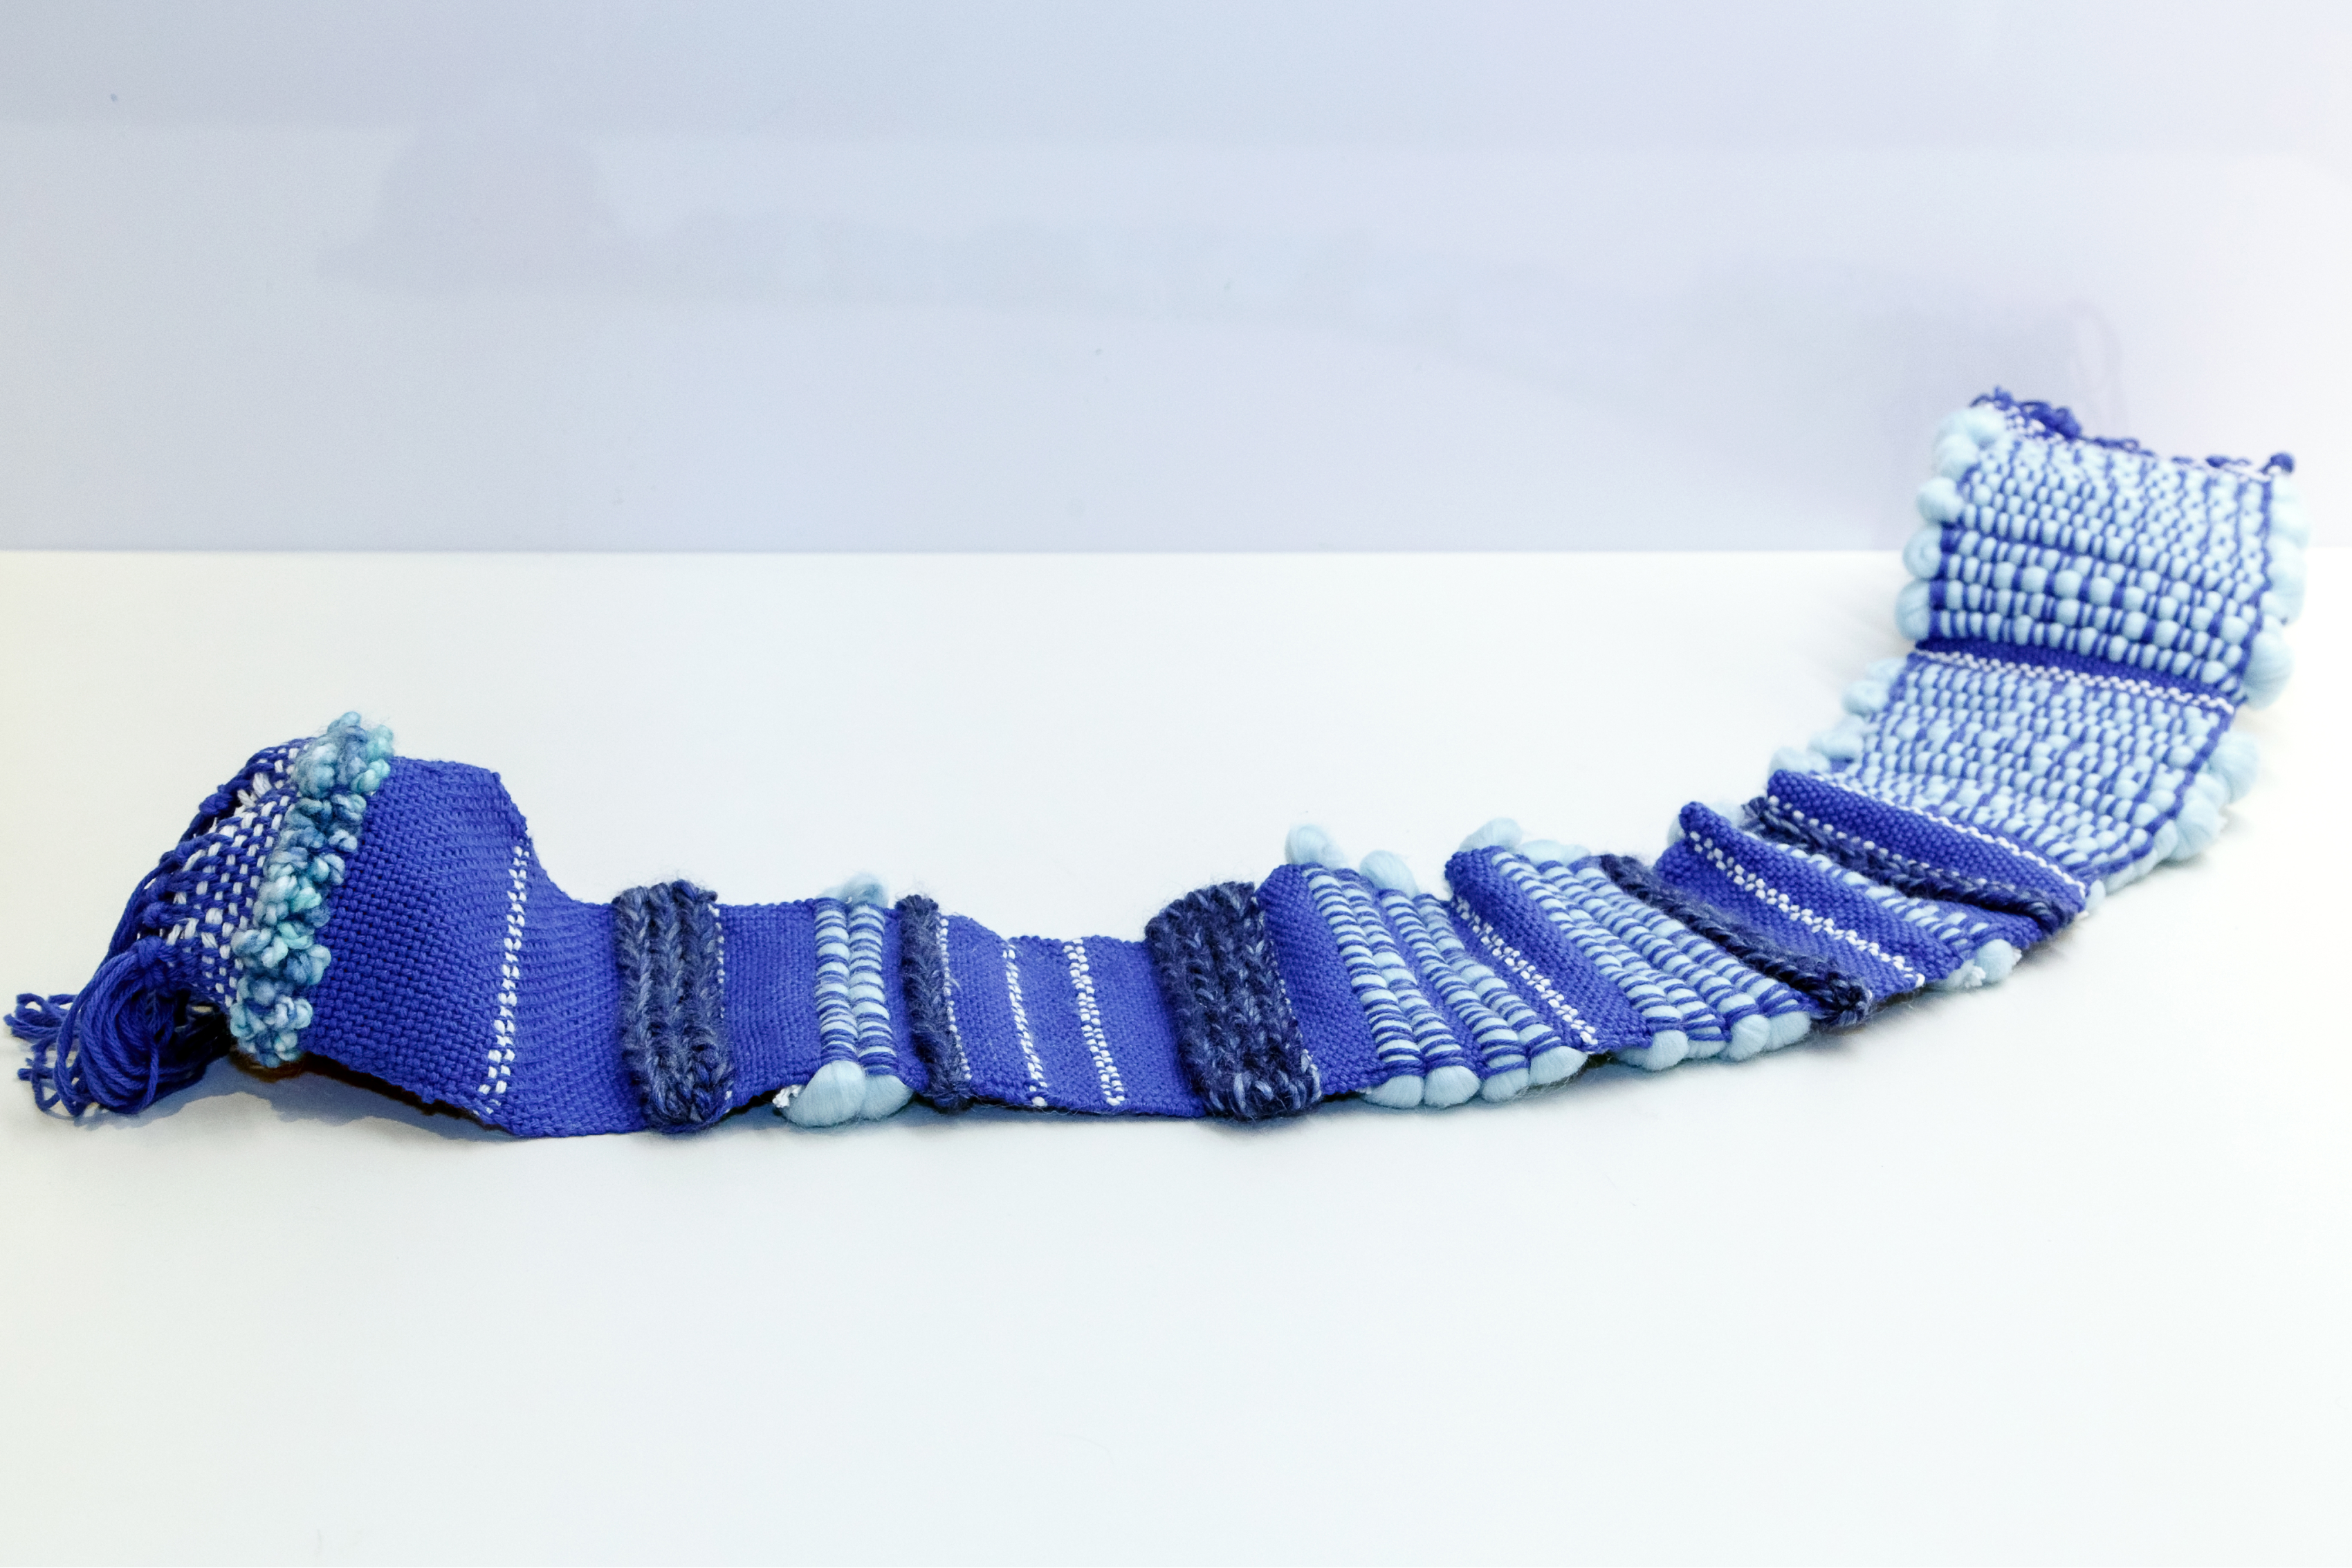
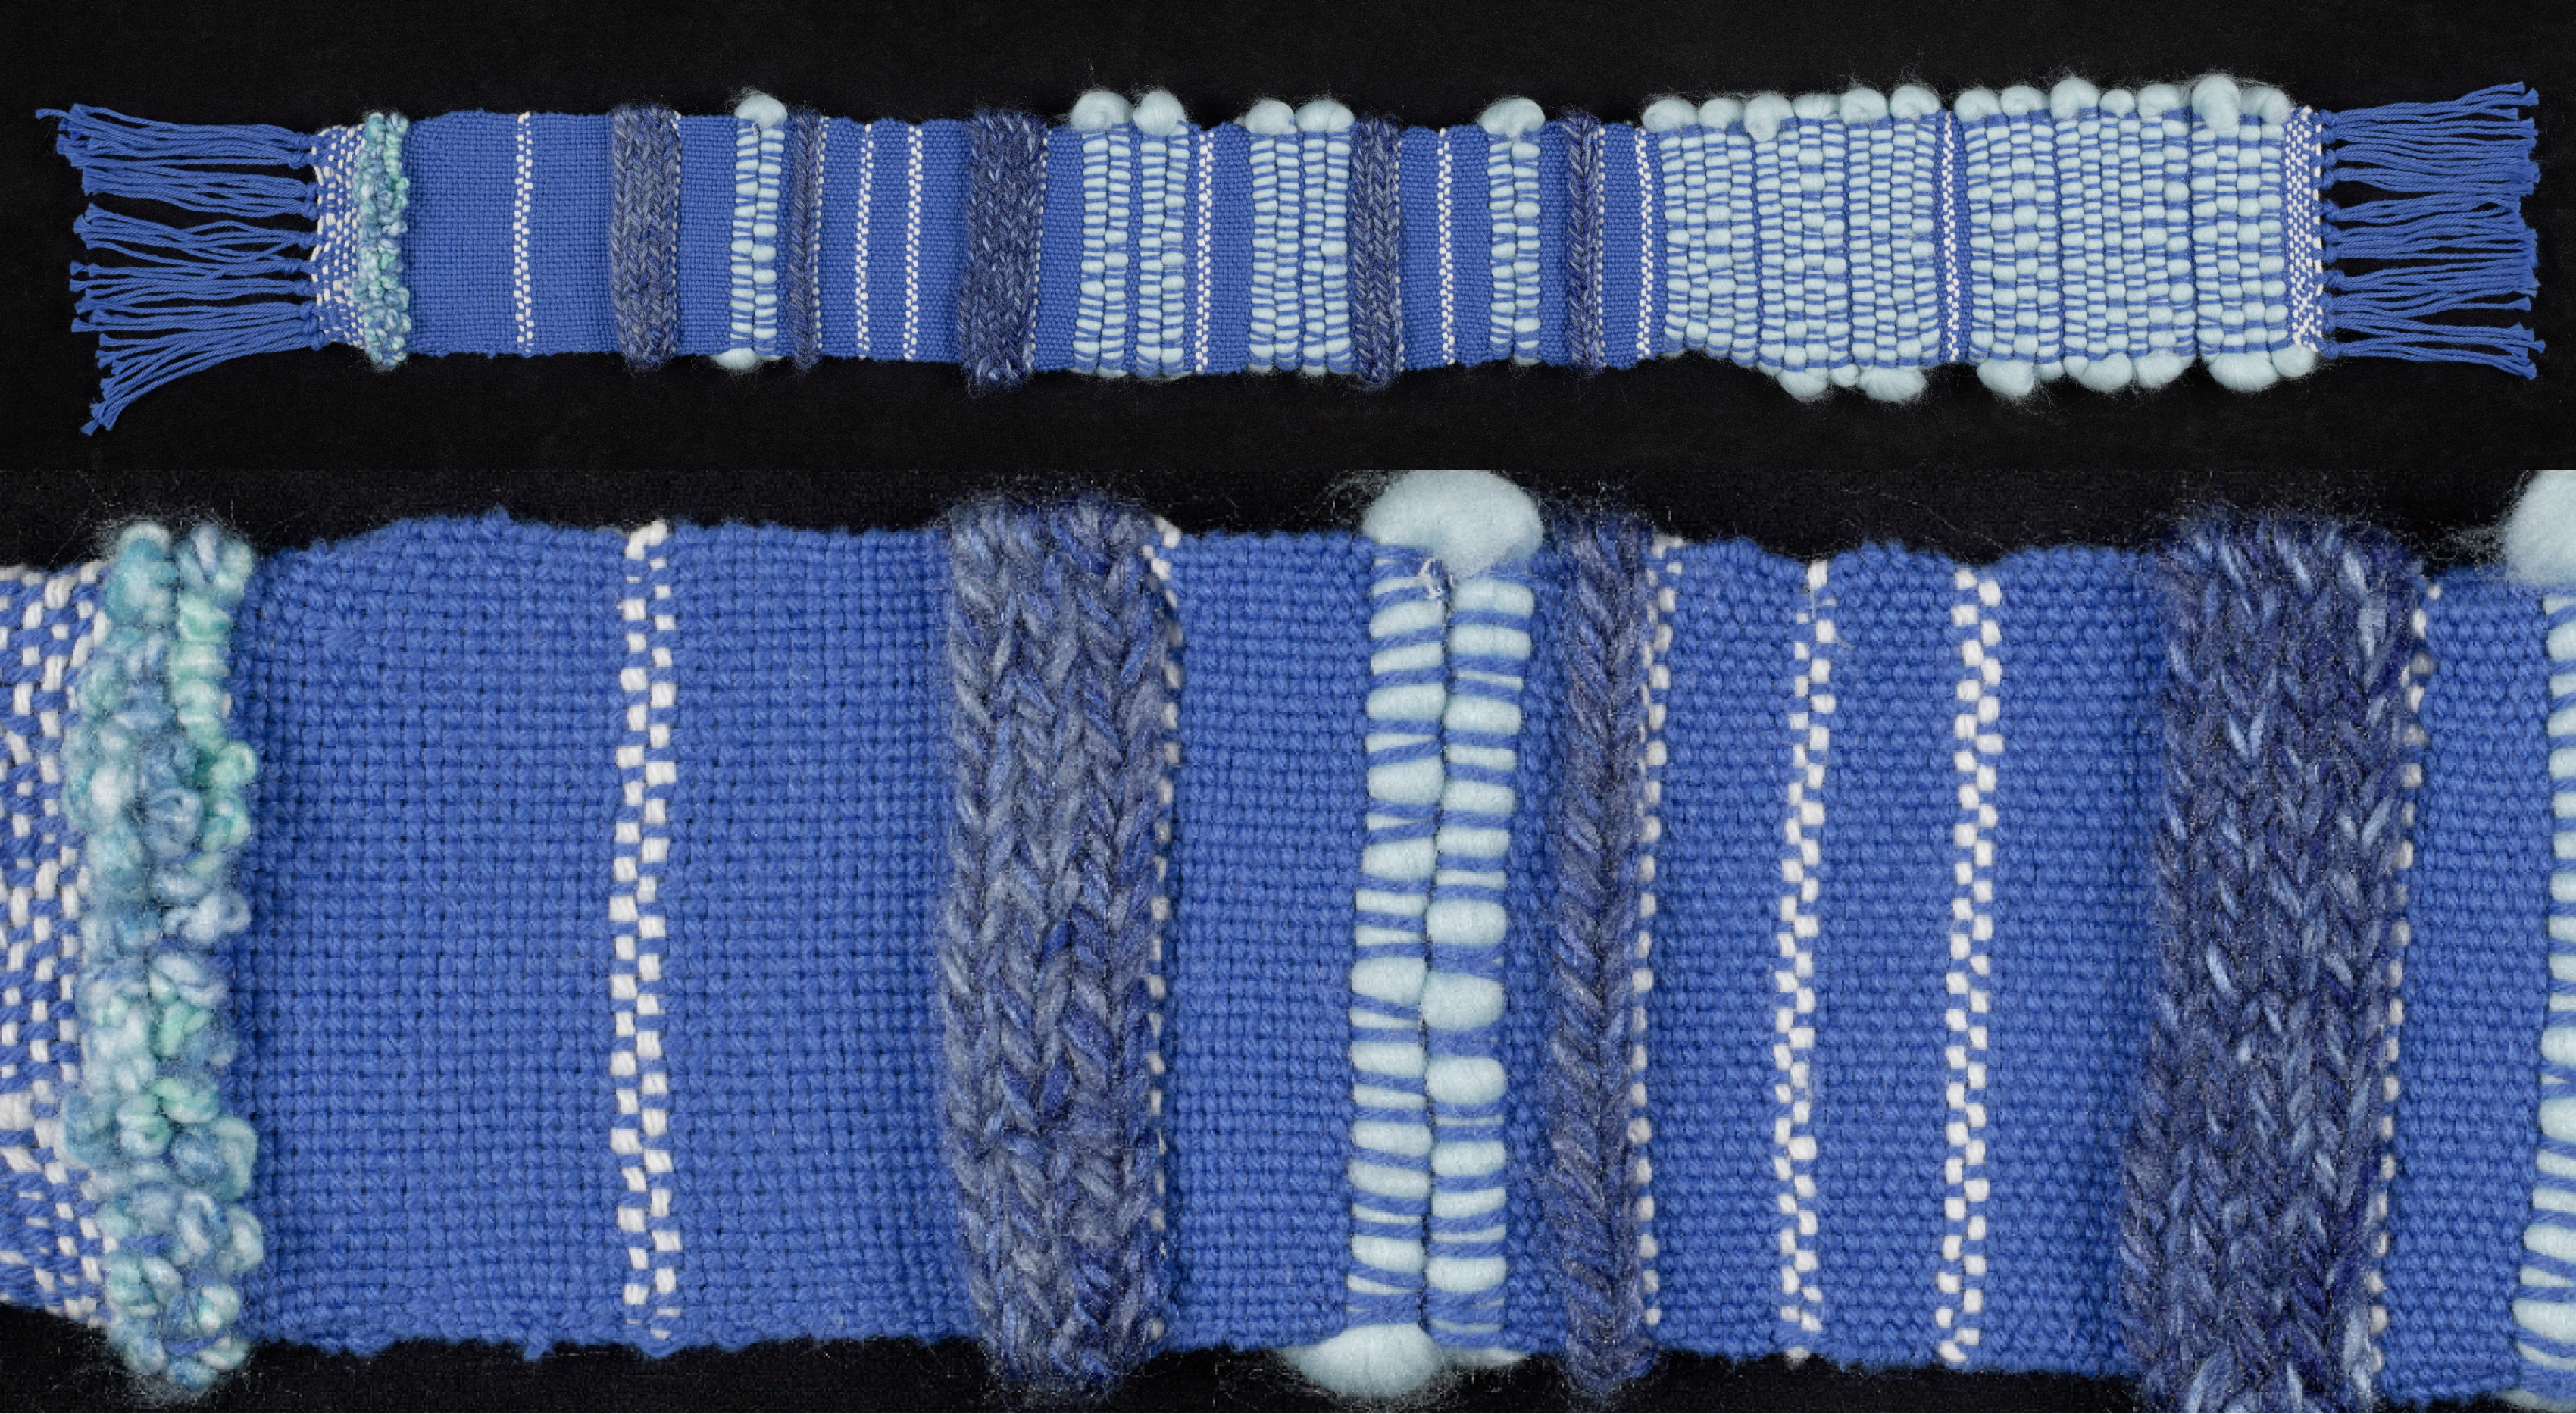
Completed weaving of the first thirteen pages of Derrida’s references in chapter 1 of de la Grammatologie.Photo by Shelley Szwast
Create your own data weaving of Derrida’s references in chapter 1 of de la Grammatologie, as described in Data Beyond Vision.
We invite you to participate in the embodiment and visible labor of data work. Download the following models and instructions, use your hands to recreate the data physicalizations we developed, or use them as inspiration to make your own interpretive objects. If you make any of these physicalizations, please share them on social media with the hashtag #DataBeyondVision.
Tools
- Loom – rigid heddle loom is recommended for beginners. DIY backstrap loom with a string heddle is also possible.
- Stick Shuttle (at least 1)1
- Scissors
- Long straw or thin dowel
- Yarn needle (optional)
Supplies
- 9 bundles of yarn of 6 different colors:
- 4 light (size 3), 2 different colors for plain text, page separator, and warp. Be sure to choose a sturdy, smooth yarn for your warp. Yarn with 2 strands is recommended for warp.2
- 1 bulky (size 5) – for epigraphs
- 2 super bulky (size 6), 2 different colors – for footnotes and citations
- 2 jumbo (size 7) – for quotations
Steps
- Let’s learn about some key points and terms on the loom, and how to set up the warp on the loom.
- Let’s learn about the weaving types used in this piece and what each represents in the “Weaving Types” section.
- Let’s weave the Derrida references page by page, covered in the “Pattern Guide for Weaving Derrida’s Margins.”
Yield
Weaving of the references in chapter one of Jacques Derrida’s de la Grammatologie (1967).
The online version of this essay includes an interactive deep zoom viewer displaying a high resolution version of this image.
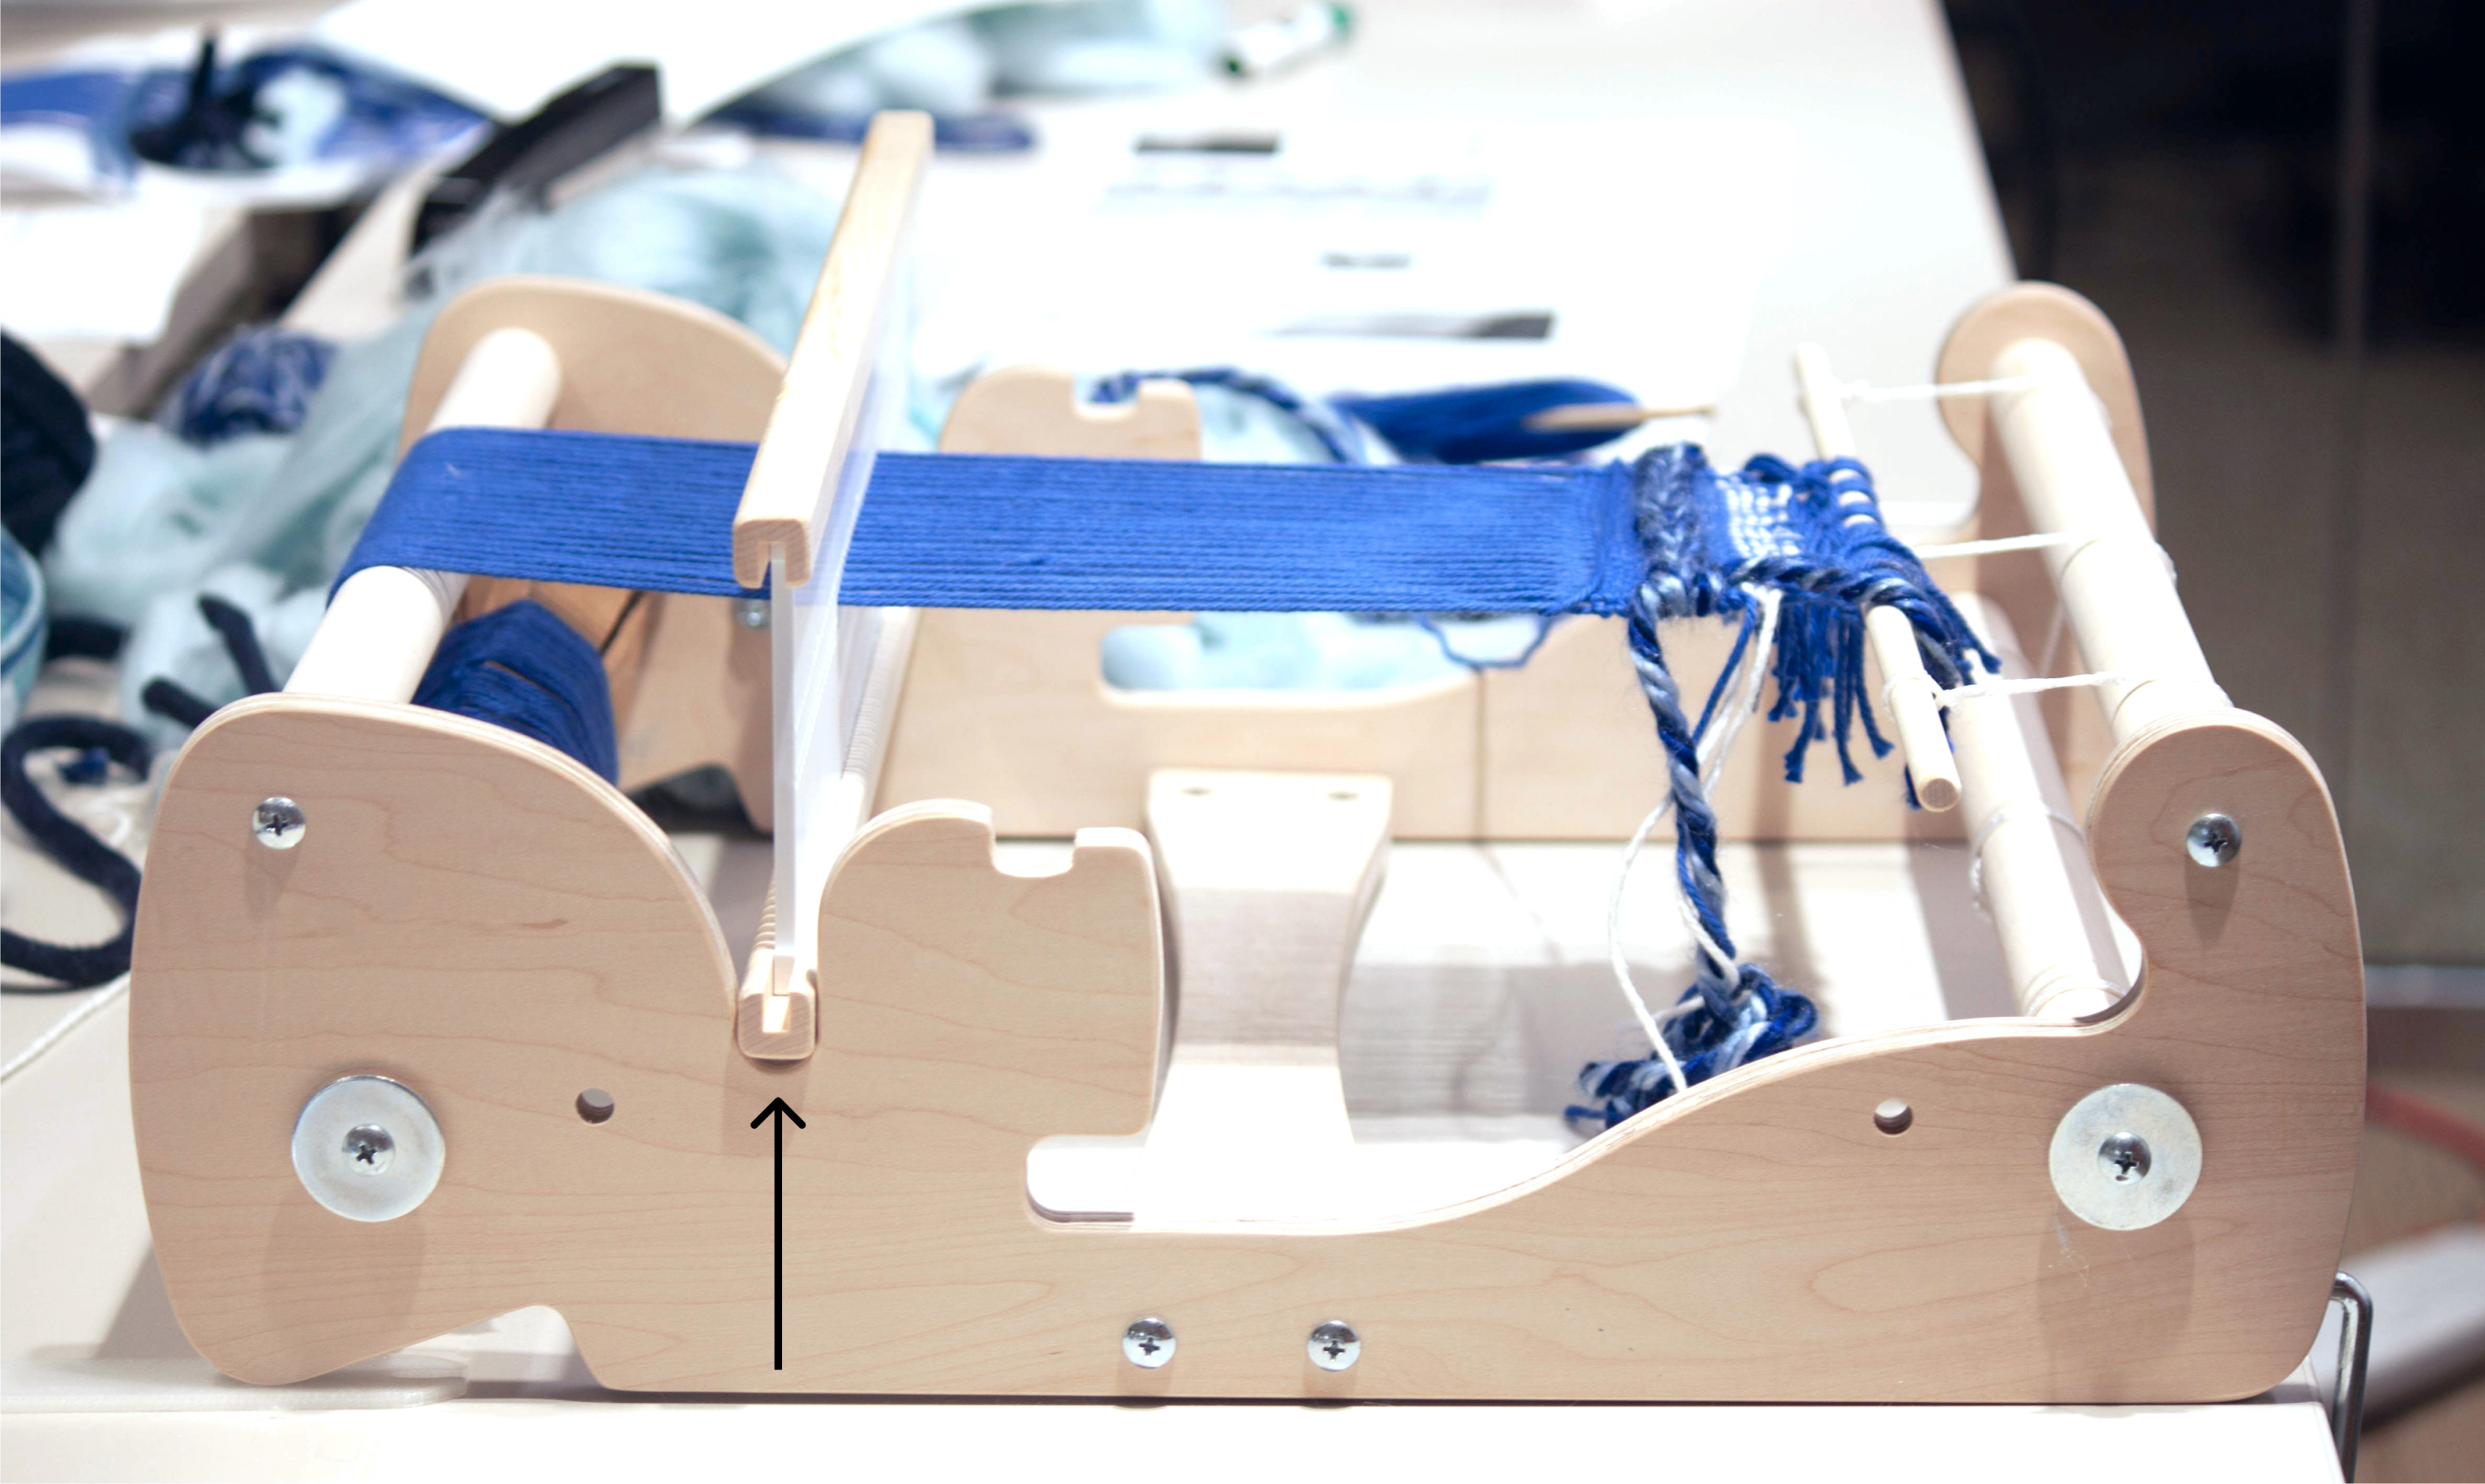
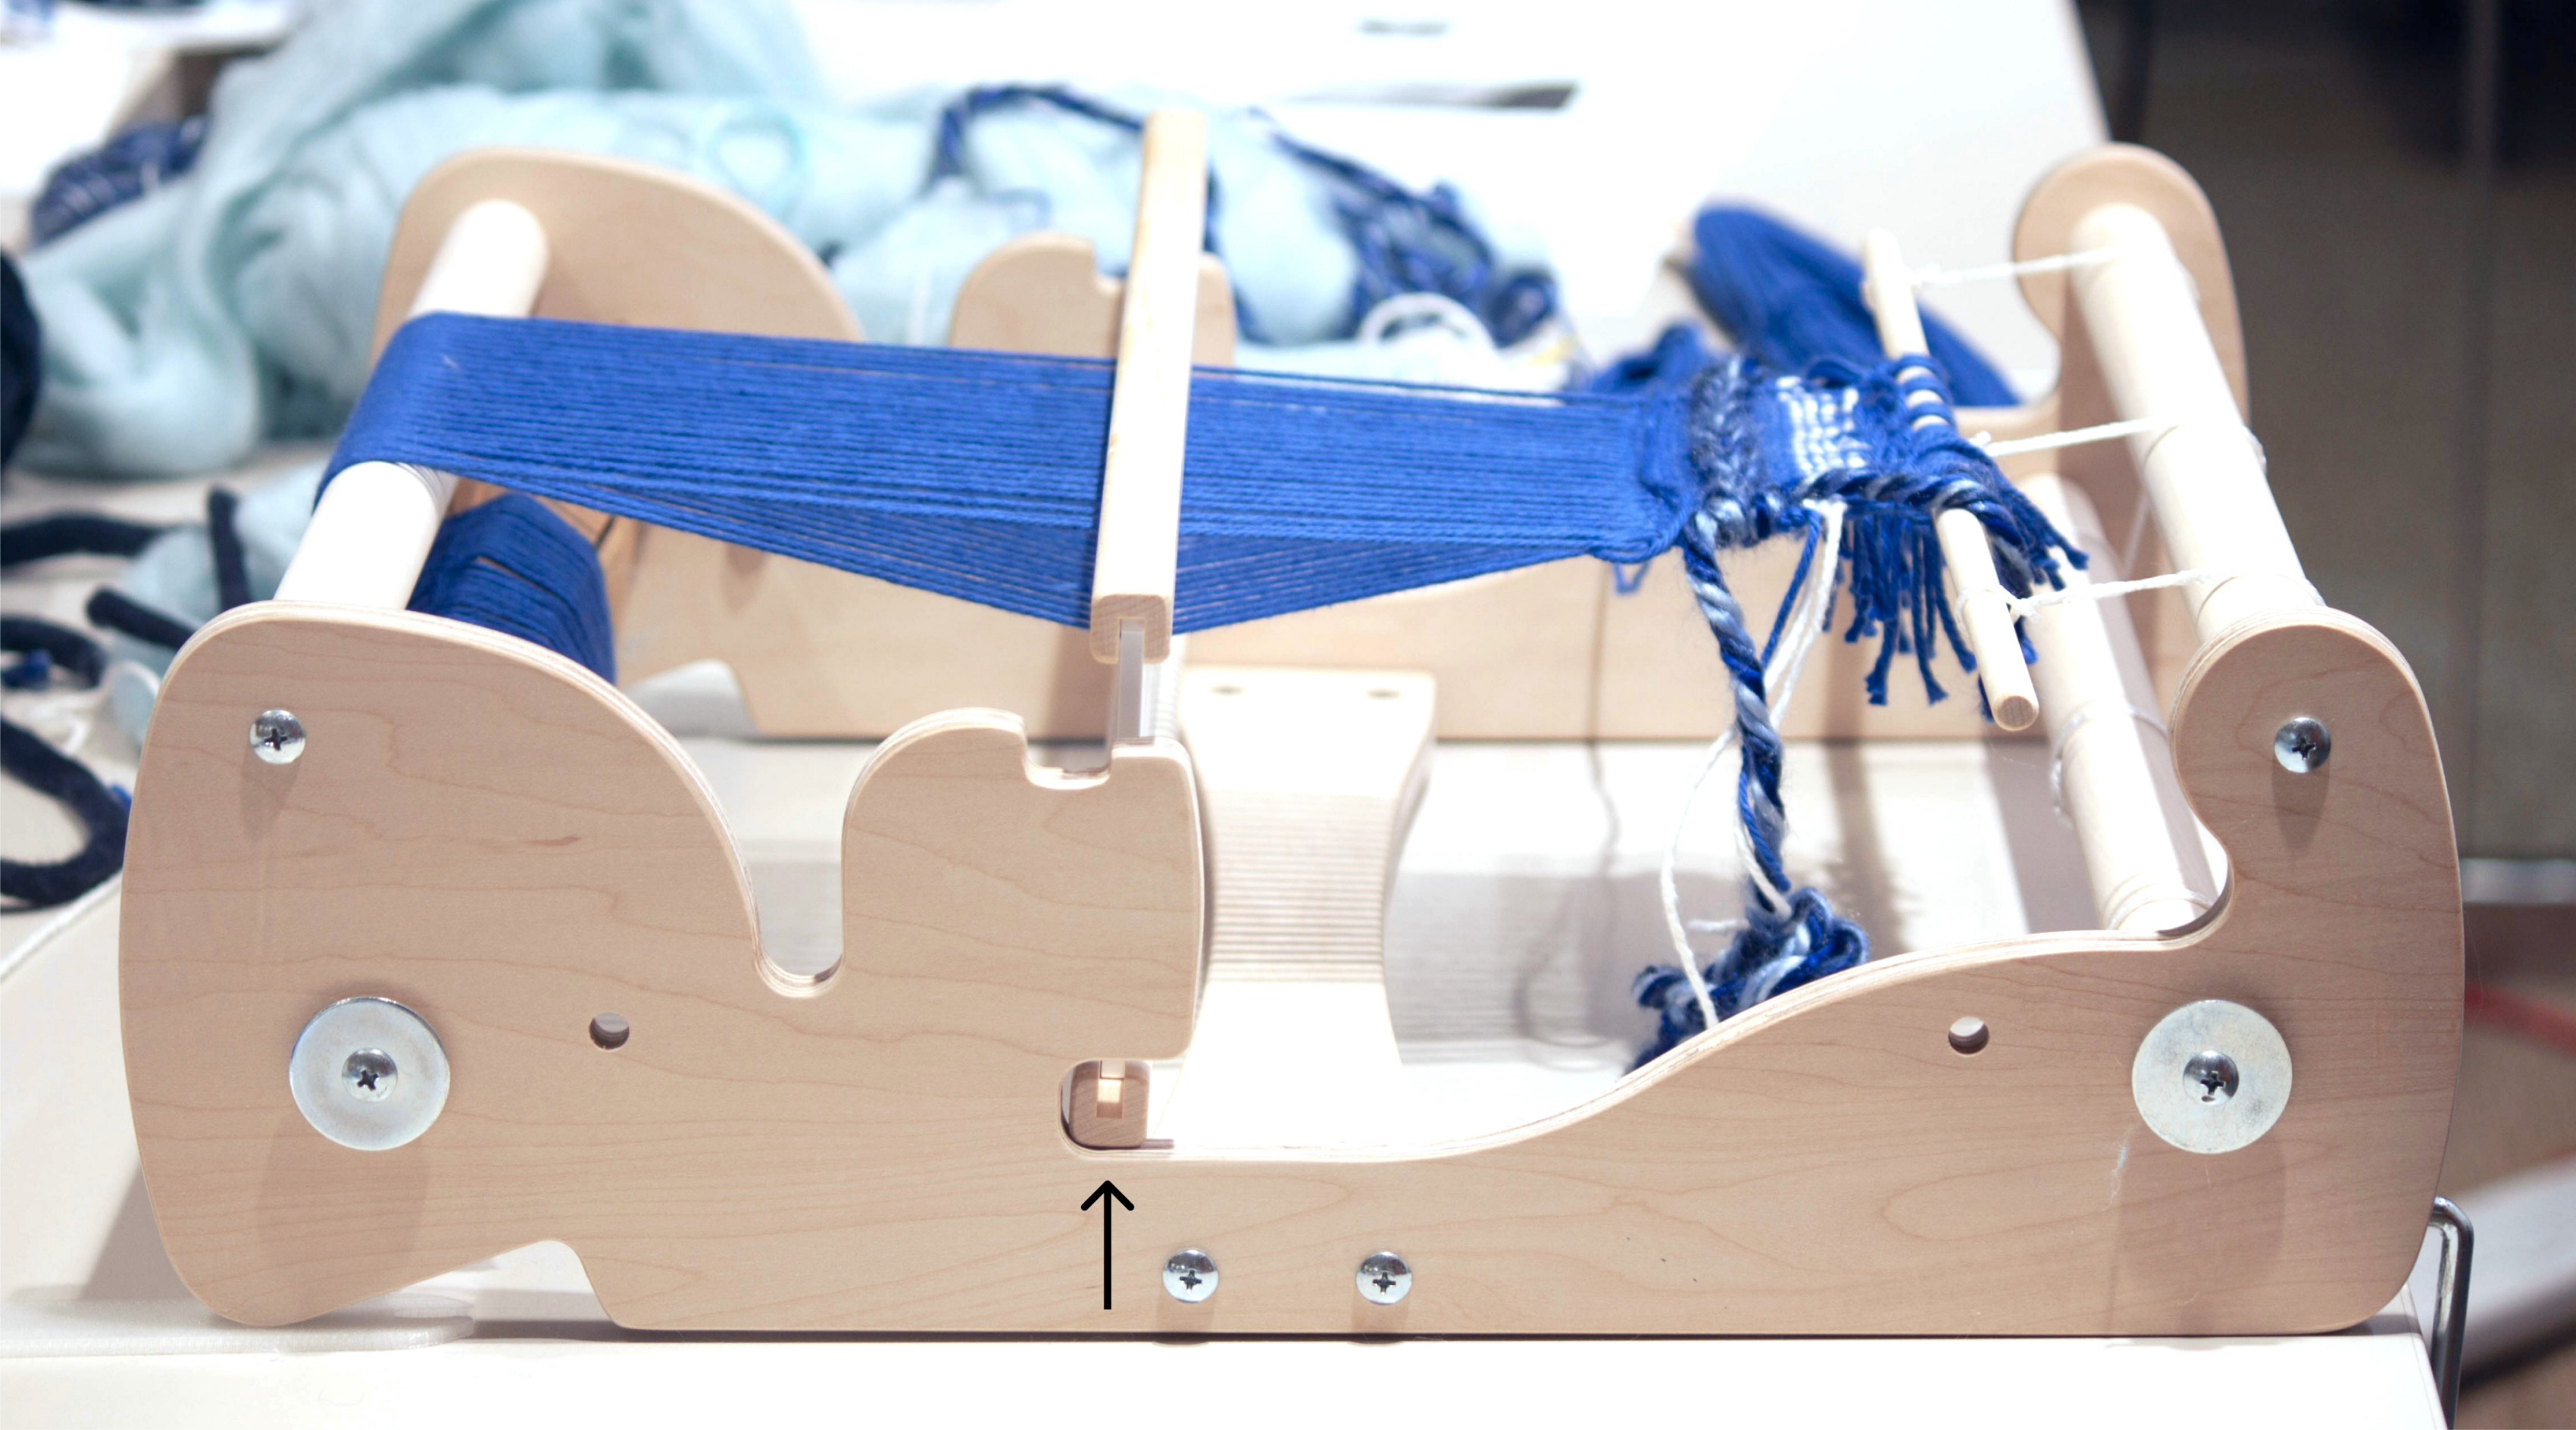
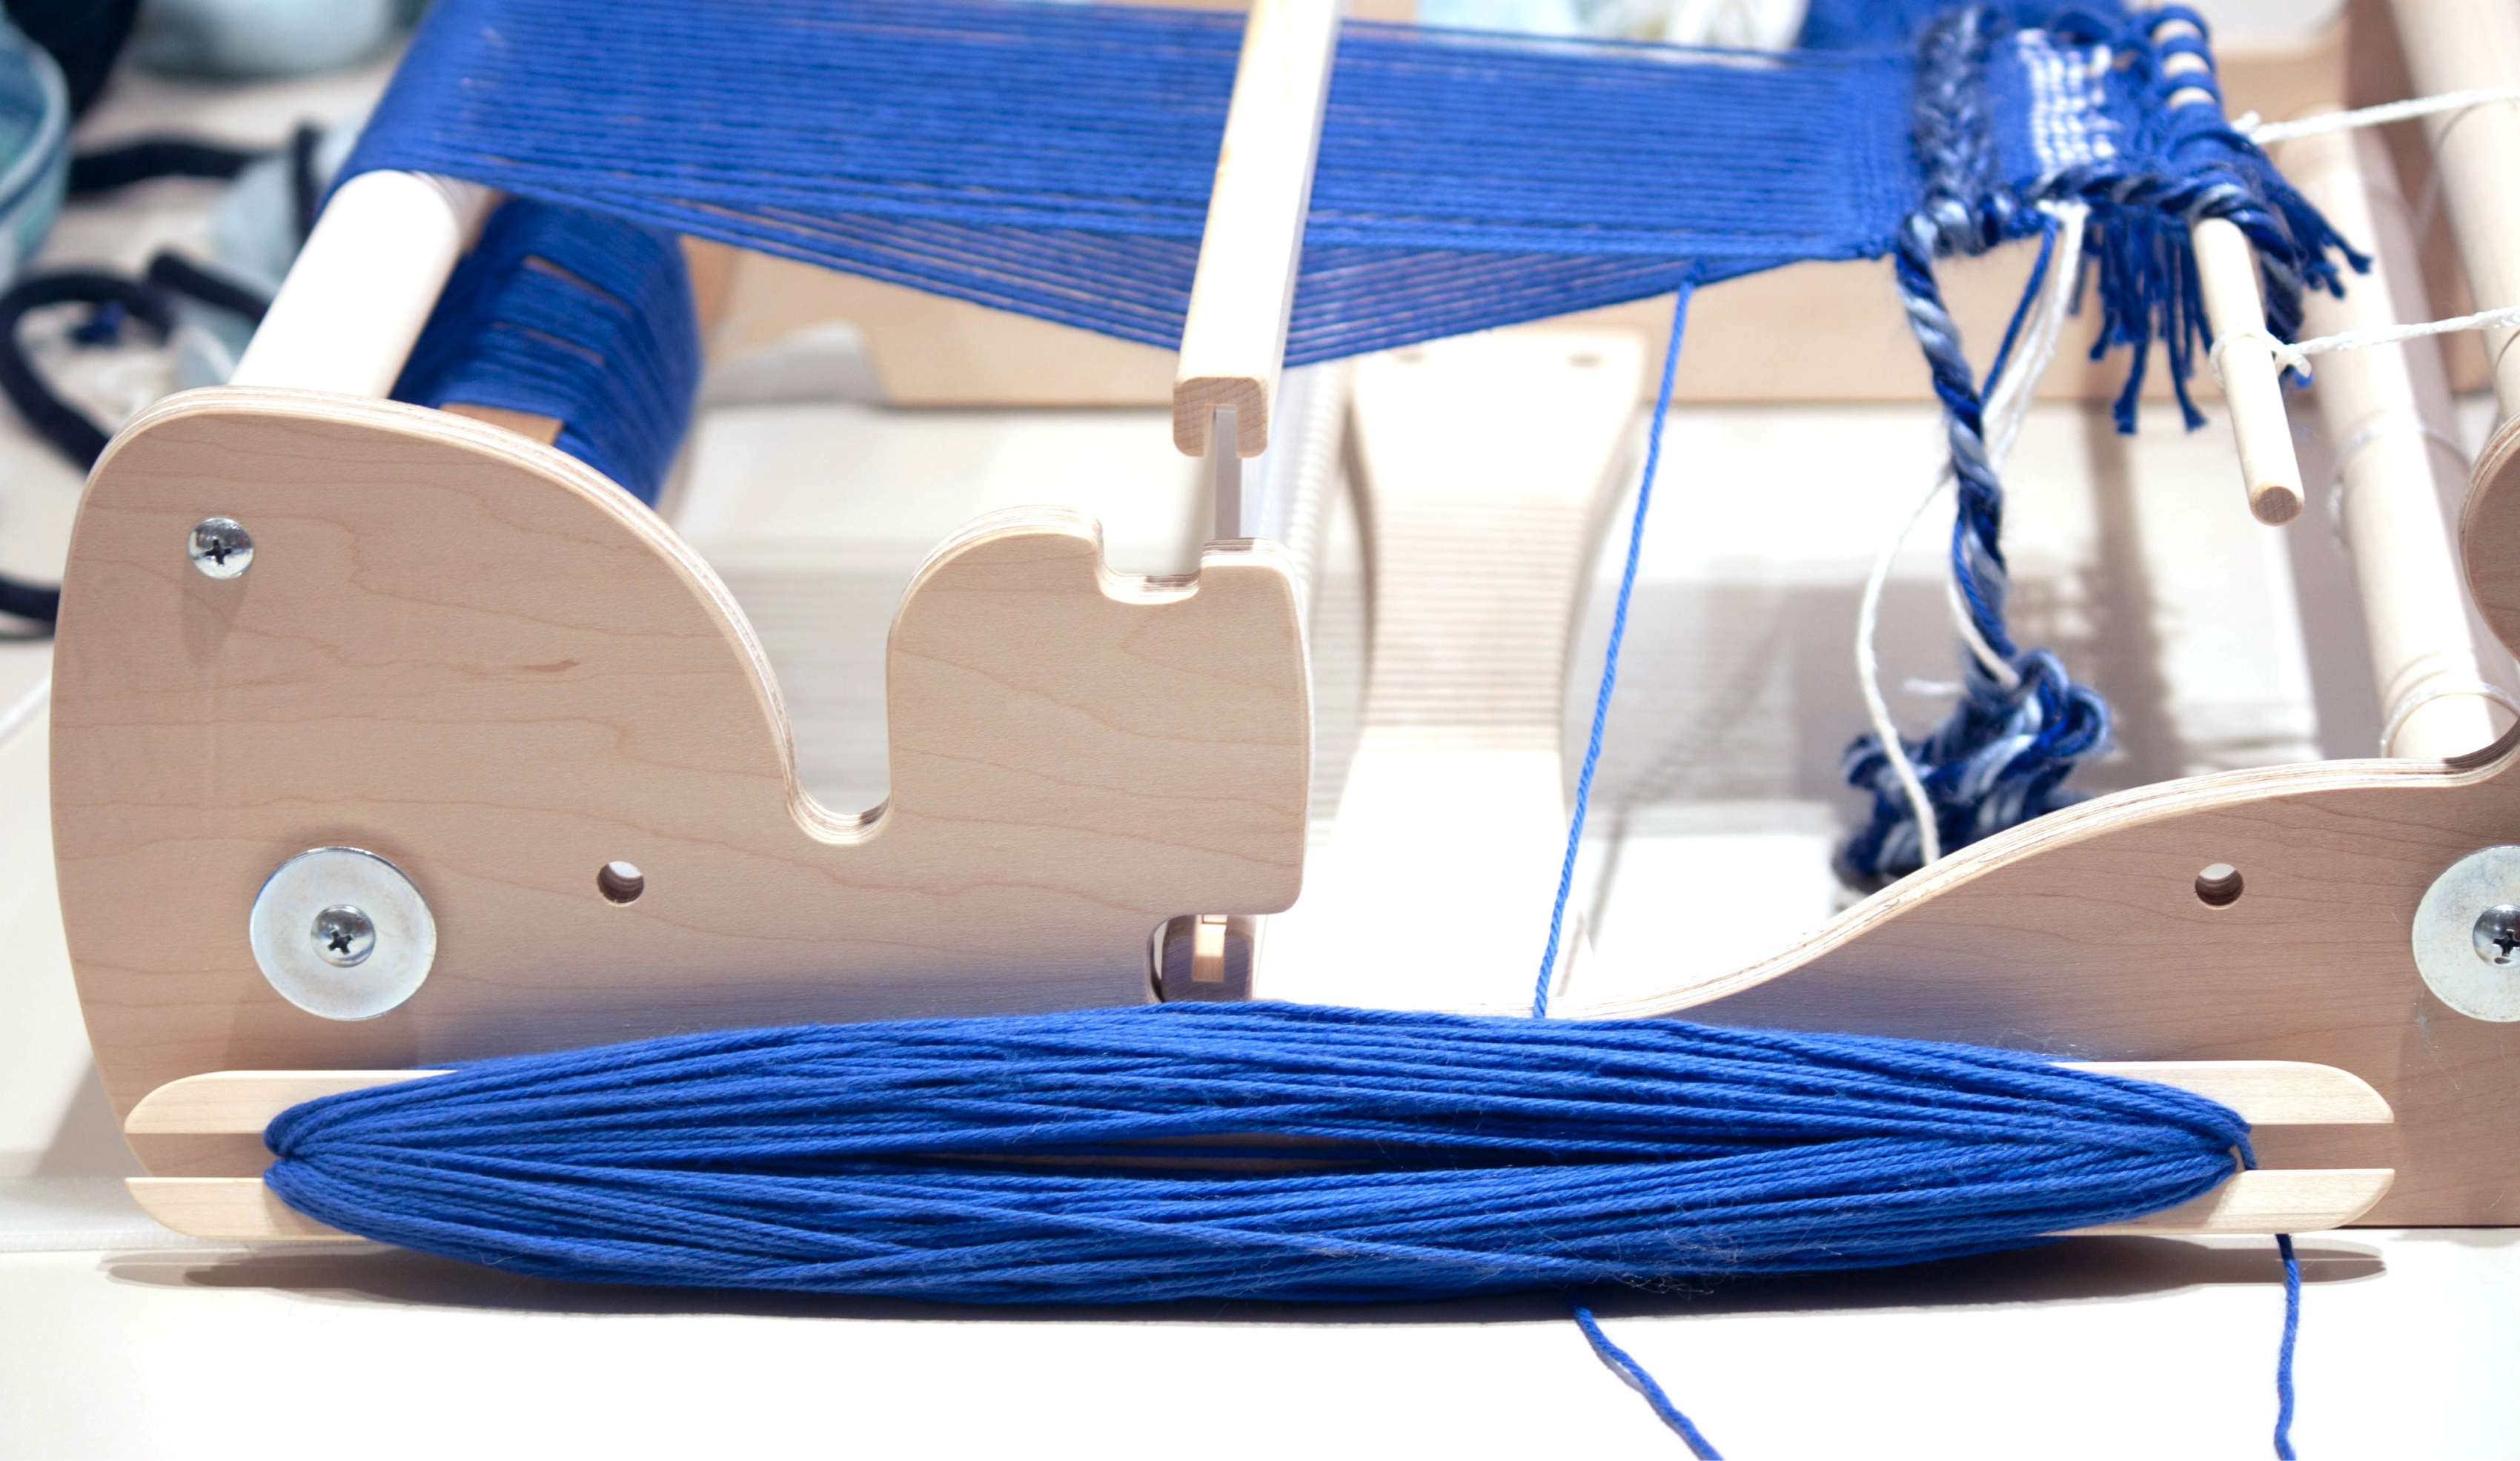
Key points about the Rigid Heddle Loom
Heddle in neutral position.Photo by Gissoo Doroudian, edited by Xinyi Li.
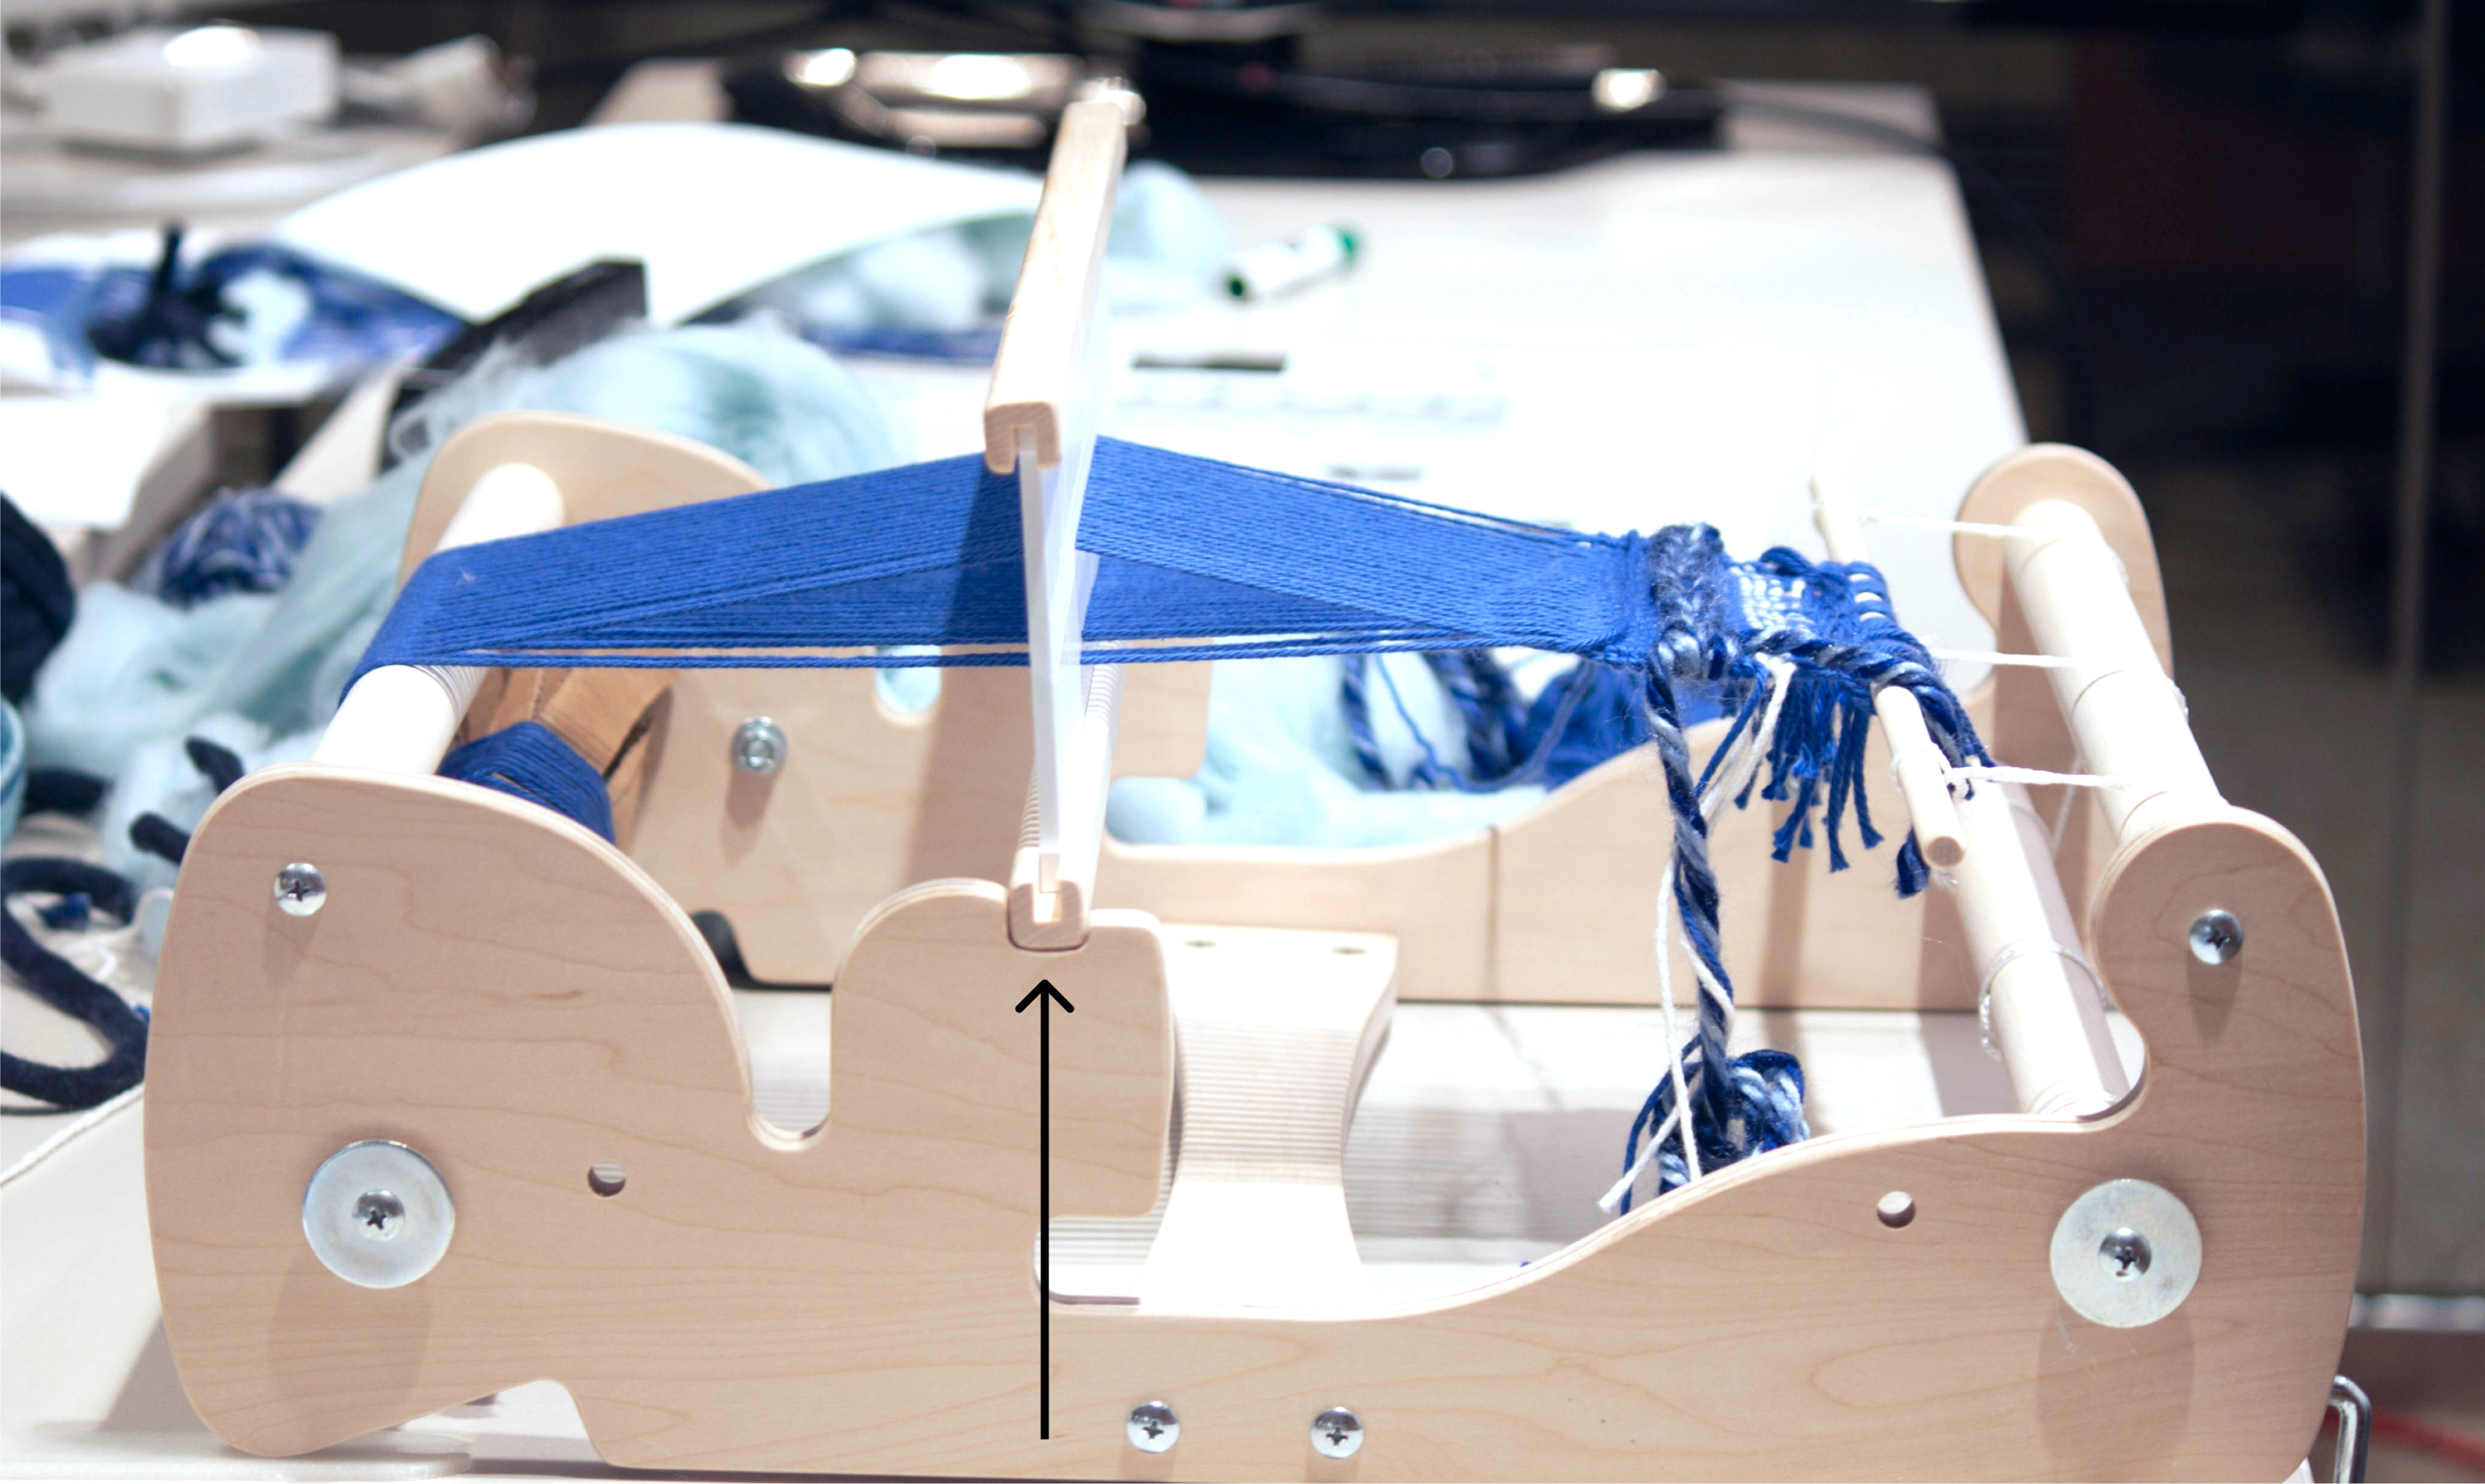
Heddle in upper position.Photo by Gissoo Doroudian, edited by Xinyi Li.
Heddle in lower position.Photo by Gissoo Doroudian, edited by Xinyi Li.
Shuttle, a tool used to pass the yarn through the warp.Photo by Gissoo Doroudian, edited by Xinyi Li.
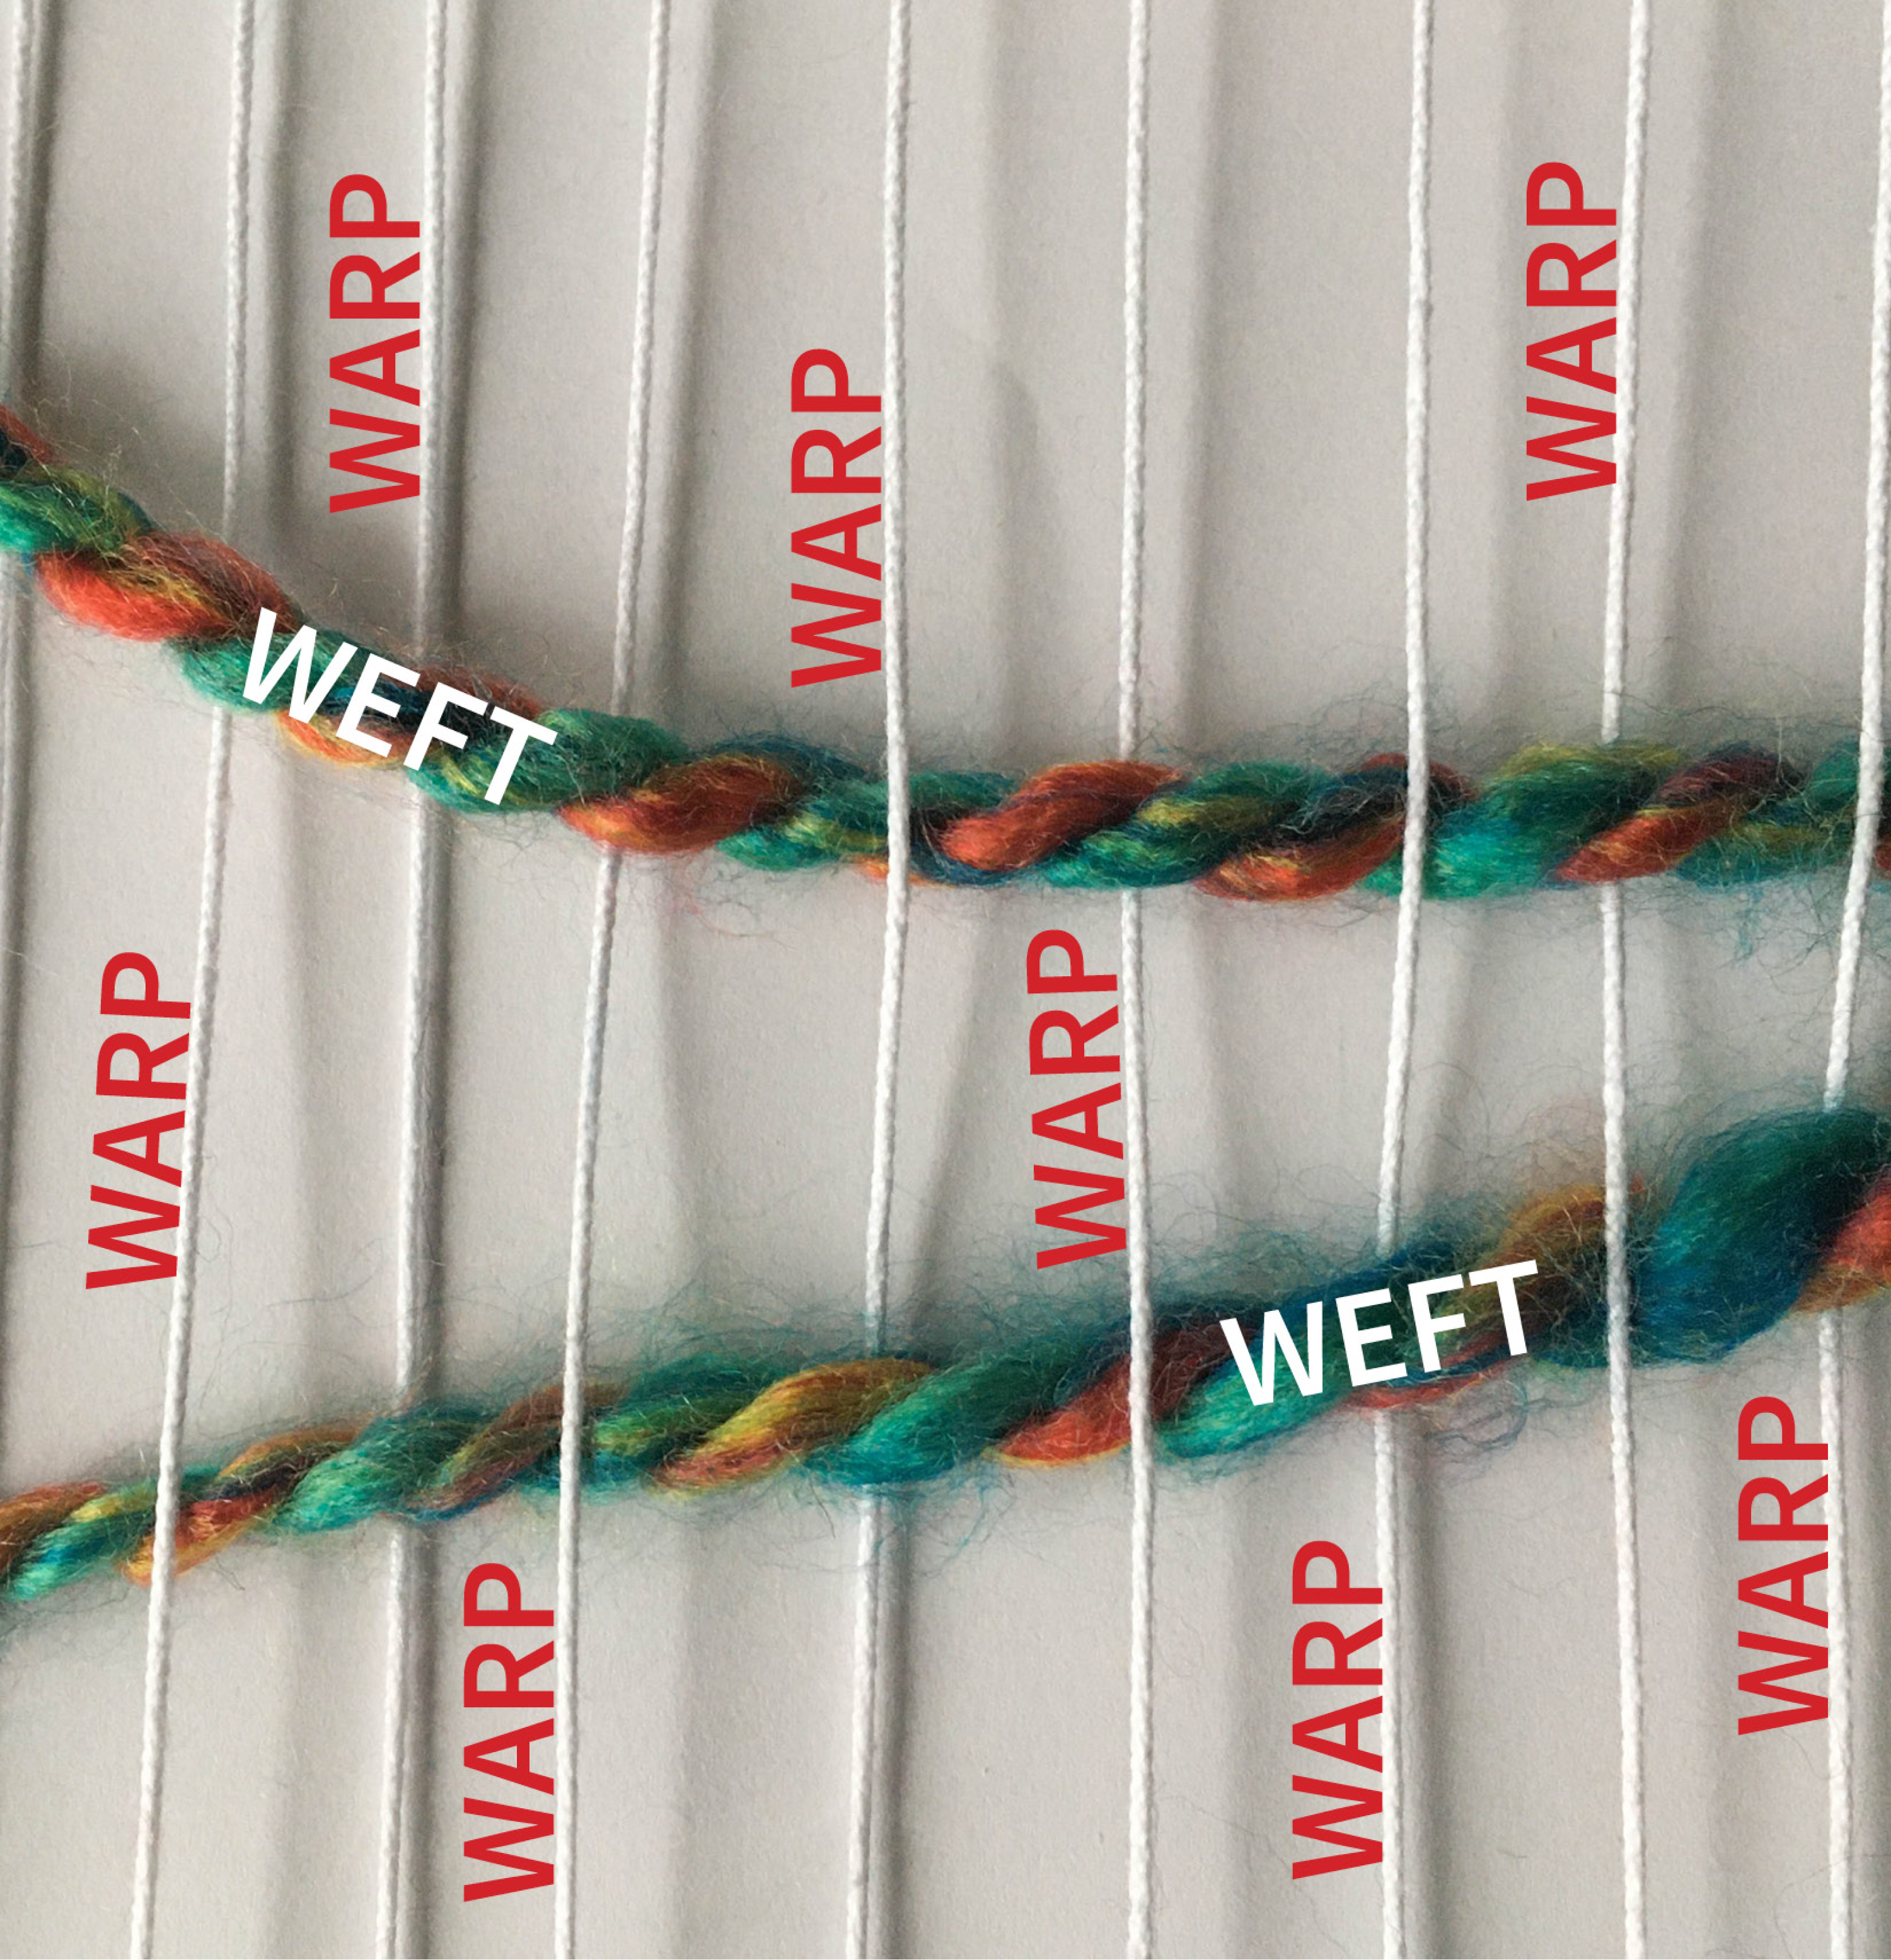
“Warp” and “weft” yarns.Photo by Gissoo Doroudian.
The yarn on which you weave a piece, which acts as the base of the weaving and sits longitudinally is called “warp”; yarns you use to weave a piece are called “weft”.3
How to set up the warp on the loom
If you purchase a loom, it will most likely include setup instructions. However, below are a few great resources on how to set up the warp on a rigid heddle loom.
- A video that carefully demonstrates the steps visually and verbally
- An article that includes a written description of the steps
- A downloadable PDF that includes visual and written instructions
Note: Approximately 37 inches of warp yarn were cut and set up on the loom to weave pages 15–27, which makes up half of chapter 1 of de la Grammatologie.
Weaving Types
Weaving types used in this piece:
Plain Weave
Note: If the yarn is thin you can use the shuttle and the upper and lower position of the heddle to weave the plain weave. However, if the yarn is too thick you need to leave the heddle in neutral position and use your hands to weave.
Method #1
This method was used to represent plain text (in royal blue) and page separation in (white).
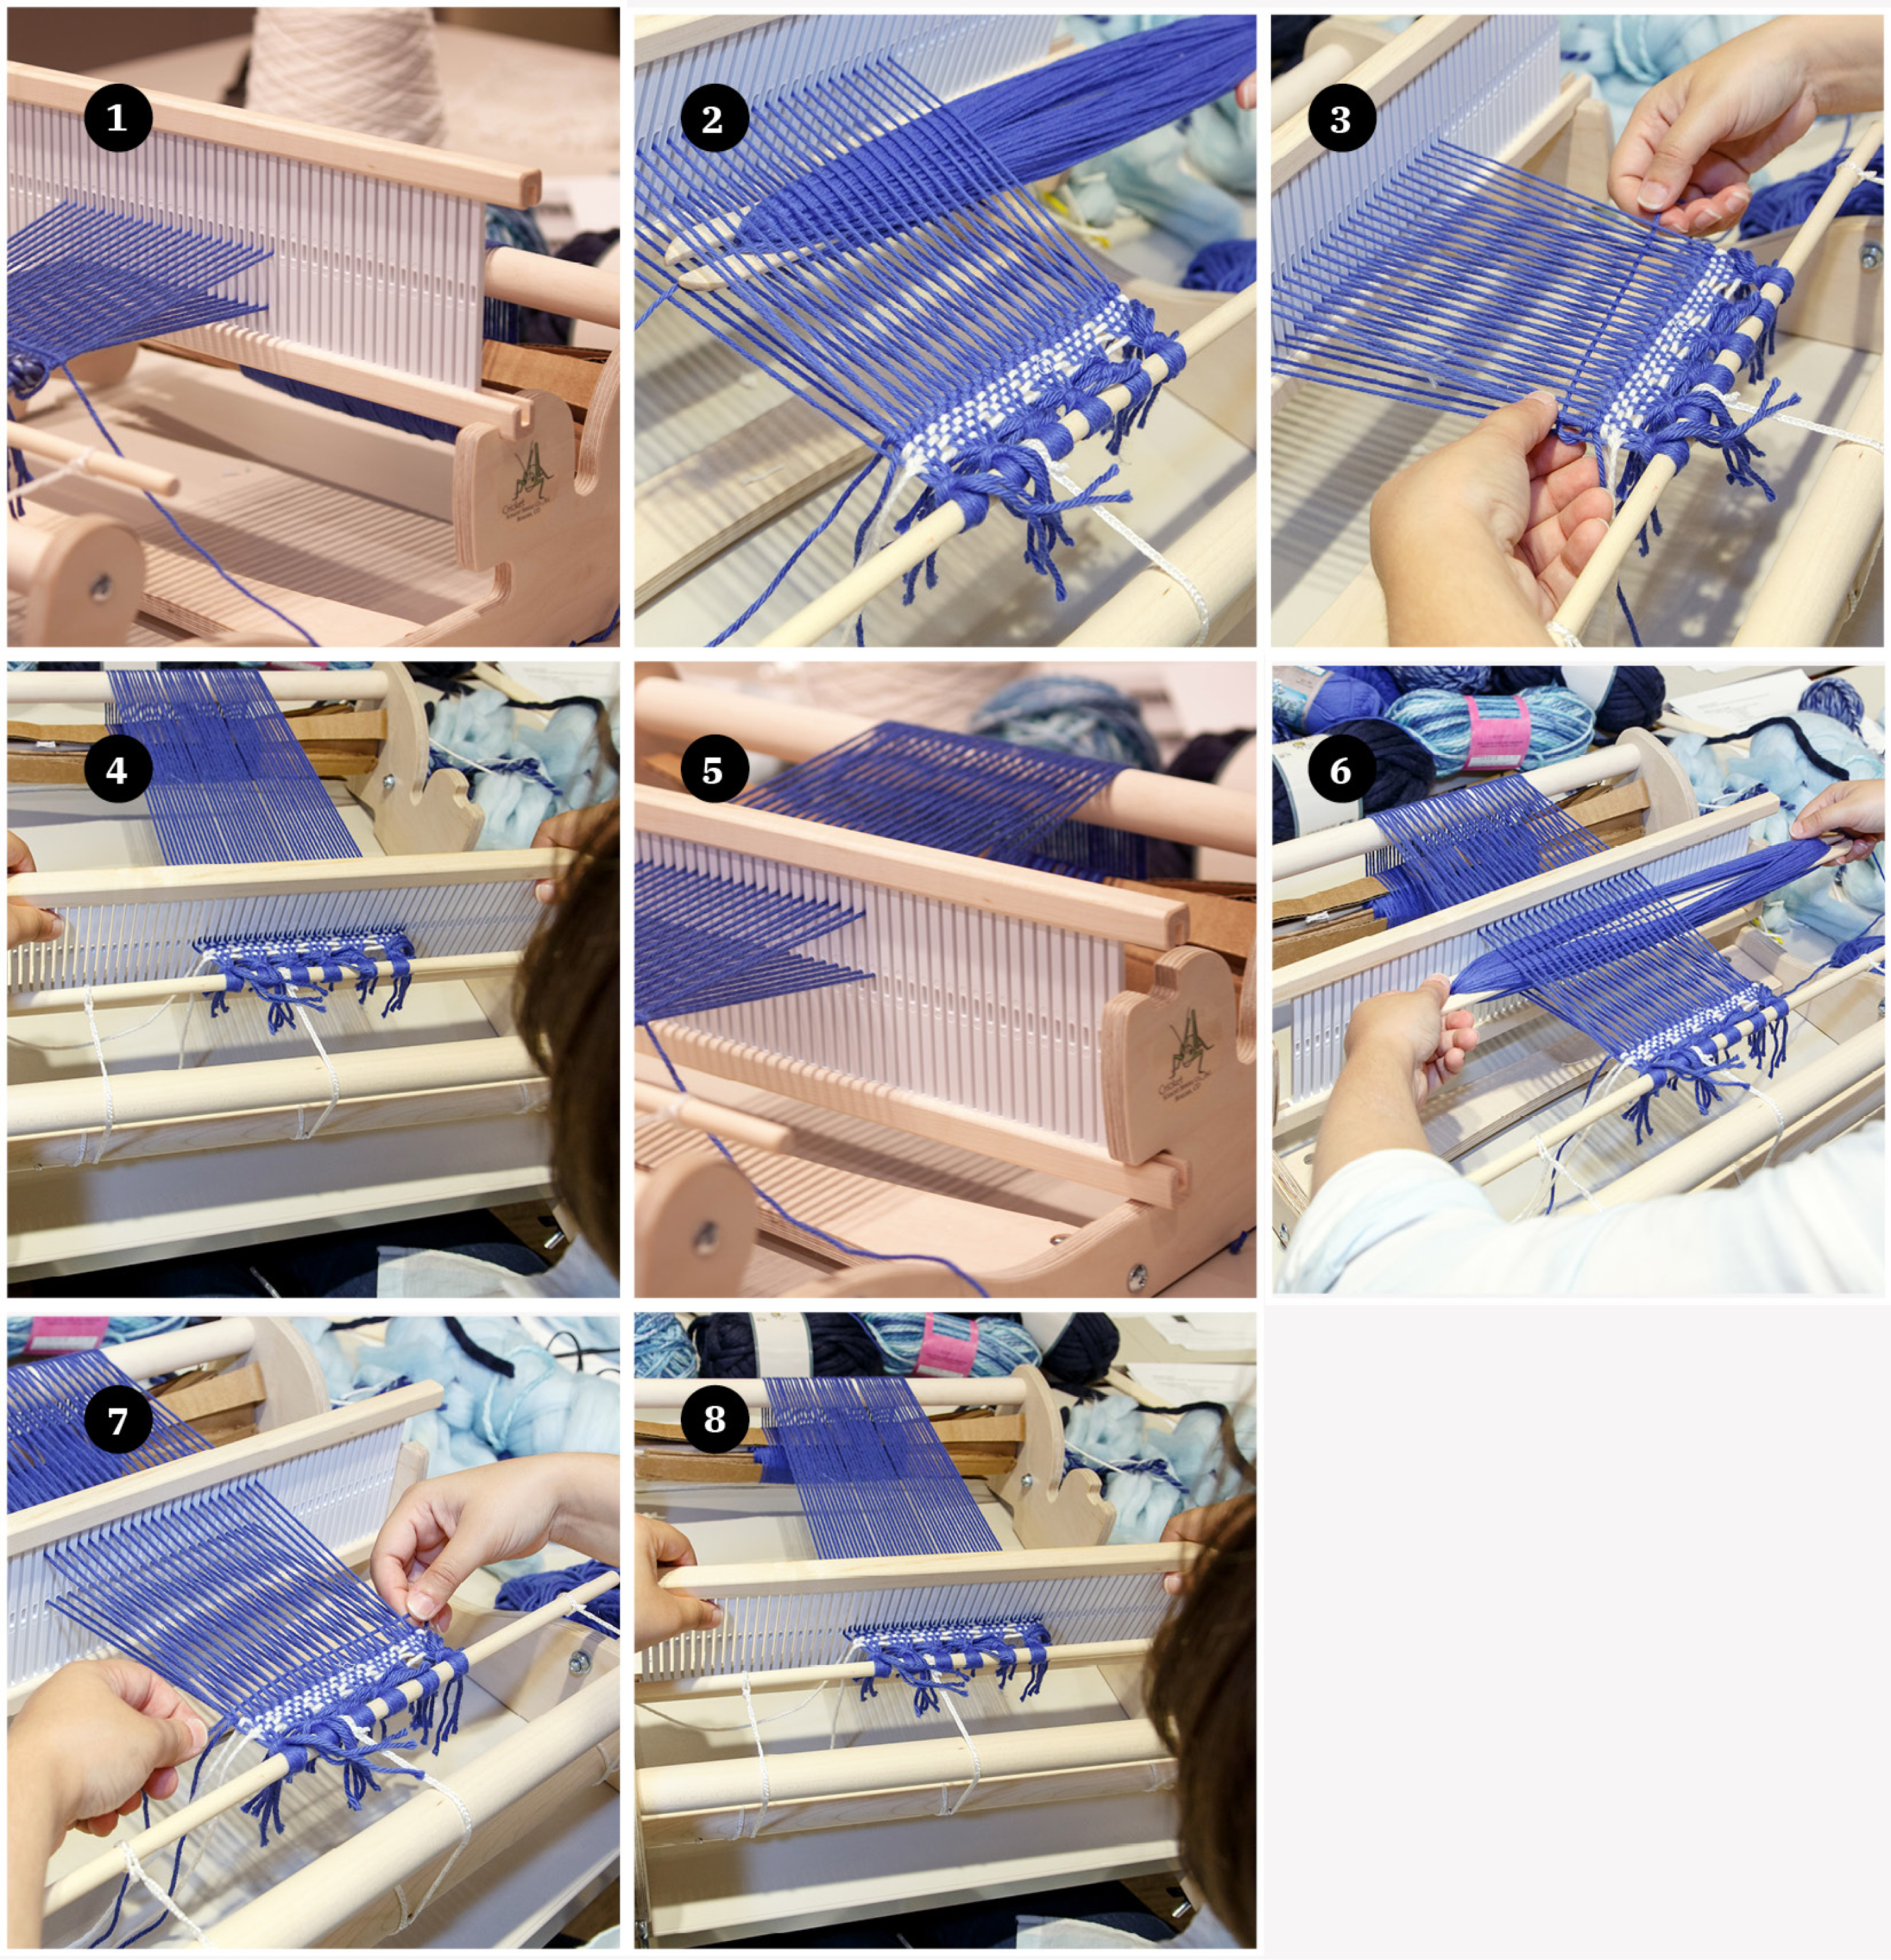
How to make a plain weave in eight steps utilizing the shuttle along with changing the heddle positions, appropriate for thinner yarns.Photos by Shelley Szwast and Gissoo Doroudian.
Heddle position: upper and lower
Yarn size: 3/light
#1–5 below correspond to the numbers on the images.
To create a plain weave:
- Place the heddle in the upper position.
- Insert the shuttle into the opening (called the shed) between the raised and lowered yarns.
- Take the shuttle out the other side.
- Press the weft into place using the heddle.
- Place the heddle in the lower position. On the second pass back (to start the second row), going left to right, repeat the process above (reflected in #6–8 in the photos).
The basic weave continues on in this way over as many warp yarns as you wish.
Note: Starting the weave from left to right going over the first warp yarn is better because it enables weaving in the loose end of the weft yarn easily. Starting by going under the first warp yarn would cause the weave to look not as seamless.
Learned and adapted from: https://www.theweavingloom.com/weaving-techniques-the-plain-weave/
Method #2
This method was used to represent quotations.
How to make a plain weave in four steps utilizing the hands to pass the yarn through the warp.Photos by Gissoo Doroudian.
Heddle position: neutral
Yarn size: 7/jumbo
(Reflected in #1 in the photos)
- Pull the weft yarn over the first warp yarn,
- under the second warp yarn,
- over the third warp yarn.
Continue until you get to the end of the warp yarn. On the second pass back (to start the second row), going right to left: (Reflected in #2-4 in the photos)
- Pass the weft yarn under the first warp yarn,
- over the second warp yarn,
- under the third warp yarn.
Continue until the first warp yarn is met again. The basic weave continues on in this way over as many warp yarn as you wish.
Learned and adapted from:
https://www.theweavingloom.com/weaving-techniques-the-plain-weave/
Soumak Weave
This technique was used to represent footnotes.
How to make a soumak weave in eight steps. Photos by Gissoo Doroudian.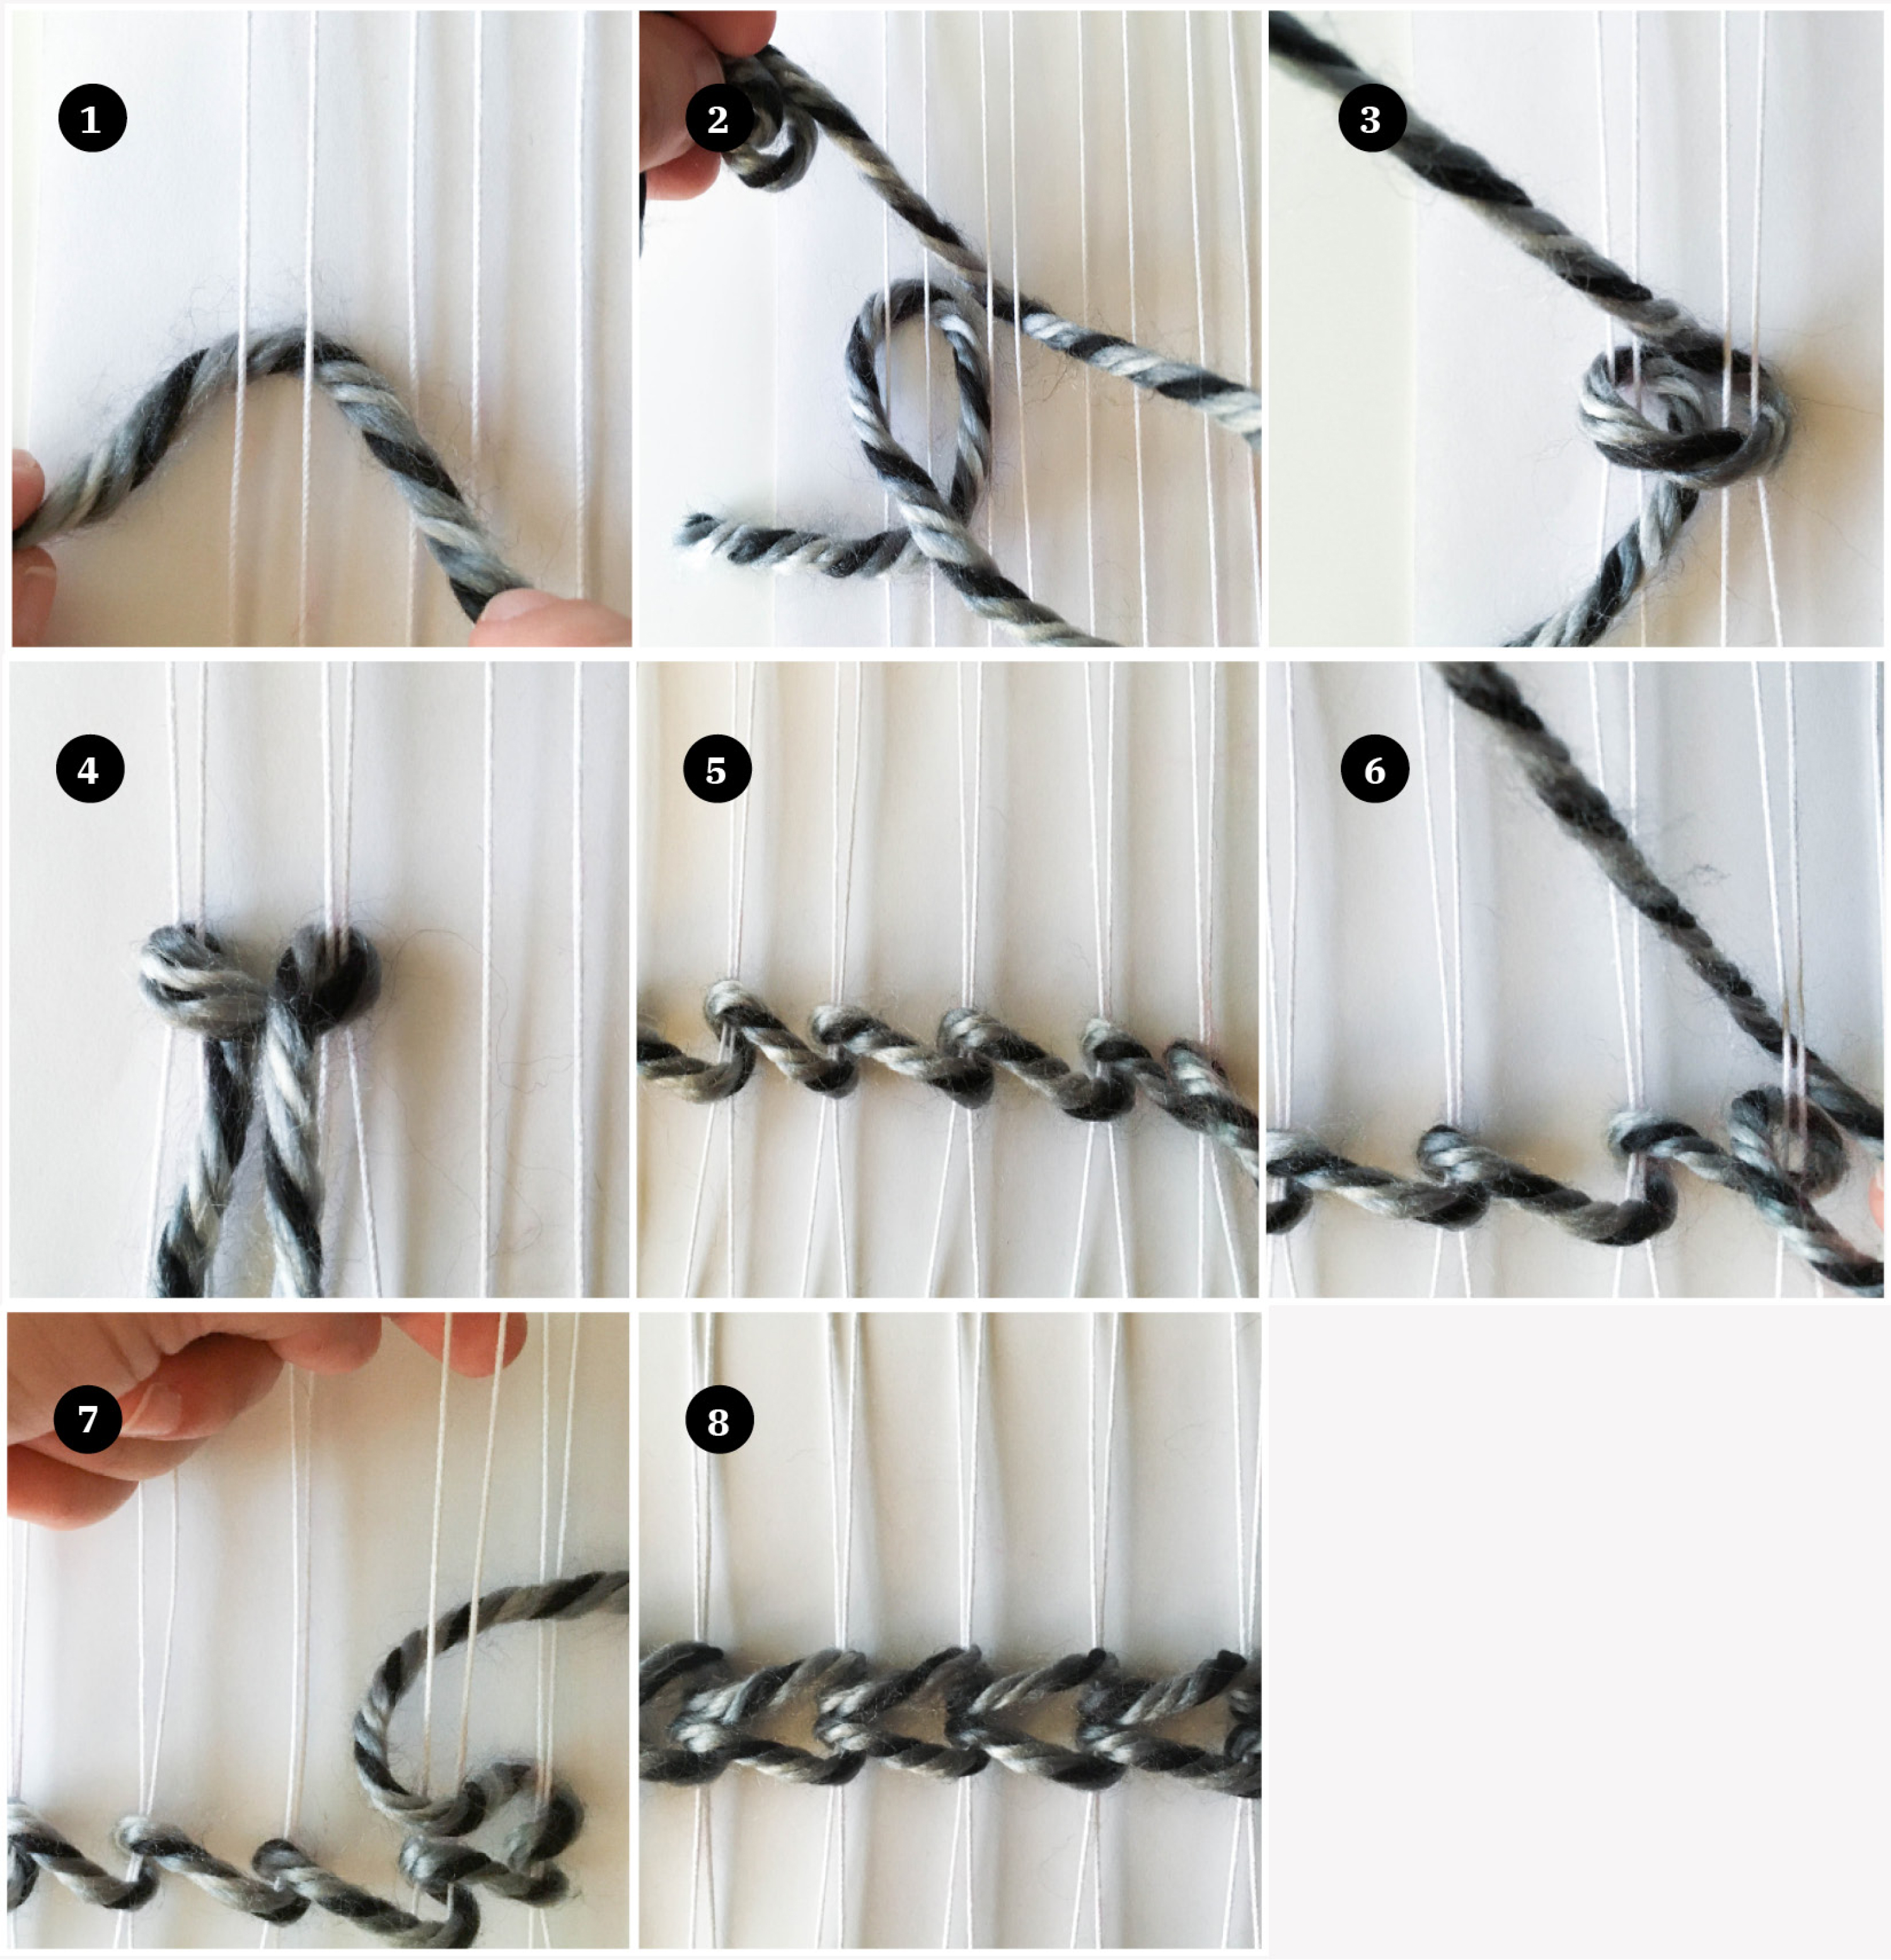
Heddle position: neutral
Yarn size: 6/super bulky
Note: images above were taken on a paper prototype loom; therefore the warp yarns are pulling more than they would on a heddle loom.
#1–3 below correspond to the numbers on the images.
The soumak weave is the process of wrapping the weft yarn around the warp yarn.
To create the soumak pattern:
- Place the end of the weft yarn behind the two warp yarns, with the end coming out to the front on the right-hand side of the two warp yarns.
- Pull out the next two warp yarns. While holding the weft yarn bundling in your right hand, pass the weft yarn behind these two warp yarns from right to left.
- After pulling the weft yarn right through to form your first slanted stitch, make sure not to pull too tightly as this will distort the warp.
Continue until you get to the end of the warp yarns. On the second pass back (to start the second row), going right to left,
- At the end of the row wrap around the last two warp yarns twice. (Reflected in #6 in the photos)
- Pull out the next two warp yarns to the left of the end and holding the yarn bundle in your left hand, pass it behind the two warps from left to right. This will create a stitch that slants in the opposite direction. (Reflected in #7 in the photos)
Continue until the first warp yarn is met again.
Learned and adapted from: https://www.youtube.com/watch?v=OaP4eQLRefk
Pile Loop Weave
This technique was used to represent epigraphs.
How to make a pile loop weave in seven steps.Photos by Gissoo Doroudian.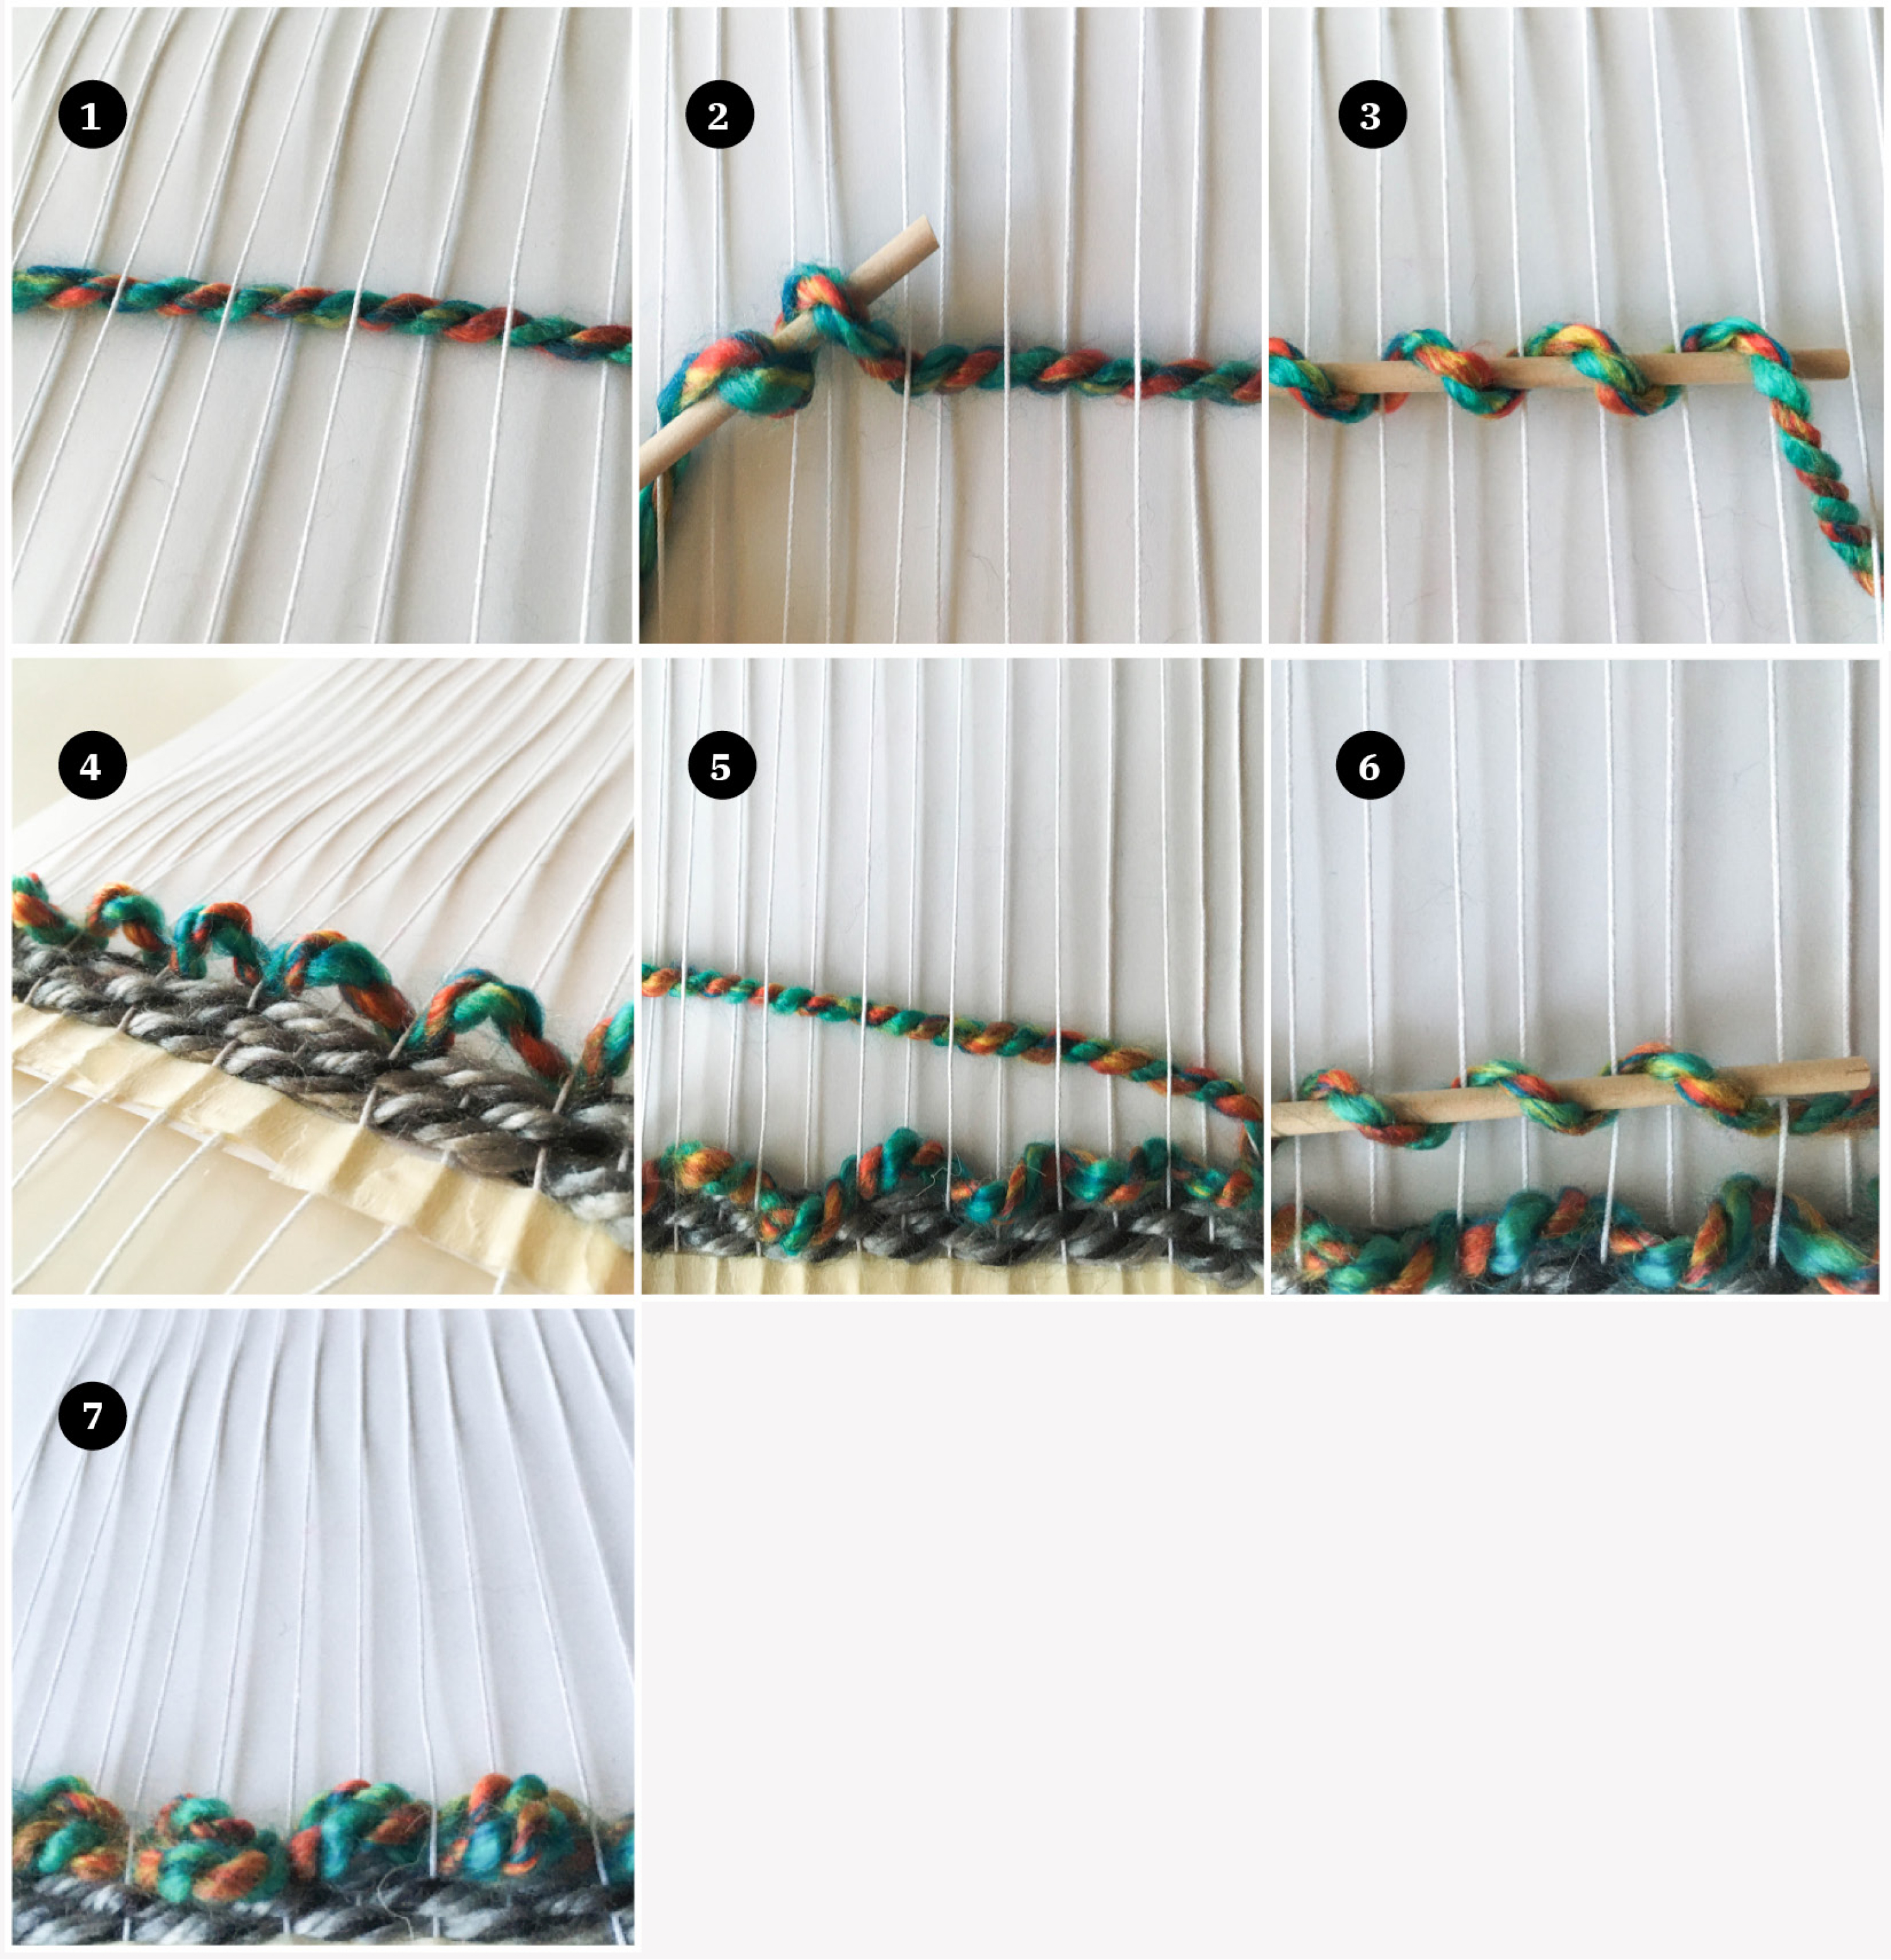
Heddle position: neutral
Yarn size: 5/bulky
Numbered list below corresponds to the numbers on the images. To create the pile loop:
- Weave a row of plain weave in the area that you want your loops, using one or two strands of yarn. Please refer to the “Plain Weave” section for instructions. Since this yarn is thinner you can use a yarn needle to pass it through the warp as well.
- Take the wooden dowel and pick up your “stitches” by wrapping them around it as shown.
- Once the entire plain weave row is on the dowel, pull the dowel down on the warp so that it brings the loops down to the support rows.
- Gently remove the dowel so that you leave behind a row of loops.
- Weave another plain weave row above your loops, and repeat the steps above, while making sure not to pull the weft too much; otherwise you’ll start to lose the loops you just made. (Reflected in #5-7 in the photos)
Continue in this pattern until you have made all the loops you want. Once done, weave a support row of plain weave and smash that support row down into your loops. You want to really smash the loop rows down so that your weave doesn’t loosen once you cut it off the loom.
Learned and adapted from: https://www.theweavingloom.com/best-of-weaving-technique-pile-loop-weave/
Rya knot
This technique was used to represent citations.
How to make a rya knot in four steps.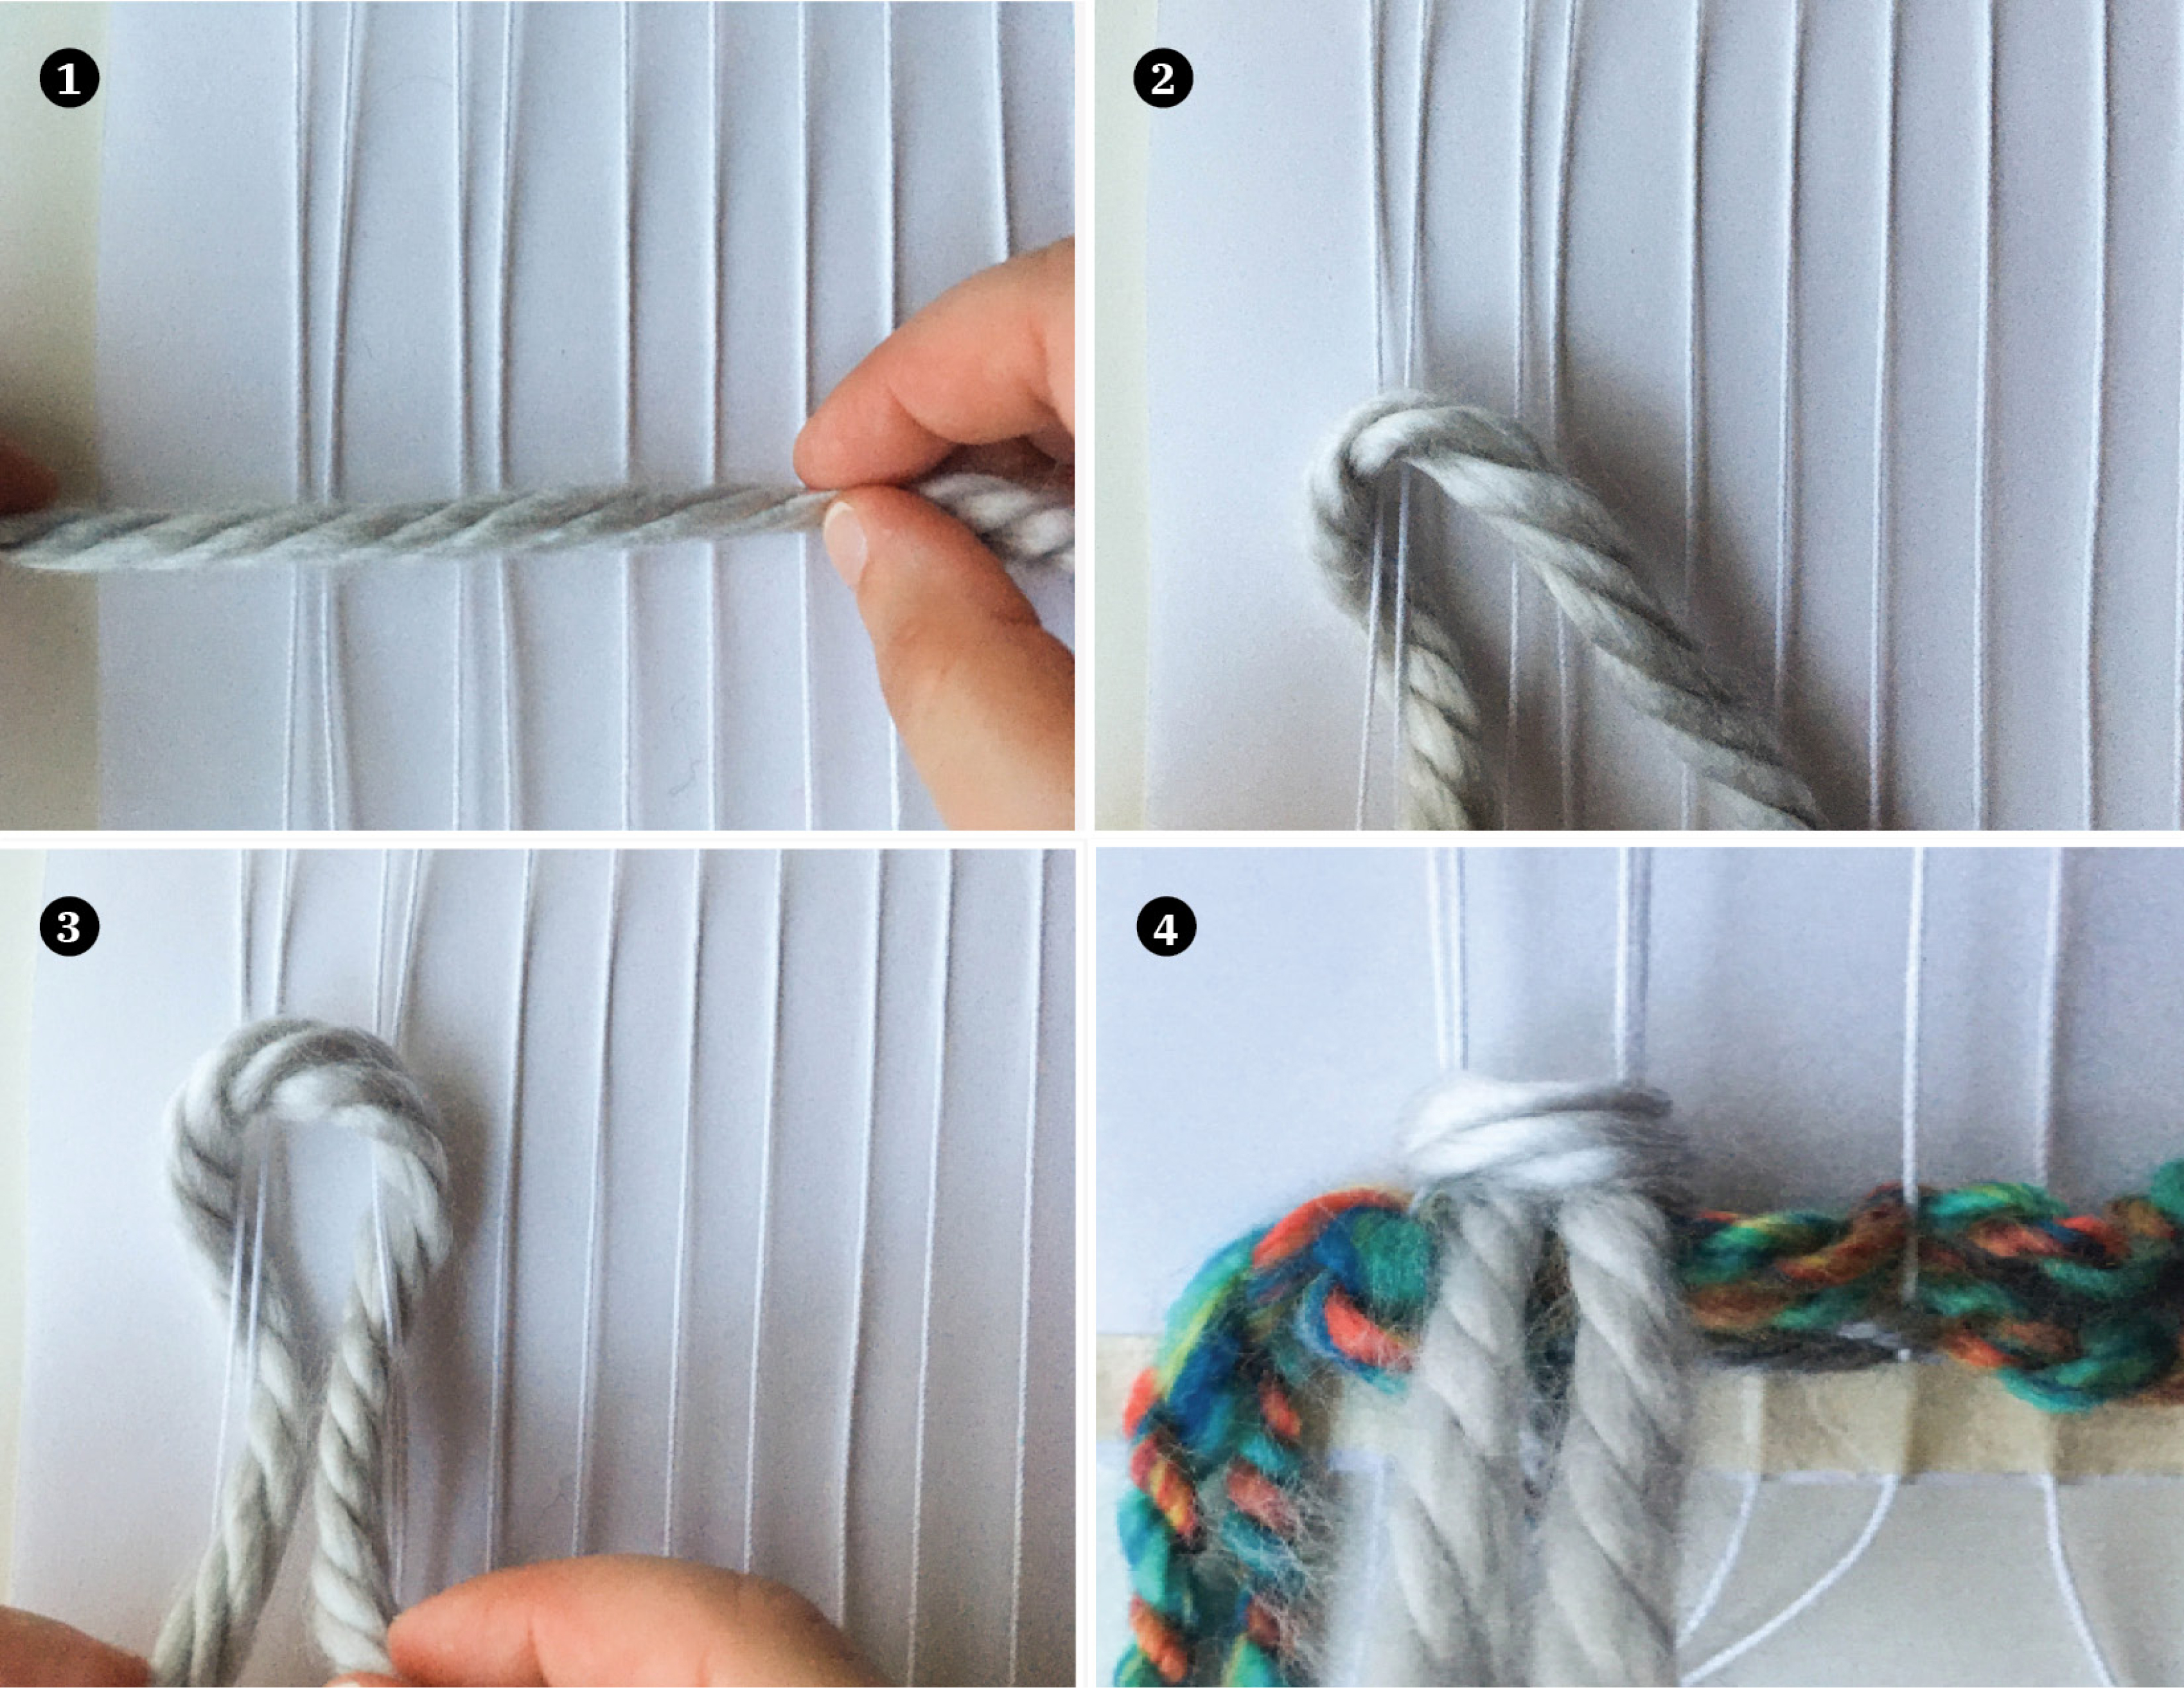
Heddle position: neutral
Yarn size: 6/super bulky
Numbered list below corresponds to the numbers on the images. To create a rya knot:
- Place strands of yarn over the warp yarns.
- Bring the left side of your yarn behind and around two warp yarns.
- Bring the right side of your yarn behind and around your other two warp yarns so that the ends meet up in the middle.
- Pull the end pieces below the top knot area.
Note: Before pulling ends down and tightening the top knot, make sure to match up both sides of the end pieces and then pull evenly, so that the knot ties with all ends at about the same length. Trimming is usually required for a more uniform fringe, but this helps reduce yarn waste. If starting with the rya knot (bottom up weaving), pull the end pieces below the top knot area. If you are ending with the rya knot (top down weaving) you would pull the end pieces above the top knot area.
Learned and adapted from: https://www.theweavingloom.com/weaving-techniques-rya-knots/
If you would like to try weaving the first chapter of de la Grammatologie download the “Pattern Guide for Weaving Derrida’s Margins” and follow the instructions.
A shuttle is a tool that is used to hold and pass the yarn through the warp. ↩︎
A yarn is made up of several twisted strands of fiber, referred to as “plies” ↩︎
The word “weft” literally means “that which is woven,” and comes from an obsolete form of the word “weave”; the forms are similar to “leave” and “left.” Wikipedia, s.v. “Weaving,” last modified October 13, 2020, 22:52, https://en.wikipedia.org/wiki/Weaving; OED Online, s.v. “weft, n. 1,” accessed October 26, 2020, www.oed.com/view/Entry/226851. ↩︎